The Improper Installation Illustrated Step by Step
sorry about the mess all the photos mixed up bottom line INSTALLER ERROR i payed 600$ florida auto trim in lake worth fla and he screwd up the seats and told me its the covers and i thought me was correct classic industrys and legendary ARE NOT AT FAULT thanks for all members input i shure as hell hope this is the worst thing i must deal with on the car but some how i know there will be more to be more trouble
Hello Bobo and B-Bodies Only Forum Members,
We are a proud sponsor of B-Bodies only, and we greatly value the feedback we get from the group here. Bobo's post on this forum led to an investigation to determine what may have gone wrong with this installation.
From the photos Bobo provided, it seemed like an installers error was the likely cause. But in order to confirm this, we issued a shipping label to have the seats picked up and delivered to the manufacturer, Legendary Auto Interiors. Upon receipt of the shipment, the knowledgeable team at Legendary un-installed everything and photographed each step to record the mistakes that were made in great photographic detail. We believe that these photos will show without a doubt that it was indeed installer error
NOT product quality that caused the many issues Bobo experienced with the seat upholstery. We have complete confidence in the quality of the Legendary brand. We selected Legendary as our preferred vendor because of their impeccable reputation and the many good reviews we had seen with regard to their product line. Our hope is that by sharing our findings with our fellow forum members, these photos may help others from experiencing similar issues in the future.
There is an old saying... measure twice.... cut once. Had the installer of these covers followed this mantra, this issue could have been avoided altogether. But as these photos will show, incorrect measurements with regard to cutting of the foam started this installer down the path to a very poor end result and an extremely dissatisfied customer.
Photo 1: (Below) In this photo, we are showing how badly the foam has been cut for this installation. The right hand finger is pointing to the listing wire. The upholstery insert gets hog ringed down to this wire. Note how far the foam is to the right of the listing wire on the right side. On the left side you cannot see the listing wire at all, as it is behind the foam. You can also see how poorly the top corners have been cut on the insert.
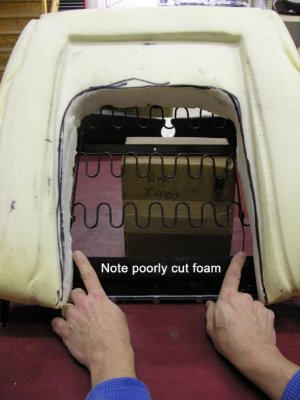 Photo 2: (Below)
 This photo shows the seat from the front view with the covers improperly installed. Due to the foam being cut poorly, you are going to get a poorly fit cover that is trying to take the shape around the foam. As you can tell by comparing Photo 1 to Photo 2, you can totally see how the poorly trimmed foam directly correlates to the crooked insert shown in the photo of the finished product.
View attachment 228747
Photo 3, 4, 5: (Below) This photo shows the rear view of the seat back with the back panel removed. You can clearly see how badly the insert listing has been hog ringed to the frame. The only way to see this would have been to remove the back panel. The insert listing should be hog ringed to the listing wire that is attached to the frame. You can see where the installer did this in some areas, but not in others. The insert should
NOT be hog ringed to the main frame like it is seen in this photo.
View attachment 228748
View attachment 228749
View attachment 228750
Photo 6 & 7: (Below) The original frames have a crimp in them indicating where center of the frame is. In the photo, we marked the center with white chalk. Then we measured from the center of the frame, to the inside of the welt on each side of the cover. From the welt to center on one side of the seat measures 7 ¼”. The opposite side from welt to center measures 8”. This clearly indicates that the upholstery is installed crooked by ¾”. Again, this is why the finished product in Photo 2 is so very tweaked, crooked and off-center.
View attachment 228751
View attachment 228752
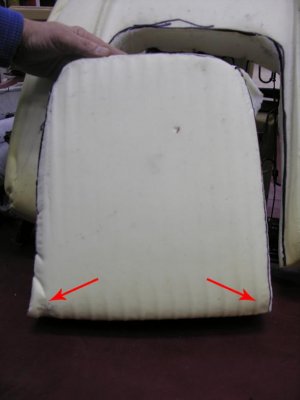
Photo 8: (Below) This photo shows the impression of where the French Seam in the upholstery was in reference to the corners of the foam. Once more, this illustrates how the poorly cut foam has thrown off the location of the seam by 3/4". The arrows pointing at the insert are showing how inconsistent the insert foam was cut.
View attachment 228753
Photo 9 & 10: (Below) Here are some alternative views of the foam that show how they were cut crooked and measurements were inconsistent.
 View attachment 228755
Photo 11 & 12: (Below)
 These photos show how in addition to the poorly cut foam and errors in measuring, the install itself had issues. Photo 11 shows an impression left when the welt was twisted or flipped causing it not to lay properly against the foam padding. Photo 12 is what an impression looks like when the welt is not twisted.
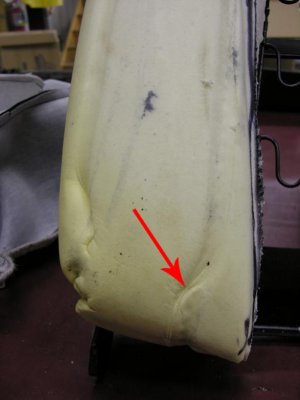
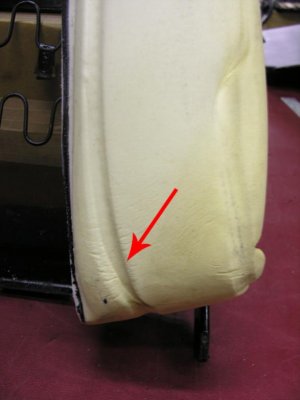 Photo 13 & 14: (Below)
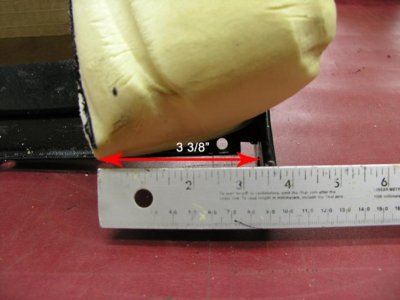
 These photos show closeups of the off-center cuts. Photo 13 - This is the bottom right of the foam base. Measuring from the inside of the seat hinge to the edge of the foam where it has been cut measures approx. 3 3/8”. Photo 14 - This is the bottom left of the foam base. Measuring from the inside of the seat hinge to the edge of the foam where it has been cut measures approximately 4 ½”. There is almost 1” difference in between the left and right of the lower foam.
 View attachment 228759
Photo 15 (Below)
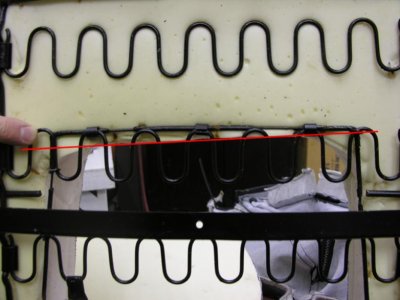
 - Note the listing wire and how far off the foam has been cut for the upholstery insert. Once again this is why you get what you see in Photo 2, a very crooked and distorted looking insert and French Seam.
We hope this explanation will help readers understand the many complexities of proper seat upholstery installation, and that these pictures provide some insight and helpful tips for installers.
We wish Bobo luck with the rest of his restoration. We will help him get back on track with his upholstery and hope we can be of service to him and all of the members of B-Bodies Only in the future. Happy Holidays everyone!
And remember these wise words... Measure Twice... Cut Once!


