• When you click on links to various merchants on this site and make a purchase, this can result in this site earning a commission. Affiliate programs and affiliations include, but are not limited to, the eBay Partner Network.

Family Tradition

Outstanding Propwash!

We're a little lacking on snow at home here too, this last series of storms to pass over somehow had some voids in it that seemed to come right over us, snow to the east and west but kind of lacking right at home.

Your plymouth is more important than a rip in the snow with the skidoo anyways!
 
Thanx Fella's..

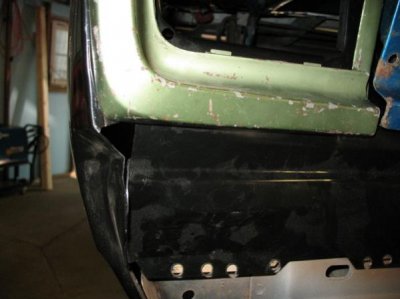
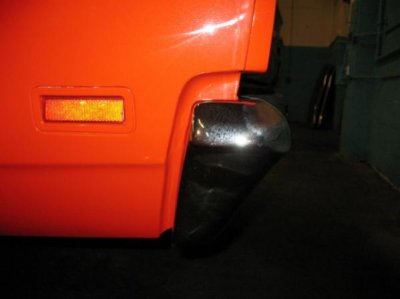
I'm guessing about one more solid day of clean up and prep, after that I should be tossing on quarter #2 Matt. One thing I did notice on the new quarters from AMD and is a bit concerning is where the quarter tuck's in under the ends of the rear bumper, I noticed that the curvature is kind of a lazy arching slop. On what remained of the factory quarter when I took them off, that curve was more like a sharper 90* degree curve (more of a deep indentation). On a rough fit up on the already fitted in Passenger quarter I noticed a couple issues i'm gonna have with that area.

1. The inside of the bumper ends could quite possibly rub in that indentation area.
2. The lip on the quarter just out from that indentation does not mate up with the lip on the end of the rear fill panel and bottom end of the tail light bucket because of that slow shallow curve vs. a sharper 90*. There will definitly be a large gap if not attended to.

I guess I can pie cut to shape, back with some 18ga. steel, weld up and finish, but definitly is an area I will be spending more time on than I wanted to.


Does you 68' quarters from AMD have the same issue in the back? Any thought you've had to remedy this on yours?

Dave, i'm so disappointed with the weather at this point, I could care less about the trails right about now. I mean a guy can only spend so much time flicking off the sky..LOL. The Plymouth has the reigns now! Sad to say, but the Doo and the tip-up's
will be having a lot of quality quiet time to spend with each other in the next 2-3 weeks.
 
Atta boy, keep that project rolling. Crappy trails means there is less distraction from your road runner.

I look at mine every morning when I get in my truck to leave the garage for work and again every night when I get home.

I sure wish I had the money to buy some body panels for mine right now. I guess it don't cost much to take em apart though does it? :)

Problem here is the trails are actually awesome and the lake ice is too, so I have distractions.

Maybe in that dead time between winter & summer I can jam on my bird project & at least make it a more respectable driver for the summer.


Sure wish we had the same winter wonderland Dave. I am glad I have a bit more time for the RR now. Got some time last night to start cleaning up all the metal that will be covered by the new quarter, but trying to keep condensation Ice out of my compressor has been a real treat. I heat my garage with a 75,000 BTU Kerosene torpedo heater which works real well, but when it's -4F like this morning and the garage sits cooled for a stretch, those little drops of condensation that don't make it out the drain valve everytime I pop it open at the end of the work end up frozen little drops in my air lines.
One of the joys of living up north I guess.

I hear you about the panels. AMD and others are pretty proud of there sheetmetal and you're right, a new blade on the end of a sawzall is pretty affordable :icon_axe:. Getting anxious to watch the Hippiebird unfold - I'll keep my eyes peeled this spring.


Patrick,

I might have stole the car, but in turn the car stole my bank account in the process. As far as a Cake resto, I wish I shared your optimisim buddy..i'm petrified to see your version of a tough resto...LOL
 
Tom-mat-toe tom-mat-toe...

Holy Crap Prop! you totally stole that car!!! :tongueflap: The guy have any more of 'em??? :rolling: Figures a chebby guy wouldn't know what he's got!!!

I've heard that there is a way to check the diff. between a 383 and a 440 is that the 440 has a flat pad on the drivers side just behind the water pump?? anybody hear of this???

Either way, Congrats Prop! and get to work!!!! :grin:

"I've heard that there is a way to check the diff. between a 383 and a 440"

You are exactly correcto. Some will have the whole cubic inch stamped into it but others will only have a partial.

I use to work in a machine shop where we remand engines. I have seen a lot of blocks where as it would only have a partial cubic inch stamped into it. Example of one that sticks out in my mind is the 361 it was only 61, the 3 was missing. Another was the 413 with the 4 missing. If you are not aware of these partial codes they can be confused with other info stamped on the pad. The pads were also used for alerting one to anything special done to the block. One number would actually alert you to the type fuel to use in case of High compression or low compression. I use to hace a book explaining al the codes that could be found up to that particular date but it has been mis placed. I am sure if you search the net the info is out there.
 
Thanx Ky509.

The motor turned out to be a 1976 440 Truck motor (had a 6T stamp). I'm not really disapointed with that fact considering the later models had thicker ribbing, larger water/oil jackets. Heads are coming off to be replaced with a nice set of aluminum eddy's and the block will be punched and stroked to a 512.
 
Got pre quarter install areas fully preped today, including finish metal work on deck filler patch on the left rear side. All that's left is take out the little reinforcement bar and a little cleaning in the jam area... On to the quarter!

s1-2.jpg
 
Thanx Fella's..

I'm guessing about one more solid day of clean up and prep, after that I should be tossing on quarter #2 Matt. One thing I did notice on the new quarters from AMD and is a bit concerning is where the quarter tuck's in under the ends of the rear bumper, I noticed that the curvature is kind of a lazy arching slop. On what remained of the factory quarter when I took them off, that curve was more like a sharper 90* degree curve (more of a deep indentation). On a rough fit up on the already fitted in Passenger quarter I noticed a couple issues i'm gonna have with that area.

1. The inside of the bumper ends could quite possibly rub in that indentation area.
2. The lip on the quarter just out from that indentation does not mate up with the lip on the end of the rear fill panel and bottom end of the tail light bucket because of that slow shallow curve vs. a sharper 90*. There will definitly be a large gap if not attended to.

I guess I can pie cut to shape, back with some 18ga. steel, weld up and finish, but definitly is an area I will be spending more time on than I wanted to.


Does you 68' quarters from AMD have the same issue in the back? Any thought you've had to remedy this on yours?

Dave, i'm so disappointed with the weather at this point, I could care less about the trails right about now. I mean a guy can only spend so much time flicking off the sky..LOL. The Plymouth has the reigns now! Sad to say, but the Doo and the tip-up's
will be having a lot of quality quiet time to spend with each other in the next 2-3 weeks.

I have found the same thing with mine. When I fitted mine for the first time that spot jumped out at me so much so that I ran over to my buddies place that had a few Runners parked that I could compare. I did try to close up that angle on one of my quarters and found that without making some relief cuts it just distorts the surrounding metal. I'm going to send you an email with this detail on cars with there original quarters. Looks like the factory quarters had a tab that was bent over and surface welded on the tailpanel just over the rear bumper. I have too many pics of this detail to include them all in this post. I still haven't figured out how I'm going to address this but I am definitely going to install the quarters and leave this detail as the last step in the process.
 

Attachments

  • IMG_3851_2.jpg
    IMG_3851_2.jpg
    29.6 KB · Views: 714
  • IMG_3927_3.jpg
    IMG_3927_3.jpg
    30.6 KB · Views: 713
  • IMG_3926_2.jpg
    IMG_3926_2.jpg
    34 KB · Views: 708
  • IMG_3866_5.jpg
    IMG_3866_5.jpg
    18.1 KB · Views: 717
That's exactly what i'm talking about Matt. Sorry to hear you are in the same boat as me with this problem. I appreciate the imput, pic's and the email. Although I'm pretty much use to having to modify or "tweek" AMD sheetmetal (a good majority of it needed modification for proper fit up), this little area is definitly going to need a bit more TLC. I do remember seeing that little tab you were refering to as well.
I don't think fabing in that would be too much of a hassle, but i'm having multiple thoughts on where to put in the relief cut so I can back the area and weld in.

Either way, it would be nice to have a decent english wheel right about now and i'm gonna have to polish up the body dolly's and hammer's a bit for this one..

Here's one of my initial thoughts...............

Quartermod.jpg


Thanks again!
 
Cant even beat Chicken wire & bondo! Nice work Will! U can have all the nw IN. Snow! I am sick of this ****! Cant wait 4 summer 2 make some progress on my heap! Can't wait to see u hang the 1/4's!
 
hey will nice work coming along on the RR.i just read your deal about the AMD quarters and thought i would put my two cents in.i ordered a rear patch panel for my ramcharger and saw that the bottom edge didn't have a sharp enough angle going underneath.i know two different kinds of vehicles but same issue.
 
I feel your pain prop...

a 68 dodge I did a while back was less than perfect in this area as well.


lotsofshapingandwelding.jpg
 
Wow, same stuff eh fella's.... I got a response back from AMD and they said they have never heard of such a problem in that area. Kind of chukled a bit and sent this back to em:

In the words of Buford T. Justice: "This happens every time one of these floozies starts poontangin' around with those show folk fags."

I thought it was funny, they probably think i'm nutz..ah well, if ya can't have fun right.

-Best of luck to you on that area of the Ramcharger Roger. Hope your projects going well.

-Looks like you did a pretty damn job at getting the Coronet as close to factory as possible in that area Dave. Nice!

-I'll take the snow Ben and you can have our cold. I think we're supposed to get around -15 below tonight, colder tomorrow. Daves probably burning furniture for heat right about now. LOL. Can't wait to see the Satellite progress once this Ice Age clears out.

Have a good one boys!
 
Cripe sakes we had -39 F last weekend. We are hovering around the zero for now but it's going to dive again this weekend. Good think my ice fishin house is well insulated.
 
Auto Transport Service
Back
Top