• When you click on links to various merchants on this site and make a purchase, this can result in this site earning a commission. Affiliate programs and affiliations include, but are not limited to, the eBay Partner Network.

Family Tradition

Prop,

I'm fighting with the rear x-member on my 'runner. I've already run into a stamping problem; there's only one bumper hole on the bottom edge. I'm using AMD parts and have already emailed Jeff to find out what to do about the mis-stamping.

I also noticed what you said about the top edge being narrower. Being the genius that I am, I drilled some of the welds out from the top thinking it'd be easier to drill and weld standing up instead of laying on my back. Now I've got about a dozen holes to fill because the new part doesn't cover the holes. :eek:ops:

If you've got any other tips from your experience installing yours, I'd sure appreciate hearing them. I'm installing all five parts, side to side. If it wasn't for threads like this one I probably wouldn't have started trying to do the welding on my car. So I'm not entirely sure if I should thank you or hate you :icon_lol:

But seriously ... :notworthy: thanks

LOL....Sorry Bob...don't shoot the messenger. :grin: Glad my thread got you to grab the bull by the horns and take on your project. That's what its all about.

Sounds like a pretty good screw up by AMD. You should have 4 tabs on the bottom lip. 2 of them line up with the rear of the frame rails. The other two line up with the outer support of the shackle mounts to the outside of the end of the rear rails. I guess the first question I have is; is the tabs there, but there is no holes or is there none of those other three tabs at all? As far as the other holes, they're centered just like the one you have. If there is no tabs, duplicate the measurements of the one you have, get the x-member centered in place, drill the holes in the new tabs then weld the new tabs in place. I would use 16GA material.

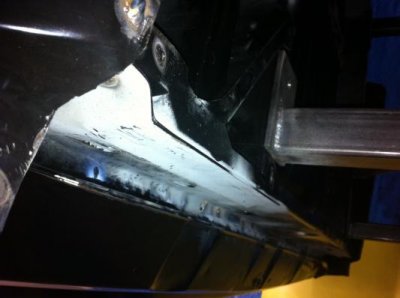
As you found, you're better off welding inverted when welding the x-member top lip to the bottom side of the trunk pan. I guess with the "extra" twelve holes you have, get yourself a chunk of copper to use as backing (the thicker the better), place of the backside whatever way you're welding from and fill in the holes. The weld doesn't stick to the copper. Sometimes it can stick just a tad, but wiggle it a bit, it usually comes right off.

I did drill the holes for the plug welds before installing the x-member and then positioned in place. I used #10 Sheetmetal screws, drilled a hole through both panels and then used the sheetmetal screws to pull the two panels together as tight as possible. Still had to use an Oak dowl and a hammer to manipulate that lip to fit tight as possible against the bottom side of the trunk pan in places. Next filled in the plug welds (inverted) and the small holes from the screws. I did have an issue with the top lips of the x-member reinforcement plates tucking up in between the rear tailight panel. Had to shave about 1/8" off that lip so they would tuck up behind the panel.

The x-member extensions did not seat the best against the trunk extensions. The factory had spot welds that welded from the outer lip of the x-member extension to the trunk extensions. I had to make relief cuts on the corners of the lip off the x-member extension, tap into place and then fill in the plug welds, I also fillet welded between that x-member extension and
trunk pan extension interface. One other thing I did to add to beefing it up back there is I ran a full fillet weld along the outside edges of the reinforcement plates instead of the small tac's.

To line the x-member in place, I used the notch in the tail light/fill panel as reference. I found the center of the hole for the gas tank filler neck, marked it, then ran a plumb bob straight down from that notch in the tail light panel, lined the mark I made on the hole in the x-member with the string from the plumb bob, then secured in place.

Other than that, no real issues....unlike your situation. Pretty straight forward stuff. I hope AMD/Jeff takes care of you. He's a great guy and I can't see him not making it right for you one way or another. Any other help I can offer, please don't hesitate to ask. Best of luck on the rest of the x-member project on your bird Bob.
 
The attachment is a picture that Jeff sent me of one he installed. It's missing the hole too. Odd that there's at least two without holes but yours had them all. No doubt I'll work something out with Jeff/AMD. I was just wondering if yours were the same or not. If I can convince myself it's just the hole that's wrong I may just locate the spot for it and drill it

This car was an old racer, so I'm pretty adept at filling holes and I've got all the fancy copper doo-dads to back it with. I just wish I'd didn't have to :). Nobody's fault but mine

Normally I grind the old parts off and don't even touch the cutter but this time there was no easy way to grind in that area because of the rear body lip. Lesson learned.

On the x-member extensions I plan to just leave those off until I'm ready to do the quarter patches and trunk drops, that way I can't go wrong (famous final words).
 

Attachments

  • image.jpg
    image.jpg
    21.5 KB · Views: 629
Dusting off this thread a bit...been a while. The '69 is still waiting on the powerplant budget to come out.

In the mean time (when I actually have time) I got back to my old high school buddy, my Coronet. Being the past two years have been poured into a '69 Plymouth, It was time to give the old Dodge some TLC.

So, completely gutted the suspension and steering underneath. Old Yeller is getting the royal treatment he deserves....

New Upper control arms
New upper control arm bushings
New Cam bolts
New Upper Control Arm bumper
New Lower Control Arm bumper
New upper ball joints
New lower ball joints
New Lower Control Arm Bushings
New inner tie rods
New outer Tie rods
New Tie rod adjusting sleeves
New Strut Rod Bushings
New Idler arm
New Pitman arm
New Mopar XHD leaf springs
New Shackle Bushings
New shocks all the way around
New wheel cylinders
New Brake shoes
New brake hardware
New Brake lines (including the 3 rubber ones)
Fresh rebuild of the Eddy 4BBL
Dump Tranny fluid, change filter
Flush the radiator
New Cap, Rotor, Plugs and wires
Fresh oil and filter
New Fuel Filter


w1-16.jpg


w2-13.jpg


No this is not an offset LCA bushing...It's Toast!!! I have no idea how this car went down the road straight and without rattling all over the place. Gotta love these old cars.

w3-10.jpg


Once this little project is done (hopefully this weekend), i'll be running the plumbing in the Plymouth and starting the wiring forward of the cockpit.
 
She should ride like a dream when all this is on! Good luck to you.. Sounds like a good time to get the Coronet up to snuff!
 
The attachment is a picture that Jeff sent me of one he installed. It's missing the hole too. Odd that there's at least two without holes but yours had them all. No doubt I'll work something out with Jeff/AMD. I was just wondering if yours were the same or not. If I can convince myself it's just the hole that's wrong I may just locate the spot for it and drill it

Mine has the holes Bob..easy enough to drill through, that's what I would do anyways. Fit up looks the same tucked up under the tail panel
 
She should ride like a dream when all this is on! Good luck to you.. Sounds like a good time to get the Coronet up to snuff!

Hoping so Ron....Thank you. I'm guessing it will be like night and day. Not giving the Dodge some love in a while was starting to rack up on my nerves..The biggest kick I get out of the car is when the wife begs to drop the top and go for a cruise on a slow summer night. Priceless. The work as well as the nickel and dimes shoved into the suspension/steering is nothing compared to that.
 
That is priceless, Last night my wife said she would like to go for a ride in the 73, she doesn't do that often and i just about fell of the couch. I wanted to take her in the worse way but unfortunately i cant right now.. Soon we hope but, i don't have a top to drop! :) i think we can manage it in a good enough way.. thanks for posting it, made me feel good and as soon as this foot gets better i made her a promise we would take it and go to the lake and just sit... And i cant wait buddy!
 
Well here's to a speedy recovery Ron. You'll be up and at it in no time. I hope very soon down the road you and yours can go out and enjoy that Plymouth and catch some R & R down by the lake.
 
wow!! i didn't think the coronet needed that much suspension work.
how was the music jam fest?
 
wow!! i didn't think the coronet needed that much suspension work.
how was the music jam fest?

Yeah Roger...Some of the suspension parts were newer, but some were pretty old so I decided to revamp it all and start fresh. The music fest was great. Had a blast!
 
How many b bodys do you have/restoring?

Wrapping up the '69 Roadrunner, '68 Coronet is just getting some mechanical freshening, and soon to have a '39 Plymouth drop top. Have someone trying to donate me an ex-Drag car '67 GTX (rough). We'll see on that one. Pretty much wrapping up all the metal work on my budddies '71 rust bucket roadrunner and his brothers '58 Impala. Kinda nice on those projects because they pretty much take care of the grunt work (cutting/rust/metal removal) and I take care of fitment and welding then rough finishing

Put it this way...definitely enough to keep me busy and broke. Kinda like having 2 wives and seven kids. :grin:
 
Bahahahaha 2 wives and 7 kids

you got your hands full for sure !
 
39 Plymouth resto thread!!!! I reckon she's a B-body...

Sweet Will!!! Love to hear you're adding that beauty to the stable!!!

So you puttin' a few extra bays on to the garage before, or after winter???

if work finally calms down a bit (not that that's a bad thing!!! you know, me pushing my meat out all day lmao) i would love to go north of the cheddar curtain for a few days and see the {new} old Plymouth and Skeletor.

Looks like you've been a pretty busy boy yourself lately too, eh? :upside down:

btw...got a name in mind for the old girl???

Not as of yet Mario...Maybe once she's in the garage a name will come to me... Yeah, Work has been completely nutz and any free time I do have in the garage has been spent on the Coronet. One of those deals where 10 things to do turns into 30. But, I guess the yellow gas Vacuum needed the love...You let me know when/if you want to head up..I'll fire up the Weber, ice down the cooler and fire up some brat's.

Little update on the bird.......Wheel choice....Yea or Nay? White letters in/out? I can't get a full car shot with the Dodge still on stilts behind me.

w1-17.jpg


w2-14.jpg
 
IMHO letters inside...makes it look more mean.

those torq thrusts??
 
Auto Transport Service
Back
Top