• When you click on links to various merchants on this site and make a purchase, this can result in this site earning a commission. Affiliate programs and affiliations include, but are not limited to, the eBay Partner Network.

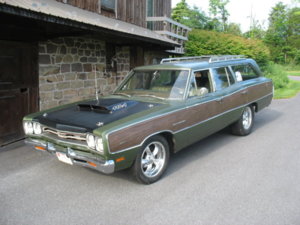
Hai's 1969 Satellite wagon

Hai

Member
Local time
12:44 AM
Joined
Sep 9, 2017
Messages
15
Reaction score
27
Location
Vantaa, Finland
I think my wagon project might be worth of shearing.
This 1969 Satellite wagon is under work in southern Finland.
Project started when my friend called me in begin 2016 that he has something that might be interesting.
Sure. He had this wagon what was imported from Arizona around 2007 and it has been standing ever since. Well, it was standing in Arizona also for the previous 20 years. Actually I knew the car from previous owner and I had some pics of it from 2007.
S2Q8n2j.jpg

4MSi8g9.jpg

We made a trade with my friend. He got my rolling 1968 Satellite ht car and I got this rolling 1969 wagon.
D57vkdh.jpg

Just before the trade I figured out that the reason why my -68 was not progressing, it was that I had already -69 ht car.
hBP3uZZ.jpg

During the spring 2016 I made some cleaning of the body, but so that the patina stays. Painting is not in plans for near future.
There was also parts sourcing for the wagon. I already got the numbers match 383 from my ht car because there is now 500cid stroker in that car.
Transmission I bought from my friend and actually I had sold it twice before. First time in TCI box "new" and second time when I was parting out 1976 Monaco wagon.
Drive shaft I found from swap meet. I was lucky to find exact correct lenght shaft with 1350 u-joints. I had only to buy 727 yoke for 1350 joints. Now there is a shaft that will handle all future plans.
There was some serious under side, in/outside washing.
I9cRHVk.jpg

2mfqb48.jpg


To be continued....
 
Any wagon project is a project worth watching in my opinion, looking forward to seeing this one come together. :popcorn:
 
Very interesting project, my better-half always said the best winter car she ever drove was a '79 Chev Caprice s/w that we had when the kids were growing up; you've got a 'tank' also.
 
Looks like you have a sweet project on your hands. Good luck with that baby and welcome to FBBO. BTW - where do you get your parts from mostly when you live in Finland?
 
Looks like you have a sweet project on your hands. Good luck with that baby and welcome to FBBO. BTW - where do you get your parts from mostly when you live in Finland?

Thanks for wishes.

We have some speed shops here in Finland and some companies focused to import spare parts.
So, everything is available. But cost is another thing. European union is collecting about 5% customs for auto parts and Finland takes 24% VAT (value adding tax). Formula goes this way if part costs for example $100. ($100 * 1.05 + freight) * 1.24. This means that stuff that you have in states costs roughly about times 2 here in speed shop in Euros with current currency rate (1EUR = 1.18 USD). That's why I try to do own importing and get the factor down. I remember the time when it was 1EUR = 1.52USD. It was some where 2008-9.

We don't have so much parts cars because these cars where quite rare here when new. Importing a parts car costs the same as a better one. This leads to that almost every project will find an owner willing to fix it.
 
The trade included also an nice replated rear bumper, but because it would stand out too much from the over all patina, just put into storage.
bT8YIv6.jpg

So, it will wait until I paint the car some day. I decided to fix one from my parts wagon. That needed some fixing of mounts and slight polish.
obTtkOR.jpg

YV2iskM.jpg

Then it was mounted on.
slS9Sui.jpg

Door handles were put back with new repro mirrors. Inside got the cleaned door panels.
NSAnaBX.jpg

ihJmbqK.jpg
 
Last edited:
Thanks for wishes.

We have some speed shops here in Finland and some companies focused to import spare parts.
So, everything is available. But cost is another thing. European union is collecting about 5% customs for auto parts and Finland takes 24% VAT (value adding tax). Formula goes this way if part costs for example $100. ($100 * 1.05 + freight) * 1.24. This means that stuff that you have in states costs roughly about times 2 here in speed shop in Euros with current currency rate (1EUR = 1.18 USD). That's why I try to do own importing and get the factor down. I remember the time when it was 1EUR = 1.52USD. It was some where 2008-9.

We don't have so much parts cars because these cars where quite rare here when new. Importing a parts car costs the same as a better one. This leads to that almost every project will find an owner willing to fix it.
Thx for the info Hai! I’ve always wondered how Europeans got the parts they need and how you restore your cars. Sounds like an even more expensive hobby in Finland than it is here in the U.S. and we complain! I’ll bet the cars are hard to come by and are quite rare there. My car is the same body style as yours just a different model. It’s a 68 GTX. You’ll find this is a great site and a lot of very smart and very helpful people belong to FBBO. Glad you joined and if you ever need anything just send a message - we’re always around!
 
Fuel tank had only some surface rust, but there was dents also because the car has been moved around with fork lift. I tried straightening it with some water pressure. First I supported the tank by one clamp, so that it would not plop and look like a potato.
O7PFNgT.jpg

With some gentle hammer blows the large dents came out.
1LqiGzY.jpg

Smaller dents needed more pressure and more support.
hnYEVC3.jpg

Then it happened. One clamp broke.
tX1xKyr.jpg

Luckily I got it back to shape. I decided that some under coating will hide the remaining imperfections.
r74rjBj.jpg
 
Here's one done for incentive.

IMG_6427.JPG
 
Very neat wagon project . . . welcome to the madness . . .
 
There was wrong axle under the car. After my measurements I found out that it must be from A100, because the width and the double leaf pads. Someone has converted it for axle over the leaf.
N73e6ir.jpg

I have one correct width axle under my parts wagon.
My friend helped my in spelling. Now it's correct.
irPkjOA.jpg

Some refreshing for the leafs.
oWEhHSV.jpg

There was thin plates between the leafs. I asked for my friend to laser cut some duplicates of those and some clamps too.
Cr7VjPa.jpg

OZwQunH.jpg

I'm happy for the final result.
LihweDi.jpg

Rear axle parts ready for assembly.
5okYoTq.jpg

And there it is.
yThffks.jpg

Because the rolling car had only the packing plates of the brakes, it was easy decision to go to discs.
I was not 100% satisfied with the mounts of SSBC brakes, so I redesigned them a little. Those were originally multi piece puzzle. My design splits the number of parts into half and same time one plate acts as support for "green bearing". No more plate after plate pacs.
fYhIRrd.jpg
M4KhwHn.jpg

And back on wheels.
XP2gO1Z.jpg

Some brake tube bending.
sKPkFEt.jpg

According to SSBC manual, these calibers are from late 80' Thunderbird. So I looked for parking brake cable from those. Soon I noticed that left side cable is too short, but right side will fit. I ordered 2 x right. Just some cutting for left side. On right side I had to change the cable. It was 12" short. Luckily I had one new cable for some Chevy Astro that donated it's inner cable for Satellite.
Ed2VWKC.jpg
 
Great thread & we don't care about spelling when ur going with ur 2nd language! Also I have to ask is the singer 'Sissel' from ur area? Love her & her singing.
 
During Christmas holidays 2016 there was time to put the front fenders back after wash.
R9FRvp3.jpg

Because the fixing of the engine was not even started, but I wanted to check the drive shaft lenght, I needed to mock up it some way. I had one extra 727 tail. With that and cross member I was able to proof it and was correct.
vkaowKV.jpg

4XGTdOr.jpg

First I thought that I could use one 1966-69 K-member I had already sand blasted and painted.
k6jdsJB.jpg

But then after removal of original one, I noticed that that there was 1969 late-> type K-member with 1970-> type sway bar provision also.
KpvYXvs.jpg

So, this one was then blasted and painted.

383 block found it's way to engine stand.
zP1ec1f.jpg
 
When the K-member was removed I had to create something to keep the body movable.
oONLnXv.jpg

Same time it received the sandblasted and painted upper arms with new joints and bushings.
Then suddenly the engine was together. It needed new bearings and crank was turned one step down.
5rMoSVJ.jpg

Parts for K-member were also soon ready for assembly.
wpNgI1a.jpg

I searched for K-member dollies to get idea how to make it and how not to make. After some thinking I made this one. First it needed to be stable enough to be transported with engine and trans on pick up bed. Means long and wide. For transmission tail support I fixed scissors jack for adjusting the correct angle. Jack is also adjustable length wise.
7tewW58.jpg

Some lower arms and brakes.
b9Ab9Rq.jpg
 
Auto Transport Service
Back
Top