• When you click on links to various merchants on this site and make a purchase, this can result in this site earning a commission. Affiliate programs and affiliations include, but are not limited to, the eBay Partner Network.

Hawk-Rod: The Restoration

Great to hear that you sorted out the Fuel Pump issues Hawk. I would be questioning the Company responsible for the design of that item...especially that clamp arrangement. I take it they are nylon cable ties....they could at have used stainless steel cable ties, if that was the best solution to hold that band in place.
Drive-shaft should be a breeze compared to the fuel pump.... :headbang: Keep it up, and you'll be there in no time. :icon_thumright:
 
Bless You Hawk Man....i knew Your wear with all would reign victorious!!
Not that it's anything You need now, maybe future, i posted a thread called
Filler Secrets 101....my take on fillers and my alternatives to shelf bought types such as Kitty Hair(long strand chop)....Dyna Glass(short chop), Bondoe(not waterproof..non-structural) & two part polyester finish putties...Huge cost savings. superior workability, superior strength and durability..less post-cure and less tack. Harder sanding, but in my Bible, that is a good thing....i'd rather sand on a brick before paint, than to have to color sand out shrinkage after paint.
Congratulations on a speed bump overcome Buddy...i'm Real Happy for You Man..jimi buff-it
 
You need to use these clamps.
View attachment 260938
The old school clamps don't clamp good enough for the higher pressure.

Thanks. That is exactly what I put on it (two on each side!). What bugs me is that they used a crappy band clamp in the first place...

- - - Updated - - -

Bless You Hawk Man....i knew Your wear with all would reign victorious!!
Not that it's anything You need now, maybe future, i posted a thread called
Filler Secrets 101....my take on fillers and my alternatives to shelf bought types such as Kitty Hair(long strand chop)....Dyna Glass(short chop), Bondoe(not waterproof..non-structural) & two part polyester finish putties...Huge cost savings. superior workability, superior strength and durability..less post-cure and less tack. Harder sanding, but in my Bible, that is a good thing....i'd rather sand on a brick before paint, than to have to color sand out shrinkage after paint.
Congratulations on a speed bump overcome Buddy...i'm Real Happy for You Man..jimi buff-it

Thanks Jimi. I was checking out that thread. I am still a babe in the woods when it comes to bodywork, but I would like to get an old 4 door or station wagon "beater" car. That might be a good car to learn some basic bodywork skills on, because I am sure my early work will not be that great - but you have to start somewhere!

In other news, I got my driveshaft painted and installed. In theory, I can now drive the car around under its own power, but I still have a loose front end and no seat, so I need a few more things before I can get there...
 
Glad you got the fuel system figured out Hawk, those problems can be a pain in the rear to say the least. I remember one time when I have an in-tank fuel pump kit that shipped with a regular fuel hose (NOT the submersible hose) well, 4 weeks later every time the car would get down below 3/4 of a tank it would start sucking air! Pain in the arse!

I just switched out my Aeromotive in-tank pump system to a different fuel cell (Aluminum). I feel and know your pain brother.

So what's up next for the 70RR?
 
So I think I am 100% finished under the dash. One of the last things I needed to do was power the FAST computer during BOTH start and run key positions. The key switch has wires that are powered during the start position OR during the run/on position, but there is no wire that is powered in the start AND run positions. This means I had to make my own little circuit.

This is actually very easy. I scrounged up an old electrical panel that had some diodes on it. Diodes are basically one way flow devices for electricity. You can't just hook the start and run wires together because then you would be back feeding voltage on these circuits when you don't want it.

Basically, hook two diodes into a Y, with them directionally correct. If you are not sure which way is correct, hook one through a simple test light. You will see the light works one way but not the other.

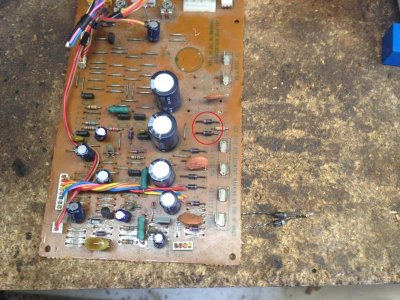
Here is the old circuit board I used. I actually took the diodes that are circled, but you can see two other diodes besides the circuit board. The "output" sides of the diodes are simply twisted and soldered together. The input sides go to START and RUN respectively.
IMG_4835.jpg

Here is what it looks like. In my case, I had used a bullet style connector for my first wire, so I continued with that style so all I needed to do was add this little guy in-line and then hook up a start wire.
IMG_4837.jpg

Wiring and under dash work is now done! (At least until I discover some other little gremlin!)

Now to finish the rest of the interior and side windows...
 
I would think you only need the diode on the start line. That wire should dead once you release the key. On second thought never mind it can't hurt. Or how about 2 relays? a start and a run relay.. Relays are easier to find than Diodes.
 
Wow Hawk, i never could make out heads or tails with car computers, i guess im old school but good luck getting it right! The old system worked or works at a full 12 volts when key is in start position and left in run the B-resister takes it down to about 7, Thats about my sum of knowledge between the old stuff and new with the starting voltage, maybe its the same but works in a different way with these "Diodes" you mention.. I think im confused already this mornin man lol.. ill just say good luck!
 
I would think you only need the diode on the start line. That wire should dead once you release the key. On second thought never mind it can't hurt. Or how about 2 relays? a start and a run relay.. Relays are easier to find than Diodes.

With only one diode on the start line the start circuit would back feed all the items on the run circuit. That might be fine if it can handle the load. I chose to keep them separate since they were designed separately.

Actually, diodes are very common and easily available. The problem with a relay is it takes more wiring, they are slower to react (you might get a very short pulse of a "dead spot"), and are more prone to failure. Don't get me wrong, they are actually very reliable and would certainly work - I have relays in circuits for my fuel pump and other circuits - just in this case, the diode is smaller, easier, faster, and in my opinion, a better choice. There are no moving parts on a diode so not much to go wrong with them...

- - - Updated - - -

Wow Hawk, i never could make out heads or tails with car computers, i guess im old school but good luck getting it right! The old system worked or works at a full 12 volts when key is in start position and left in run the B-resister takes it down to about 7, Thats about my sum of knowledge between the old stuff and new with the starting voltage, maybe its the same but works in a different way with these "Diodes" you mention.. I think im confused already this mornin man lol.. ill just say good luck!

LOL Ron, you are not confused at all - you have it exactly right! In my case, with the fuel injection and updated system, I am not running a ballast resistor, so the wire that feeds the coil during the start cycle is actually what I used to power my computer (through the diode) during the start cycle. It works great and I think all my wiring work is behind me now - what a relief!
 
Great work Hawk, glad you got all the Efi stuff worked out, looking forward to more progress instead of chasing gremlins.
 
With only one diode on the start line the start circuit would back feed all the items on the run circuit. That might be fine if it can handle the load. I chose to keep them separate since they were designed separately.

Actually, diodes are very common and easily available. The problem with a relay is it takes more wiring, they are slower to react (you might get a very short pulse of a "dead spot"), and are more prone to failure. Don't get me wrong, they are actually very reliable and would certainly work - I have relays in circuits for my fuel pump and other circuits - just in this case, the diode is smaller, easier, faster, and in my opinion, a better choice. There are no moving parts on a diode so not much to go wrong with them...
Having worked on Jaguars (AKA LUCAS, the prince of darkness, masters of the back feed), Diodes scare me.. I would make a spare and throw it in the car toolbox along with relays and fuses..
 
Having worked on Jaguars (AKA LUCAS, the prince of darkness, masters of the back feed), Diodes scare me.. I would make a spare and throw it in the car toolbox along with relays and fuses..

LOL, I hear you. I am slowly amassing spares that I may need. I have thrown in spare relays AND a couple of spare diodes. My only fear is I will have 500 pounds of spare parts in the trunk and no room for my own stuff when I leave!
 
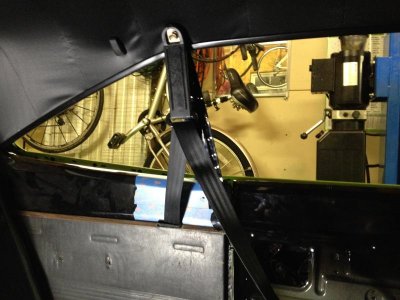
So I am doing some work with the seat belts since this will help me finish up and install rear glass and seats. As mentioned in earlier posts, I am adding three point set belts in front and rear (except center). The rear are done but now to engineer and finish the front. Last night, I got the seat belts mocked up, as well as the internal door latch and locks installed and working. Not much to show with locks, but here are a couple of the seat belts:

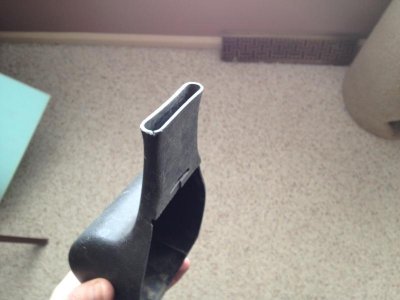
This is what I used as a "guide" to guide and protect the belt as it slides through the hole. They are a pair of old seat belt covers from a newer Mopar that I had laying around in my "junk" stuff...
IMG_4320.jpg

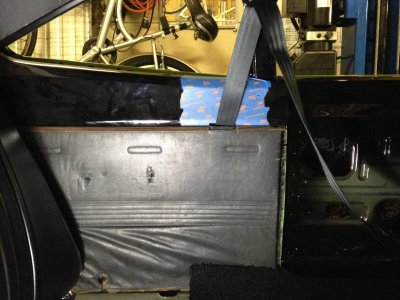
Here are a few shots of the roughed in mock up. The interior panel is an old mock up piece for test fitting, and the guide is not necessarily placed in its exact location. This was an overall test to check the placement and functionality of the retractor in the inner panel.
IMG_4840.jpg

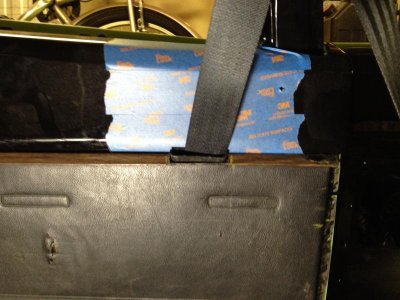
Here is a close up view of the belt as it exits from the inside of the panel. The transition between the vinyl and metal interior panels made a perfect spot to exit the belt. I cut a hole in my trim to allow space for the guide. I think I will end up replacing the fake wood decals on these trim pieces. While these are not correct for Road Runner's, I think it will look decent with my woodgrain wheel and woodgrain pistol grip shifter. It will also give me further ability to blend in the guide as it exits from the trim...
IMG_4842.jpg

Here is another view...
IMG_4843.jpg
 
Sweet to see all the progress! Wiring is one of those things that you hate until you get a handle on it and then all of a sudden it's kinda fun, looks like your having fun. I really like how you did your shoulder harnesses, wonder if I could do the same with mine? I bolted mine to the factory bolt hole but it just runs up the side instead of threw it, wonder if the leather upper pads would be in the way? Does your car have the flip out windows or do they roll up? Nice thinking Hsormen
 
Sweet to see all the progress! Wiring is one of those things that you hate until you get a handle on it and then all of a sudden it's kinda fun, looks like your having fun. I really like how you did your shoulder harnesses, wonder if I could do the same with mine? I bolted mine to the factory bolt hole but it just runs up the side instead of threw it, wonder if the leather upper pads would be in the way? Does your car have the flip out windows or do they roll up? Nice thinking Hsormen

Hi Dev,

My car, as a cheapo coupe, has the flip out windows, so I didn't have to worry about any window tracks in the way - it is just empty space on my car. With a Charger, you would need to work around them, and it may not be possible...
 
Hi Dev,

My car, as a cheapo coupe, has the flip out windows, so I didn't have to worry about any window tracks in the way - it is just empty space on my car. With a Charger, you would need to work around them, and it may not be possible...

Looks like you figured out a way to take advantage of that flip window, I was wondering because I remember mine being pretty full in there. Can't wait for that exciting post about the first maiden voyage, should be soon.
 
Congratulations Hawk, watched the video and the car sounds great. Why is it that the small things are what trips us up, my small thing was my fuel pick-up was not low enough to grab the fuel. Looks like you are back in control. Am looking forward to next video which will include some driving.
 
Hawk Post Coupes Rock to the 7's....my favorite B was my 68 Coro that post makes a good difference when loading up sideways forces.

Derwud....why brits drink warm Guinness....Lucas refrigerators...Italian veglia-borletti is redunant, relay crazy dark thirty too. had a Fiat Mira Fiori 131...that had a relay between distributor & coil that would open when engine got hot...and die....popped the relay can out of block. ran a jump wire coil - distributor.....never another bother i still haven't ever figured out what the relay was supposed to do.....but i drove the piss out of the car...liked it....also really like the two door 128...very good looking little sedan
 
So the FAST system is now running like a champ. It turns out there were NO issues attributable to the FAST system.

So it looks like there were NO issues with the FAST system - just me! :grin:


Well Hawk, your trailblazing has again helped us that are following along. Got my FAST EZ EFI system and the first thing I read upon opening the box was the Tech Bulletin, proclaiming that ignition systems like the Pertronix Ignitor III that don't have a tach output are incompatible with their system. Of course I had purchased a Pertronix Flame Thrower distributor with the Ignitor III shortly before starting the resto. :angryfire:

For plug-n-play ease I'm going with the FAST distributor and ignition box. Did you use their Dual-Sync distributor in your car? Your posts on the timing will be very helpful. Coincidentally in the current month's HOT ROD mag, the 'Hot Rod to the Rescue' article dealt with a FAST system and the rotor phasing and timing. It turns out the FAST system worked flawlessly once the timing was dialed in.

Glad some of my posts are helping folks out! Yes, I do have a Dual-Sync distributor. A couple of key things with it:
(1) It barely fits in because the cap is larger GM style. I had to clearance my head for it. It was very minor, but think about that before you go and paint your engine and then find out you have to grind the head! It is really just to remove casting seams - but check some of my earlier posts.
(2) DO NOT follow the instructions that come with the distributor. That caused a lot of confusion for me. Instead follow the FAST system instructions only.
(3) I highly recommend you get/use a timing light with advance - it will make the job much easier.

Good luck!

Hawk
 
I had to clearance my head for the Pertronix too. But that was the iron head, now running 440 Source Stealth. I have a timing light with advance and tach so there's one thing I don't have to buy extra...:happy11:
Thanks again for the heads-up.
Rich
 
Auto Transport Service
Back
Top