• When you click on links to various merchants on this site and make a purchase, this can result in this site earning a commission. Affiliate programs and affiliations include, but are not limited to, the eBay Partner Network.

Holley 770 Street Avenger adjustment

Current total timing is 38deg, 20 initial and 18 mech advance, i have disconnected the vacuum canister again.
i've swapped 1 blue spring for the lighter grey spring, now i am using chart E as in the above mentioned picture.
Now the mechanical advance is all-in around 1900-2000 rpm.
But still, i keep seeing 11.0 AFR at best..:BangHead:

So, guess i will have to order some smaller main jets, like size 66 and 68.
Should i try and see what it does? The cruising AFR should drop right?
If it does i understand there is a chance i am leaning out on acceleration and WOT, but this is should sort with increasing pvcr.
Think i will just attempt to drill them in this case, if it does turn sideways i will have to buy myself a QF metering block with replaceable bleeds.
 
I have been reading up a bit and found some comments here and there that during cruising (light throttle), under "high" vacuum conditions the engine is running on the idle and transition slot circuit, the main jets and power valve are not included in this story.
Could this be the reason why changing jets does not affect my cruising AFR?
What can i do to check this, and more important what can i do to change/test this?
Since the idle circuit is already on the lean side i think it is best to leave that part alone, but what about the transition slot circuit?

Pretty common problem, may need transfer slot restrictors. You’ll need a 10-32 tap, some brass set screws and a numbered drill set. Smaller IFR’s may help also.

B89EBA34-C0BB-40EC-9DDE-5BACA9205A78.jpeg
EA03F8E6-3B32-4735-AB18-68961858B71A.jpeg
 
But how do i know for sure i am running rich due to the transfer slot at cruising?
Because these mods end up with me drilling holes etc, after that there is no return compared to replacing a replaceable item like a jet.
You would expect to be running on the primary jets while doing 60-70mph right?

I will get some smaller jets first and try to see if that brings down the cruising AFR.
I read in the book of David Vizard that to get the cruising AFR down to just keep reducing primary jet size until satisfactory.
Once that is set need to check and look at the power mixture again and then only increase pvcr and secondary jetting to compensate for the lost fuel from the primary jets.
Now running #70 jets in the primary, i will get some #68, #66 and #64 jets and see if it comes down.
 
Reading one of your other posts it sounded like you already made jet changes to no avail. The transfer slot trick is for at low speed cruise. If your issue Is say at 45 mph then jetting should help clean it up. Every carb and combo is different as far as where the mains come in. Absolutely try jetting it down first. That will clean up your high speed cruise. If the low speed is still fat then you will have to make other changes. I don’t know what that carb has for emulsion And air bleeds but they can contribute to the whole thing being out of wack. Making something adjustable doesn’t mean you can’t put it back to stock. You just need to record the stock settings. Actually tuning a carb requires a lot more than jet changes if you’re going for perfection. I go off the deep end on a lot of these posts cause I already know what And where I would be. Pretty hard to communicate via message board.
 
Last edited:
Thx for thinking with me here, i do know it is hard to make correct judgements from a distance.
I did nearly got a heart attack today, as i drove of and hit the throttle...finding it to be stuck and not returning to closed position.
:steering:
Drove back home slowly and had a look what happened there.
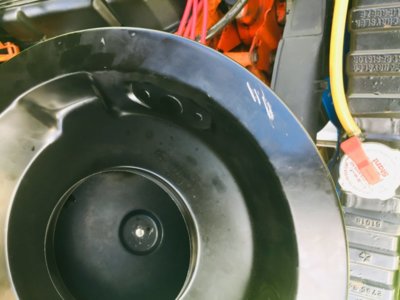
It seems my kick down linkage got stuk behind the edge of the air filter housing and causing it to get stuck.
I played around with it to get it all sorted, also loosened the throttle cable and checked if the carb shafts were binding or so but they do move freely.
After setting all that back and started the car i noticed the idle was low...
Guess the last time i had the throttle cable reinstalled i put it too tight and was opened slightly.
Readjusted the idle and idle adjustment screws as it was running rich.
Then went for a drive and noticed at speeds up to 40mph that it actually run more lean, towards 12 - 12.5.
Above that it does go up to 11-ish.
So as you said, i might get it close to good if i get some smaller jets and try again.
For now i will let it cool down and maybe take the carb off and check for the current butterfly valve position of the primary's and see where they are in reference with the transfer slot.
Could it be that when way off in comparison to the transfer slot, my throttle is too far open while i could get them more closed and fine tune it with the idle screws?

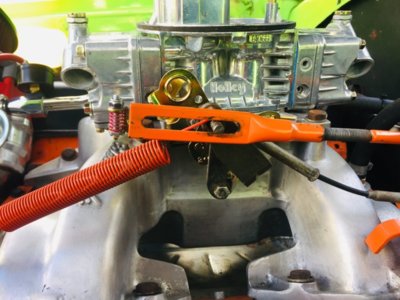
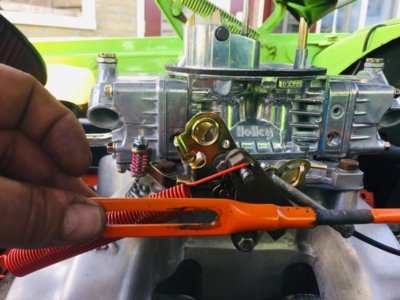
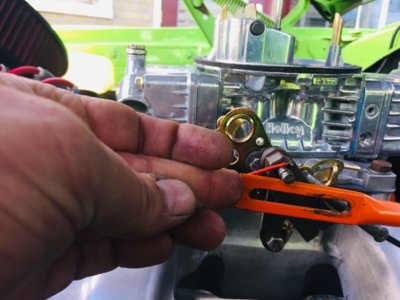
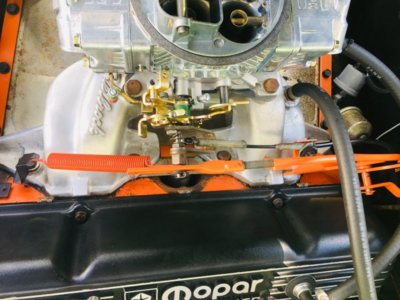
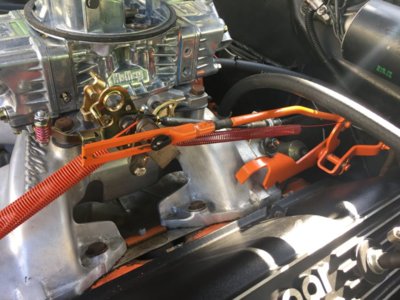
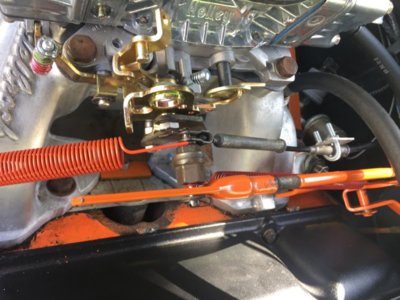
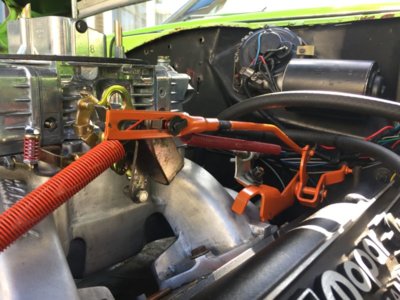
Another thing i need some help with is with the kickdown linkage position.
Is there a spring missing on mine?
The kickdown linkage seems odd to me.
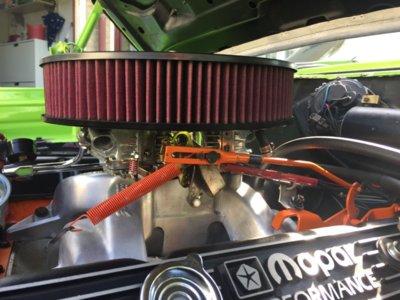
The first picture is as it sits normal (throttle closed)
Second is when i fully pull it forward by hand
Third is fully pushed back by hand
Fourth is some scratches under the air cleaner where the kick down linkage had been rubbing.
Last is a general view of the setup

IMG_E2701.jpg IMG_E2702.jpg IMG_E2703.jpg IMG_E2705.jpg IMG_E2700.jpg
 
Looking pictures on the web of the kickdown linkage i noticed there should be a spring.
Ordered one, and also a new throttle return spring, now i got the 55 coil spring of the '67 or '68 model and ordered a 45 coil for the '69 automatic 440 4-barrel.
And some jets, size 64, 66 and 68.
When i receive them i will make some tests and report back.

Edit: Oh, and a 1/2" spacer for between the carb and air cleaner....
 
Received the jets, springs and air cleaner spacer.
I did not change jets yet, probably tomorrow if the weather permits.
I set the kick down linkage as per a old video i found here on the site and installed the spring which sits nice and snug now.
Video link:
Also removed and lubed the throttle cable, did not help much but i repositioned it with a temporary bracket as i felt and could see it was binding because of the odd angle of how it is connected.
Now the throttle moves free without any binding so the stuck throttle issue should be solved now.
The "factory correct" throttle spring i received was weaker as the one i had installed now so i did not change it.
The spacer did make some decent room for the kick down linkage and it is not touching the hood, it might actually when revving the engine.
A test drive will tell i guess.

IMG_2724.jpg IMG_2725.jpg IMG_2726.jpg IMG_2727.jpg
 
You've got some crazy stuff going on there. Why is the intake all butchered up like that, and what exactly keeps the exhaust from escaping the cross over where there is no intake? What's up with the return spring mount and throttle cable bracket? And the kick down spring is still wrong. When the simple stuff like this is in such disarray, it's not hard to question everything
 
Why is the intake all butchered up like that, and what exactly keeps the exhaust from escaping the cross over where there is no intake?

What do you mean with butchered up? The intake is a Edelbrock Performer RPM, i think you mean the cross over for coolant that goes across the manifolds, these ports are blocked off on the cylinder head as this manifold has no crossover port.

The throttle cable bracket is something i made temporary as the angle of the throttle cable was so far off it started to bind.
This is what the car had when i bought it and i am not sure if the throttle bracket is the correct one for my car. (Think this is for a 318 from what i found on the web)
I think i need another one that sits higher and keeps the kick down linkage up higher, then also the throttle cable will sit up higher which would make sense.
I also found i will need the longer connecting pin that holds the kick down linkage, then the return spring will have it's own groove on the end and sits correct.

Like the setup in the link is what i need i think.
https://www.ebay.com/itm/For-Mopar-...Throttle-Bracket-w-OEM-Kickdown-/223502380972
 
From the photo it looks like the idle screw is screwed in pretty far? If that is the case, you are likely exposing much of the transfer slot and are mostly out of the idle circuit. I was running a good sized cam on my car, and had to drill the throttle plates to allow more idle air while closing the throttle blade angle to only expose a small amount of the transfer slot in the base plate. I have the Ultra Avenger, so it had 4-corner idle screws which may have gave me a bit more adjustability?
 
From the photo it looks like the idle screw is screwed in pretty far? If that is the case, you are likely exposing much of the transfer slot and are mostly out of the idle circuit. I was running a good sized cam on my car, and had to drill the throttle plates to allow more idle air while closing the throttle blade angle to only expose a small amount of the transfer slot in the base plate. I have the Ultra Avenger, so it had 4-corner idle screws which may have gave me a bit more adjustability?

I know it looks like it is far out indeed, but the screw is different from my old carb and these stick out quite far, even when closed.
The idle screws are set at 1 turn open.
Once warm the engine idles on the lean side, but giving it more on the idle screw means an rpm drop and i need to open the throttle more so i left it where it is.
4-corner idling works better indeed, i was under the assumption this also had 4 corner idling.
I picked the wrong carb as i got the 80770, while the 83770 does have 4-corner idle adjustment.
On Holley their website both showed 4-corner idling in the picture so never bothered to question it, but it is ok, i can work with it and have it to idle well.
I will get going soon and get the primary jets (70) replaced with size 66 and see what the cruising AFR will be, once i have some findings i will report back...really hopes this works.
 
What do you mean with butchered up? The intake is a Edelbrock Performer RPM, i think you mean the cross over for coolant that goes across the manifolds, these ports are blocked off on the cylinder head as this manifold has no crossover port.

The throttle cable bracket is something i made temporary as the angle of the throttle cable was so far off it started to bind.
This is what the car had when i bought it and i am not sure if the throttle bracket is the correct one for my car. (Think this is for a 318 from what i found on the web)
I think i need another one that sits higher and keeps the kick down linkage up higher, then also the throttle cable will sit up higher which would make sense.
I also found i will need the longer connecting pin that holds the kick down linkage, then the return spring will have it's own groove on the end and sits correct.

Like the setup in the link is what i need i think.
https://www.ebay.com/itm/For-Mopar-...Throttle-Bracket-w-OEM-Kickdown-/223502380972

Wow. You need to go on line and look to see what an RPM manifold looks like.

Coolant across the manifold??? No. No coolant across the manifold for any big block Mopar.

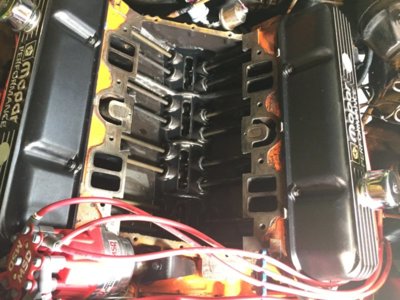
There is exhaust cross over, which someone cut out of that intake manifold. This would be ok on an aftermarket cylinder head that does not have the crossover provision. But you have a standard head with the crossover, and it's not sealed.

This amounts to at least two cylinders with exhaust leaks that vary with rpm and load, rendering your A/F ratio measurements useless.

You're on your second carb that doesn't work. It's likely not the carb.

Finally, the return spring was not the problem, the bracket has the spring mount too close to the carb.
 
Last edited:
That crossover is used for exhaust?
I always assumed it was coolant water.
The ports on the heads have been blocked off with plugs, see picture.
As i mentioned before i bought the car this way and never really looked at the how and what was modified.
I know plenty things are maybe different but it always worked well.
That's why i am asking here to see if anyone could figure out what is not correct here.

It is not that the carb doesn't work, it does it's job although being rich on cruise which is what i wanted to rectify.
For some reason now i started having issues with the throttle linkage, once all is connected the mechanism does not fully close, a little push on the linkage and it drops closed.
Kick down linkage removed and it moves more freely, throttle cable also removed and it works 100%.
Throttle cable wire goes smooth by hand and i cannot see any reason why this is causing a bind.
The return spring bracket is too close indeed, therefore i shortened the spring latch hook on the carb end to make sure it is under tension when the throttle is closed.
Even bending the spring bracket away from the carb does not help to close the throttle fully.
Maybe the throttle cable pin needs to move further away from the shaft center to create more arm for leverage?
I don't understand what has changed, initially it worked fine without binding and have been flat out on it several times as it runs like a rocket.
Only thing i changed on the carb are idle mixture screw adjustment, high idle adjustment screw for the electric choke as it was running too low idle.
And changed primary jets....

Today i worked on the car to see what/where there is still something that prevents the throttle from fully closing.
As far as i could see, with the kick down linkage removed it works better.
I set the kick down linkage as per the video i linked, where it has a small gap in the groove when the throttle is fully closed.
Think the spring for the kick down linkage now also works against me....

IMG_7822.JPG
 
So i left the kick down spring off and it did work, looks like at initial startup the electric choke also maintains the throttle partially open but releases after the set time.
It was idling around 1500 rpm when warm, hit the throttle once and noticed the choke plate kicked the last bit to full open and after the rpm dropped to normal.
Changed jets from size 70 (hole size is actually 0.073"...holley logic) to a 0.066".
When speeding up slowly you can clearly see the transition from the idle & transition slot, which keeps it around 12.5 - 13.0 AFR and then drop to beyond the AFR meter range on the lean side....
So 0.066" was a bit small :)
Stuck a 0.069" and drove again but this time the AFR was between 12.0 and 13.0 at cruising speeds which is what i wanted.
When hitting it there is a very short lean moment and then crawls back to 13 - 14 under load, including secondary's so think my next step is to increase the secondary jets a size up.
For the last few days i noticed some strange noise as well under the car which i could not place so that point needs attention before anything else.
When keeping rpm around 1000-1200 i hear some rattling noise which sounds like a metal plate is loose, like there is something lying on the valley pan rattling around, but more on the driver side of the engine.
I dropped the oil for the sake of it and checked for metal.
There is some metallic effect in the last bit of oil that drained out, not sure if i need to worry now.
Tomorrow i will drop the oil pan and remove the rocker cover to check if there is something wrong.
I am hoping it was something else causing the noise i heard.
 
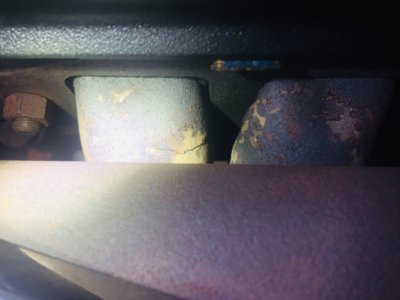
I found the source of the rattle.
I knew i had a leak on the header and expected the gasket. (again)
But i did not expect this type of leak....

As Holley defines their jets by flow rate instead of hole size, they advice to increase jetting in steps of 2.
But what to follow, increase jet by 2 numbers or increase hole size by 2?
I want to up the jetting of the secondary, which currently has size 75 jet (0.082").
At high load i am seeing 14.0 - 14.5 AFR so it just needs a bit more on the secondary.
But increase it with size 76, which has a 0.084" hole, which is 2 sizes larger by hole size.
Or go to size 77, which has a 0.086" hole, which is 4 hole sizes larger but 2 sizes by number :BangHead:

For the rest it runs quite ok, just a little richer on idle&transition @ 12.0 - 12.5, once it changes to the jets you can clearly see it on the AFR meter as it moves up to 13+, and when maintaining speed it sits around 13 - 14.
Pushing it it jumps in the good range 12.5 - 13.5 but once the secondary's open it gets too lean in the 14s again.
Almost there......thx guys for some guidance.

Now time to pick some new headers!! :popcorn2:

IMG_E2762.jpg
 
Auto Transport Service
Back
Top