• When you click on links to various merchants on this site and make a purchase, this can result in this site earning a commission. Affiliate programs and affiliations include, but are not limited to, the eBay Partner Network.

Lookie what $5000 buys you....

All the header bolts were coated with thread sealant since on stock iron heads, the threads go into the coolant passages.
Next up was the cross shaft for the shifter. For now, I am keeping the column shifter in place. I was putting this together with the parts that I pulled from Ginger and some of what came with this car.
First off, the cross shaft wanted to sit out of level. The transmission side was the high side.
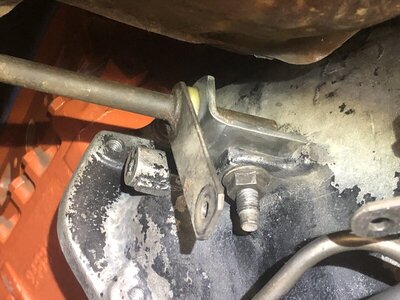
(Forgive the next 2 pictures...They depict the correct setup that I stumbled onto. I did not take pictures of the first incorrect arrangement.)

383 183.jpg


I thought that maybe my suspicions about the transmission mount being too tall were showing another symptom.

What I needed to do was to drop the end that attached to the transmission so that it sat level. This makes the levers work properly because they would be swinging in the proper plane.

This bracket......

383 181 B.jpg


Comes in different heights/offsets. I first had the bracket on the right, then I tried the one on the left. It made the difference.

383 179.JPG

383 180.JPG

What I needed was the shorter bracket to lower the transmission side.
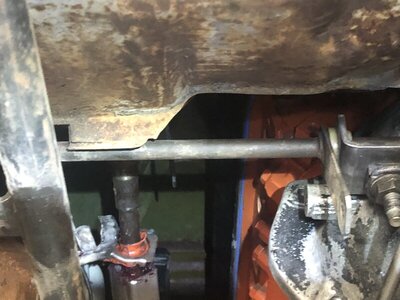
383 182.JPG 383 181.JPG
 
Last edited:
^^^ Those dang steering column couplers....I always have trouble with that thin sheet metal retainer. ^^^^
Sometime last year, I made a deal with FBBO member BDF6 for an exhaust setup. Pypes 2 1/2" stainless steel with mandrel bent tubes and an X center section. It is a bolt together kit too!
383 187.JPG
383 188.JPG


383 189.JPG
383 190.JPG
 
TTI headers are made so that the collectors point to the humps in the torsion bar crossmember.

Hooker headers don't have that feature.

383 190 (2).JPG


The right side is almost a straight shot but the left will need a zig-zag to fit.

In a stroke of really good luck, I looked out back and found a section of pipe that had the right bends that I needed.
This is a test fit. I will weld on the reducer to do it right.
383 191.JPG


383 192.JPG


383 193.JPG
 
383 194.JPG


I was amazed when that left hand section fit like that. What a stroke of good luck.

383 195.JPG


383 196.JPG
 
TTI headers are made so that the collectors point to the humps in the torsion bar crossmember.

Hooker headers don't have that feature.

View attachment 1084931

The right side is almost a straight shot but the left will need a zig-zag to fit.

In a stroke of really good luck, I looked out back and found a section of pipe that had the right bends that I needed.
This is a test fit. I will weld on the reducer to do it right.
View attachment 1084932


View attachment 1084933


View attachment 1084934

Luck had nothing to do with that, great job Kern Dog!
 
Once in a blue moon, things just naturally fall into place - because they're meant to.
Greg's skills plus kharma from Ma Mopar herself!
go-get-em-tiger.jpg


By the way, I don't suppose all those pics and information on the Brewer's trans crossmembers
page is of any help with your questions on that?
 
Once in a blue moon, things just naturally fall into place - because they're meant to.
Greg's skills plus kharma from Ma Mopar herself!
View attachment 1084965

By the way, I don't suppose all those pics and information on the Brewer's trans crossmembers
page is of any help with your questions on that?

I will check the Brewers site later tonight. Thanks for the suggestion.
 
I went through a couple of containers and found some odds and ends.
I found another section of pipe with the right bend and fitted the right side.

D 383 195.jpg
D 383 196.jpg
D 383 197.jpg
D 383 198.jpg
 
Now I had the system fitted and ready to weld up. I used the regular MIG wire and 75/25 Argon-oxygen gas even though most of the exhaust is stainless steel.

D 383 200.jpg


I didn't weld everything, I ended up clamping the joints near the transmission tailshaft.


D 383 201.jpg


I did weld the 4 pipes that directly attach to the X section.


D 383 202.jpg
 
D 383 205.jpg


I did weld the pipes going into the muffler.

D 383 204.jpg


The tailpipes that exit the mufflers were clamped. I put hangers there too.
This will allow me to take the center section out later. There is enough room to remove the transmission with the exhaust in place but one day when I take this car apart to paint, it will be great to be able to unbolt stuff instead of cutting and welding back together.

The tailpipe hangers are similar to what I did on Ginger.
D 383 206.jpg


D 383 207.jpg


The tailpipes are centered under the backup lights like the other car too.
D 383 208.jpg


R T 7 A.jpg
 
Most of the underbody stuff is done.
I decided to take a look at how I'm going to route the 4 gauge wire to the starter. I was amazed at the amount of room I'll have to get to the starter terminals.

383 213.jpg


383 214.jpg


That window is huge! The TTIs in the red car are a tight fit. I'm amazed at how much more room there is to work with the low deck 383 and smaller headers.

383 215.jpg
 
Cheap headers....
Yeah, there is always a cost. This time, it is spark plug clearance, or the limited amount of it.
What is the minimum clearance that you can have between the spark plug boots and the header tubes?

The plug wires are Taylor. I had to shorten 7 of them to get them to fit and look right. They were half 90 degree ends, half were 45 degree.
I had to make #3 a straight boot. This looks way too close to me. The only fix I can think of is to pull the header and dent the tube for clearance.
383 218.jpg


383 217.jpg


# 5 is close as well.

383 216.jpg


I can shave off a little of the silicone jacket to gain some room but if I pull the header to dent one tube, I'll dent three of them to be sure.
 
Well, if this YouTube generation has learned one thing about headers, it's that you can beat hell
out of them before harming performance, eh?
I'd be more concerned with warping the mounting flange, myself.
Are you going to run "shorty" plugs?
 
I thought about that. I wonder if the local NAPA can get those?
 
I wish that I knew how much shorter these were compared to regular plugs.


105437S_L_877f8494-e88f-41d5-858e-98c7b31a6ead.jpg


This one doesn't bother me so much.

383 216_LI.jpg


This one does.

383 218_LI.jpg
 
https://www.summitracing.com/parts/acc-9002c

Not that you would want to buy new wires, but I have been running these on all my cars with no issues. They come in 90*, 45*, or straight ends and can be bought singularly to make up the kit you need.
 
Auto Transport Service
Back
Top