• When you click on links to various merchants on this site and make a purchase, this can result in this site earning a commission. Affiliate programs and affiliations include, but are not limited to, the eBay Partner Network.

Meet Max the '71 Coronet

Got out into the shop tonight and lowered the front a bit to match the rear. Actually has a slight forward rake at the rocker panel pinch welds. Might do a touch more but this is about right.
Then took it out for a drive to settle everything and take a couple pictures

front three quarter.jpg
Side View.jpg
 
The Coronet was busy this weekend. Went to a benefit car show for a fellow cancer victim this weekend, had to go support. Also did some weld repairs on a friends trailer, and out to lunch after that.
20240323_183059.jpg

20240323_183119.jpg


Annnnnd we're back in "Hover Dodge" mode... time to rebuild/upgrade the front suspension/steering/brakes and rear brakes/sway bar/shocks. Will be doing some K frame reinforcement and looking at (and possibly installing) some USCT subframe connectors.

20240324_170850.jpg
 
So yesterday and today I got the front sway bar mocked up and the power steering pump out (along with a bunch of outdoor yard work). Front bar was a bit of a pain, it would be super simple on a lift, unfortunately I don't have one. Managed to get it through the K member though and all the rest in place so I could mark the lower control arms for the drop link tabs (my car didn't have bars originally). Lower arms are in beautiful shape, the left strut rod, not so much. You can see the curve in it in the pic. I have aftermarket adjustables to replace those.
20240329_151314.jpg

20240329_170613.jpg
20240329_170630.jpg
20240329_151815.jpg


I decided to get the power steering pump out today. I'm switching to a Borgeson steering box and the pump leaks, so I'm going to rebuild or replace it (haven't decided yet) along with new hoses and a cooler. It fought the entire way out, whatever engineer at Chrysler thought putting the bolts into the water jacket on small blocks was a great idea... grrrr. Managed to get them out though, and pump is on the bench.

Next up... getting the steering column loose. I have the Bergman kit so I don't have to cut the column, but I also have a new headlight switch to install, so that will get done while the column is loose too. For anyone who hasn't tried this, aluminum foil makes great temporary funnels/shields for directing coolant/oil where it needs to go to avoid making a huge mess.
20240330_174042.jpg
20240330_174052.jpg
20240330_163648.jpg
 
And most of the suspension is off... anyone need some freshly rebuilt 10" front brakes? Ordered a rebuilt pump, new lines, and a cooler (the Borgeson box needs a cooler). I didn't take the steering column out today, figured that's a good job for the rainy days coming in the forecast since I don't have to sit on wet pavement, along with the upper arms.

pics as always...

20240331_173532.jpg
20240331_173612.jpg
20240331_174626.jpg
20240331_150156.jpg
 
And the subframe, power steering and lower suspension is all out and disassembled. Out of the entire pile, all I'm actually using is the K member, the lower arms, and the center link on the steering. Next up is firing up the pressure washer and cleaning 54 years of gunk off the K member, and a bunch of cleaning/blasting/painting various other parts. I got the steering column and the instrument cluster out the other day, and figured out how the floors got wet/rusty... some (fairly) minor issues to repair in the cowl. Haven't decided whether to address it now, or do a temp patch and sort it out properly when I do the front floor repair. Leaning towards the latter, since I really want this up and cruising for the summer. Also figured out why the car pulled right under braking, a combo of a dead lower ball joint, a really sloppy drag link, and a bent strut rod. I suspect someone jacked up the car with the strut rod, as there's no evidence of any damage at all under the car or on the K member. Engine bay looks oddly bare without the K member/PS pump
20240405_140500.jpg
20240405_144451.jpg
20240405_144608.jpg
20240405_144646.jpg
20240405_144653.jpg
 
I need to do a support like yours when I swap out the K on my 67 wagon down the road. Have a spare 70 unit to use. Its currently the one in the 65 as the one I worked over for it is wrapped up on a shelf to protect the powder coating.
 
I need to do a support like yours when I swap out the K on my 67 wagon down the road. Have a spare 70 unit to use. Its currently the one in the 65 as the one I worked over for it is wrapped up on a shelf to protect the powder coating.
I got that one at everyone's favorite, Harbor Freight. Heavy, but definitely strong.

1000 lb. Capacity Engine Support Bar
 
Well, the left front strut rod wasn't the only thing bent... lower control arm was too. Managed to grab one in good shape reasonably locally for a decent price (thanks Rocket Restorations), and we're back in business. Also got out most of the new front suspension to admire, now of course it's in the way :lol:

Have to blast the control arms, and finish clean the K member, then fab the reinforcements and weld them in along with some seam welding. Paint everything and then back together it goes. Rear sway bar FINALLY arrived from Firm Feel... beautiful work but man it just shouldn't take 6-7 months to get one.

Can't wait to get this back together with a decent alignment and some performance tires and drive...

20240411_170355.jpg
20240407_150033.jpg
 
So this weekends fun was removing the upper A-arms, cleaning/painting the fenderwells, and installing the rear sway bar. I suspect the fenderwells have more paint on them now than they did from the factory. I have 3M undercoat on the way so I can retouch that too. Looking a bit nicer already though.

After A-arms removed and some scrubbing and pressure washing

20240413_164515.jpg


After scuffing with Scotchbrite and wax/grease remover.

20240414_135033.jpg


Paint done... this is oem color in a spray can from my local paint supplier

20240414_162212.jpg


Repainted the alignment hole covers too.

20240414_162529.jpg


Rear sway bar is a real PITA to snake past the exhaust and rear brake line. And yes, I did put in the frame bracket bolts later.

20240413_131915.jpg
20240413_131930.jpg
 
Today's progress, blasted, prepped, and painted the power steering mountings and pulley, and the shift rod.

20240419_182018.jpg
 
So, I found out about a great deal on some parts... and they came with a free car. Not even joking really, given the amount I paid for the parts, the car really was a freebee. Sometimes you find someone getting rid of stuff at firesale prices and you just have to go with it. I'll be making another thread about it once I start, which will be a while. Have to make more progress on the Coronet, and wrap up a couple other things first.

1971 Plymouth Satellite Sebring, originally a 318 car, currently has a '65 413 in it (odd choice). The hole in the hood is for a Cuda style shaker hood scoop, a brand new repro Shaker setup came with the car. Tons of other new parts, freshly rechromed bumpers, and a 489 case 8 3/4" rear axle. Open diff, but those aren't the easiest to find. Should work well in the Coronet with the hemi, with a limited slip installed.

20240426_121718.jpg
 
So I've been busy lately, I stripped the K-frame, made some reinforcements for the steering box/engine mounts/idler mount, and did some seam welding. Huge pain welding on the subframe edge, 50+ years of leaks getting between the layers made it pretty tough to get decent welds, despite multiple cleanings with the pressure washer/degreaser, wax/grease remover, brakleen (non-chlorinated), and acetone. Finally resorted to taking a torch and trying to burn the stuff out and re-cleaning with acetone, which didn't make much difference. I'm definitely a grinder not a welder... and all this didn't help, but it got it done and painted.

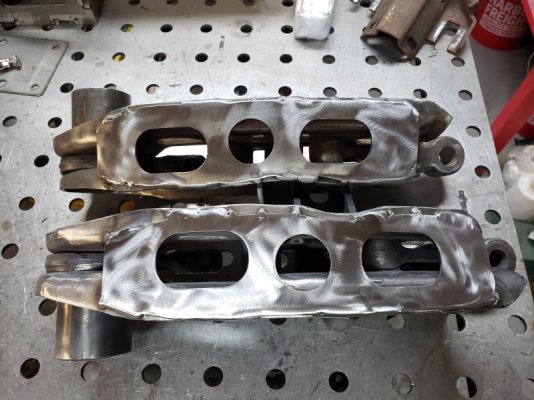
Today I got the remains of the inner bushings out of the lower arms, stripped them, and got the sway bar link mounts and reinforcements welded on. Since I was able to get these cleaner, the welding went much better. Tomorrow I'll get them blasted and painted.

20240520_185858.jpg
20240520_185833.jpg
20240522_181708.jpg
20240524_170107.jpg
20240524_171739.jpg
20240524_190206.jpg

And some days, it be like that...
20240524_181647.jpg
 
When I worked over the k that goes into my 65, I had it tanked twice and there was still crud hiding in there that showed up when I was doing my mass welding. I ended up getting the Victor Wrench out to burn the remainder from the back areas and crevices.
 
Auto Transport Service
Back
Top