• When you click on links to various merchants on this site and make a purchase, this can result in this site earning a commission. Affiliate programs and affiliations include, but are not limited to, the eBay Partner Network.

My 73 Roadrunner Project

anyone that messes with old cars is crazy.......

LOL. Keep wondering myself why I keep going back for more.

Don't know how I missed your thread, but you are doing an awesome job. What had to be done for the repaint? Hopefully just scuff and repaint. I say that like it is an easy job, but everybody here knows it is no fun.
 
250 seems more than fair to me. I'm doing my own and know what a pain in the azz it is.
 
LOL. Keep wondering myself why I keep going back for more.

Don't know how I missed your thread, but you are doing an awesome job. What had to be done for the repaint? Hopefully just scuff and repaint. I say that like it is an easy job, but everybody here knows it is no fun.

So, if you are meaning the second paint, not the first, yes, it was just a block out and repaint, this time 5 coats color and 3 clear. It should have not been necessary if the first guy would have done a respectable job, but that's another story. At least the car is back on track.

The engine should be back in a couple of weeks, the exhaust from TTI and reproduction rallye wheels are on the way. I still have lots to do before all that shows up, but hoping to fire up the car by sometime in August!!!!!

Yep, that's what I meant. It sure did turn out nice the 2nd. time around. Hope you didn't end up costing to much to have it redone, but at least it is done the right way now.
 
Awesome Build !!!!

Wow!!! Awesome build!!! Your car is looking great. Keep up the good work.

I just stumbled across this thread by accident. Glad I did.
 
250 seems more than fair to me. I'm doing my own and know what a pain in the azz it is.

I just finished doing one of mine and "pain is the azz" sums it up allright. That original anodized surface is terrible to get through. To anyone contemplating doing this job I have one bit of advice - strip that anodize off with Drano first. Of course that's a pain in the azz too....

...I had them do 3 sets, so maybe I am crazy!!!! hahahahahahaha

Now I know who has been kicking my azz on these bezels on eBay!!!!!!!!!!!!!!!!!!!!!!!!!
 
The trick to removing anodizing easily is to let your chemical -- Easy Off oven cleaner is my favorite -- soak on the entire part for just a few minutes and NEVER let it dry. Stand upwind, and use wire or needle nose pliers to suspend or hold the part; heavy gloves are also a good idea.

Shake the can thoroughly, spray it on the parts, let it soak for 3-5 minutes, and spray it again ... and keep shaking, spraying and soaking until you see a grayish / brownish film start to rise on top of the bubbles. It might take a half hour and quite a few shots but it works. When you start seeing a mainly white film again, rinse the part with cold water, blow it dry, and inspect it to make sure all the anodizing is gone. Then continue on with your resto efforts. :D
 
I keep oven cleaner in my work truck for lots of cleaning jobs and now I have another use
 
The trick to removing anodizing easily is to let your chemical -- Easy Off oven cleaner is my favorite -- soak on the entire part for just a few minutes and NEVER let it dry. Stand upwind, and use wire or needle nose pliers to suspend or hold the part; heavy gloves are also a good idea.

Shake the can thoroughly, spray it on the parts, let it soak for 3-5 minutes, and spray it again ... and keep shaking, spraying and soaking until you see a grayish / brownish film start to rise on top of the bubbles. It might take a half hour and quite a few shots but it works. When you start seeing a mainly white film again, rinse the part with cold water, blow it dry, and inspect it to make sure all the anodizing is gone. Then continue on with your resto efforts. :D

I wish you would have said something before I went through all that sanding on my headlight bezels. LOL
 
Great looking '73 RR. Coming along real nice. Second paint job looks fantastic. Headlight bezels and bumpers are shiiiiiny also. What are you doing about the rear bumper filler rubber? Do you have the original parts or did you find some somewhere, or are you not putting them back?
 
Great looking '73 RR. Coming along real nice. Second paint job looks fantastic. Headlight bezels and bumpers are shiiiiiny also. What are you doing about the rear bumper filler rubber? Do you have the original parts or did you find some somewhere, or are you not putting them back?
I don't have any to put back, the originals were totally destroyed, but Dave from Restoration Specialties is doing another run of the center section, hopefully available in a couple of weeks and may have re-production ends by sometime this fall, which would be great. Keeping fingers crossed.
 
These are just polished, not anodized or clear coated, that would dull the finish.

Most respectfully, maybe your polish source told you that to keep you coming back. There are definitely options that preserve the shine and protect with zero dulling. The bezels were originally "bright dip anodized". The process is still done. Search on Google and you'll find info and pics.
Also, "PVD chrome" is really just vacuum deposited aluminum. It is every bit as shiny and reflective as chrome - but it oxidizes quickly if not protected. When they make the PVD chrome wheels they are clear powder topcoated.
https://detroitwheelandtire.com/pvd-what/
PVD chrome over plastic cannot be clear powder coated due to the temperatures involved. Instead a clear urethane (e.g. PPG DAU-75 urethane with DXR-80 hardener) is used. All three of these options would work on your polished aluminum and you would not lose any of the shine.

The trick to removing anodizing easily is to let your chemical -- Easy Off oven cleaner is my favorite -- soak on the entire part for just a few minutes and NEVER let it dry.....

Excellent tutorial - Good Job!

I don't have any to put back, the originals were totally destroyed, but Dave from Restoration Specialties is doing another run of the center section, hopefully available in a couple of weeks and may have re-production ends by sometime this fall, which would be great. Keeping fingers crossed.

I was able to save my end fillers but had to remake the center one. Here is how I did it.
http://www.muskie-lures.com/73roadrunner/73_road_runner_rear_bumper_center_trim.htm

I am really enjoying this thread and admire your work. I have to say that I've never yet seen anyone restore a 73/74 RR to the level you are. I'm sure it's going to be a stunning car when you are done. Are you planning to keep it?
 
Hey KB73RR,
Regarding your comments, and not to reply with a quote to a quote to a quote, hahahahahah, I was planning on looking into some options to preserve the shine and luster of the bezels, I am a rookie with a lot of this stuff so I appreciate the feedback. I don't think the chrome shop is trying to keep me coming back as they did recommend some polishes that can be used by hand to keep them bare and keep the shine.

Regarding the center bumper filler, I have read the link you provided, and while that would work, I am going to see what Restoration specialties will have here in a few weeks.

Yes, I am planning on keeping the car, I have owned it for 30 years, and this is why I am doing such a high level of restoration, its not a flipper, but part of the family now!
 
kb73rr, there are constant developments, new technology and progress in the powder industry (which most people don't realize has been around for almost five decades now). These days they have low-temp powders designed strictly for plastic, wood, mdf, and even a portable system for swimming pool interiors that cures in the sun! Here's a little light reading for those interested in the process ...

http://www.pcimag.com/articles/print/97453-the-future-of-industrial-coatings
 
On to something else.

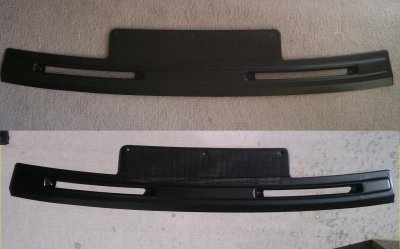
Just wanted to share some shots of what the paint on my dash looks like and finally able to successfully get the Lacquer to lay down properly with correct texture and look.

Here is the dash grill shown indoors(look kind of like basic trim black) and in the direct sun (whoa, whats going on there!).
dash paint comp.jpg

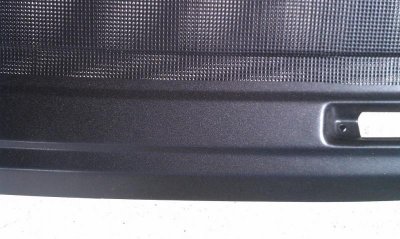
Here is a close-up in the direct sun, you can really see the metallic now and one of the reasons I wanted to go with original paint recipe and why I love this paint, because the black is black, and the metallic really makes it unique and away from the ordinary basic black look.
IMAG1595small.jpg
 
kb73rr, there are constant developments.... Here's a little light reading for those interested in the process ...
http://www.pcimag.com/articles/print/97453-the-future-of-industrial-coatings

Thank you, that was most enlightening. Learn something new every day. I also checked your business site. The six layer valve covers was amazing. I showed it to a guy here at work who has had all kinds of powdercoating done on his car. He swore up and down before that two-color powdercoating never looks really good. He was blown away by your work.

Yes, I am planning on keeping the car, I have owned it for 30 years, and this is why I am doing such a high level of restoration, its not a flipper, but part of the family now!

Excellent. It seemed you were working at it way too hard just to sell it. It's going to be one very sweet car when you are done.
 
Auto Transport Service
Back
Top