• When you click on links to various merchants on this site and make a purchase, this can result in this site earning a commission. Affiliate programs and affiliations include, but are not limited to, the eBay Partner Network.

Project Rat Rod V code 70 Charger R/T is about to begin.

The next thing I have to do is find a pair of 70 lower control arms, with the sway bar tabs. Then I will press out the bushings, sand blast them,then I have some 1/8 steel and I will box the control arms. After that I will install the new bushings and paint them in a mix of gold and green that I use to simulate the factory cosmoline coating, with the ball joint ends of the control painted silver to simulate them being dipped in cosmoline.
 
I dug out the new inner and outer tie rod ends and adjustment sleeves,so I can paint them. I also have some other parts,like sway bar links and brake hoses,that I want to clear coat to preserve the finish of the plating on them.
 
Hey Pete....
If you make mistakes and have to do stuff over, is it fair to call you RePete?

:bananadance:
 
I got started on painting the tie rod assembly and clear coating some of the plated pieces to preserve the plating on them.
20201203_100557.jpg
20201203_100602.jpg
20201203_100609.jpg
20201203_100837.jpg
 
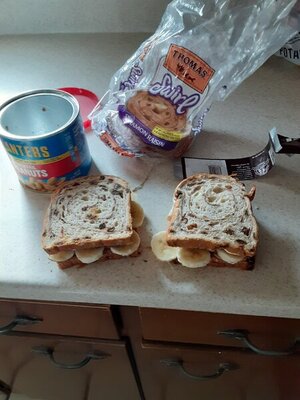
I made the ultimate peanut butter and nana sammich for breakfast today. Two slices of bread, Jif peanut butter, Planters peanuts, banana slices, marshmallow fluffernutter,and mini marshmallows! Elvis has nothing on me!View attachment 1032871
Where’s the Hershey chocolate bar Pete? :wtf:
Seriously though...That’s disgusting :rofl:
 
It's a slow process,but I feel like I am making progress! The Road Runner convertible needed more work than I anticipated,but it will be worth it!
 
My plan was to borrow the lower control arms from the Road Runner convertible,and then swap them out on the Charger,and recondition the Charger ones for the Road Runner convertible,but one of the Road Runner lower control arms has some nasty welding on it,so I went up to my loft and started digging for one,and in too good to be true form,I found one in less than a minute,but of course it was the same side I already have! Oh well,I need to get a flashlight and dig deeper!
 
I went up in the loft,and after about a half hour of digging,I found the right 70 control arm,with the sway bar mounting tab on it! I put it on the floor,and noticed the end where the ball joint goes was bent,so back to square one! Oh well. I guess I will take the ones out of the car and recondition them. So much for the two hour front end rebuild! On another note I needed shock mount plates for another car,and I found a left one a couple weeks ago,so while I was looking for control arms I found another one,and as my luck is going today,you guessed it,another left shock plate!
 
20201205_101511.jpg
20201205_101517.jpg
Well I got my one good control arm blasted,and ready to etch prime and paint. Then I can install the new bushing and ball joint. There is an amazing amount of detail in the control arms that gets covered up by 50 years of rust and grime!
 
Where’s the Hershey chocolate bar Pete? :wtf:
Seriously though...That’s disgusting :rofl:
Well Tom,I am never one to back down from a challenge, so it's official, the ultimate Peanut butter and nana sammich has been achieved! Two slices of cinnamon raisin swirl bread,Jif Peanut butter, Planters peanuts, Marshmallow Fluffernutter over a bed of mini marshmallows, sliced bananas, and the pias de reststance,one Hershey's chocolate bar! I think I might need insulin after eating two of them! But atleast I washed them down with a diet Pepsi! Breakfast of Champions! Really I mean look what happened to Bruce Jenner with those Wheaties! Lol!
20201207_102456.jpg
20201207_102526.jpg
 
Today I had to fix the exhaust system on my daughter's Jeep, so after laying on the ground out in the cold for two hours, I wasn't feeling much like getting back into cutting up the floor pans in the 70 Road Runner convertible project car, so I decided to swap out the trunk lid on the 70 Charger R/T. As I said a few pages back in this thread, I had a clean 70 trunk lid that already had the holes drilled out for a go wing, so I painted the lid to match the flat white primer on the rest of the car, and painted the go wing with the same burnt copper color that I used on the wheels. I think it will look good with the burnt orange interior and side stripes. So I swapped out the trunk lids today. By doing this, the 70 purple Charger R/T that is going to be a Daytona clone will get the trunk lid that came from the white Charger, and my sunroof 69 Charger R/T SE will get the trunk lid from the purple car. The purple cars lid is also a nice California piece, but it doesn't have the go wing cut outside in the inner structure, so it will work great on the 69 Charger. So by swapping out one lid,the other two Chargers get a trunk lid upgrade!
 
Well I started working on my one good lower control arm today. I was able to knock out the mounting bolt with a small chisel and a hammer. When you use the urethane lower control arm bushings, it is necessary to keep the inner sleeve and outer cup of the original bushings, and press the urethane bushings into the spot where the rubber went on the original bushings. I cleaned up the inner sleeve and the outer cup with some Emery cloth and they are ready to receive the new urethane bushings.
20201208_071712.jpg
20201208_072814.jpg
 
Today my friend called me and told me that my 18 spline 4 speed transmission is all done for the car. He said that it was in overall really good shape, and he just had to replace a few minor normal wear parts, and freshen it with new bearings and gaskets. I will pick it up on Friday. I was in the loft looking for another part,so I snapped a picture of the bent right control arm that I found the other day. I guess I will have to hunt one down if I want to have everything ready for the front end rebuilding session!
20201208_194444.jpg
 
The next thing I want to do is install my pair of 70 B body painted racing mirrors on the car,I plan to do it over the weekend. I already painted them to match the car, I just have to remember where I put them. They are in the garage somewhere! Lol
 
Well I started working on my one good lower control arm today. I was able to knock out the mounting bolt with a small chisel and a hammer. When you use the urethane lower control arm bushings, it is necessary to keep the inner sleeve and outer cup of the original bushings, and press the urethane bushings into the spot where the rubber went on the original bushings. I cleaned up the inner sleeve and the outer cup with some Emery cloth and they are ready to receive the new urethane bushings. View attachment 1037229 View attachment 1037233
I have the urethane bushings, can you post how you remove and install the new ones please.
 
The urethane bushings that came in the kit I have,do not have any steel sleeves or outer steel cups,so you have to remove the original rubber bushings,and re use the original inner sleeves,and outer cups. Sometimes you can press the bolt out from the side where the tortion bar goes,other times I use a propane torch and melt the rubber bushing out.
 
Auto Transport Service
Back
Top