• When you click on links to various merchants on this site and make a purchase, this can result in this site earning a commission. Affiliate programs and affiliations include, but are not limited to, the eBay Partner Network.

Rust revival

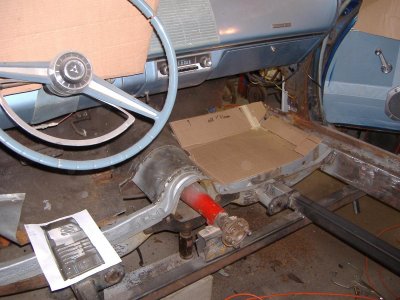
Carrying on I moved to the right front floor.
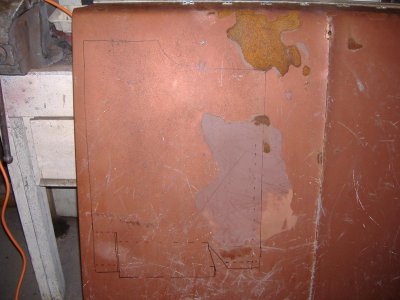
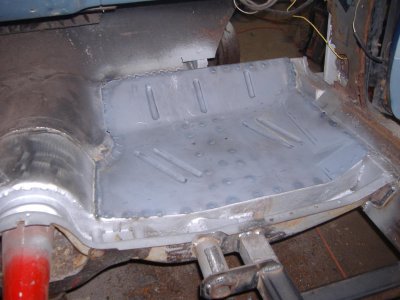
Repaired the forward section of the trans hump to the crossmember first, then made a cardboard template of the new floor panel.
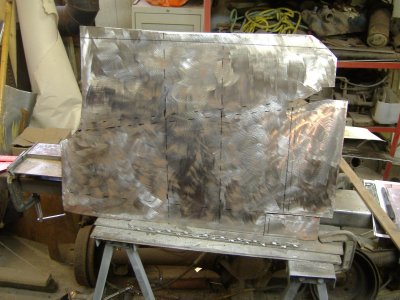
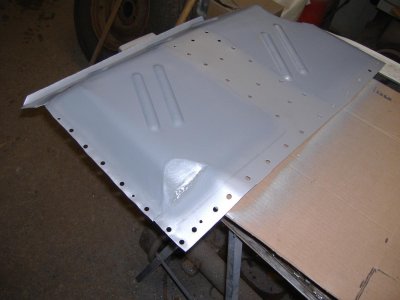
Drew it out on the Belvedere hood and cut it out/cleaned it up.
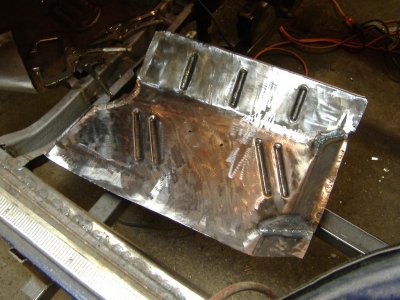
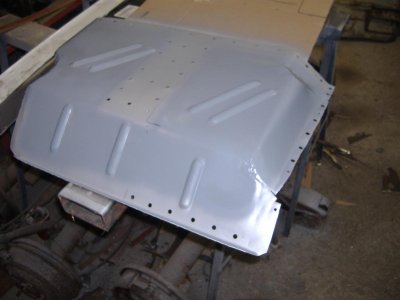
Trimmed it to fit and then hammered in the beads.
I was thinking on using the later style bead layout like the picture placed on the crossmember but eventually decided to freehand it to look a bit more like the 63 style pattern.
I'll holesaw some drain holes later so I can add the factory rubber plugs.
I stopped the floor at the front edge of the crossmember as I needed to add some length to the donor middle floor section and the exact distance wasn't finalized yet.
By hiding the seam in the crossmember it won't be visible from under the car. :)
Drilled the spotweld holes, primed the center and weldthru primed the edges, ALMOST fully welded in...(ran outta gas! LoL)
 

Attachments

  • excess pics 289.jpg
    excess pics 289.jpg
    149.8 KB · Views: 743
  • excess pics 290.jpg
    excess pics 290.jpg
    129.1 KB · Views: 750
  • excess pics 294.jpg
    excess pics 294.jpg
    145.4 KB · Views: 738
  • excess pics 298.jpg
    excess pics 298.jpg
    168.6 KB · Views: 732
  • excess pics 302.jpg
    excess pics 302.jpg
    141.7 KB · Views: 720
  • 004.jpg
    004.jpg
    112.8 KB · Views: 759
  • 003.jpg
    003.jpg
    106.5 KB · Views: 758
  • 002.jpg
    002.jpg
    81.8 KB · Views: 758
  • 001.jpg
    001.jpg
    65.5 KB · Views: 763
Your work is amazing. Keep posting the progress.
 
Drivers side wasn't as bad around the cowl area thankfully, but still needed a full pan and the rail brace replaced.
Same ol' cardboard pattern but had to add some size as the drivers floor is a small bit wider.
 

Attachments

  • 008.jpg
    008.jpg
    143.8 KB · Views: 711
  • 007.jpg
    007.jpg
    147.9 KB · Views: 709
  • 006.jpg
    006.jpg
    147.6 KB · Views: 714
  • 004.jpg
    004.jpg
    176.8 KB · Views: 720
  • 001.jpg
    001.jpg
    170.4 KB · Views: 721
  • 009.jpg
    009.jpg
    195.5 KB · Views: 726
Trimmed it out and fitted it.
Primed and installed...
 

Attachments

  • 008.jpg
    008.jpg
    90.2 KB · Views: 706
  • 007.jpg
    007.jpg
    76.6 KB · Views: 702
  • 006.jpg
    006.jpg
    158.6 KB · Views: 707
  • 004.jpg
    004.jpg
    144.3 KB · Views: 709
  • 003.jpg
    003.jpg
    132.4 KB · Views: 712
  • 010.jpg
    010.jpg
    155.4 KB · Views: 716
A little farther along I fit the donor center floor sections from the 67 Bel and decided to add sections to the front floor pan to fill the gap.
I could have added the length to the donor floor but decided it would be a little too hard to control the shape and fit.
Basicly what I'm doing is creating a new flange area that will look like the factory flange area at the back floor.
Makes the fitting of the donor floor much easier and also should have any Mopar guys scratching their heads even more when they look under and see the joint.
"Hey....mine isn't like that!?!?" LoL

I moved the donor floor section back 3" and also the seat mounts.
With the stock seat location I found it was just a little close to the wheel, so moving back 3" will obviously fix that AND gave me the ability to regain the missing 3" difference there seems to be between Plymouth and Dodge.
I'm guessing the extra length was in the rear floor section but putting it in the front worked better for me.
I'm using a Caddy split-bench up front so the required custom brackets will let me mount the seat wherever I need it anyway.

Anywho...enough typing...heres a few pics. :D
 

Attachments

  • 005.jpg
    005.jpg
    180.4 KB · Views: 714
  • 004.jpg
    004.jpg
    175.6 KB · Views: 714
  • 003.jpg
    003.jpg
    140.1 KB · Views: 711
  • 002.jpg
    002.jpg
    151.2 KB · Views: 702
  • 001.jpg
    001.jpg
    143.2 KB · Views: 709
  • 006.jpg
    006.jpg
    148.2 KB · Views: 701
  • 010.jpg
    010.jpg
    105.5 KB · Views: 741
  • 013.jpg
    013.jpg
    174 KB · Views: 700
Welded in and a pic from down under.
 

Attachments

  • 006.jpg
    006.jpg
    104.8 KB · Views: 689
  • 003.jpg
    003.jpg
    150.3 KB · Views: 684
  • 004.jpg
    004.jpg
    168.3 KB · Views: 698
Great work! Thanks for posting a pic of your chisel tool for making beads! Just awesome!
 
Glad to see another one getting saved from the boneyard. I think mine was in the same shape as yours. Takes a lot of time and money, most people would just part out and junk the rest. Keep up the good work and don't stop. Your saving a piece of history there. Good luck
 
Oh kayyy...back to posting updates.
Been busy for the last while but I'm fitting it all in when I can. :)

Made up the section to extend the hump and welded it in.
Had the seat brackets shot blasted and repaired the bad spots, then fitted the floor temporarily to align them to the inner rockers.
Got them welded in too.

Cleaned up the donor floors with a knotted wire wheel and replaced the weak sections for either side.

Bolted them down to the seat brackets and made the corner pieces to finish off the repaired sections.
 

Attachments

  • 010.jpg
    010.jpg
    128.8 KB · Views: 645
  • 006.jpg
    006.jpg
    138.6 KB · Views: 654
  • 004.jpg
    004.jpg
    161.7 KB · Views: 639
  • 003.jpg
    003.jpg
    118.2 KB · Views: 643
  • 012.jpg
    012.jpg
    145.2 KB · Views: 651
  • 014.jpg
    014.jpg
    142.3 KB · Views: 638
  • 015.jpg
    015.jpg
    120 KB · Views: 639
  • 018.jpg
    018.jpg
    140.9 KB · Views: 644
...and the rest of the pics. :)
 

Attachments

  • 015.jpg
    015.jpg
    63.6 KB · Views: 635
  • 013.jpg
    013.jpg
    103.1 KB · Views: 652
  • 010.jpg
    010.jpg
    111.3 KB · Views: 653
  • 005.jpg
    005.jpg
    110.3 KB · Views: 636
  • 002.jpg
    002.jpg
    65.9 KB · Views: 654
  • 016.jpg
    016.jpg
    152.8 KB · Views: 637
  • 019.jpg
    019.jpg
    144.8 KB · Views: 655
Man, your metal work skills are pretty sick...with all you are doing to this, and all you are clearly capable of, why not just make it a 2 door? Or start with a two door that needs all the same work?

Tommy
 
Your a monster brother!!! Goodness gracious the amount of fab work on that is crazy!! keep it up!
 
Man, your metal work skills are pretty sick...with all you are doing to this, and all you are clearly capable of, why not just make it a 2 door? Or start with a two door that needs all the same work?

Tommy

Thanks man....Theres a 50/50 chance this will get a 2 door conversion eventually if i can find the parts...or even an extra set of 4 door front doors that I can stretch out and finish off BEFORE cutting on the car at all.
I'm not going to do it unless I have all my ducks in a row first!
4 doors are a plus at times though.

I could have found a different, more popular Mopar I guess, but this one was lying neglected for a long time and I always felt a bit bad about it.
I was watching it with no real interest in actually buying it for a couple of years.

One day I discovered that it had been pushed down into the grass behind the owners garage and I finally decided I had to act now or she was a goner.
I just got it in my head that this could be a cool though slightly oddball family beater and there was no one else to save it.
2 days later it was mine.
I'm a sucker for the beat-down underdog I guess. :)

Maybe thats a good name for it.
Project Underdog! LoL :D
 
Very nice, that is going to be one stout car when you are done.
 
The car is coming along quickly and looking great to boot!

IMO 4 doors need Lovin' too!

Great work; you will be driving it soon!
 
Auto Transport Service
Back
Top