Follow along with the video below to see how to install our site as a web app on your home screen.
Note: This feature may not be available in some browsers.
When you click on links to various merchants on this site and make a purchase, this can result in this site earning a commission. Affiliate programs and affiliations include, but are not limited to, the eBay Partner Network.
Thanks for the comments on the vacation pics and you are correct Matt. It was truly an amazing vacation. Now that I’m back to reality I was able to get my right rocker fully installed this weekend. Ended up replacing eh door jamb with one from a parts car I had due to the crappy body work of others. Sorry if I’m a broken record on the previous people’s body work but they did more damage than the rust did… :laughing6: A little more grinding to do but nice to have a solid straight right rocker. Hoping to start on the left side this week now that the weather is cooling of a bit here in SE MI. Only have to replace the front inner rocker and the door jamb on the left.
My 68 is in pieces also... ( not as many as yours) I love watching your progress. Hopefully i will be able to get some metal welded in mine over the next couple months. Need to do the Roof, trunk pans, driver side floorpan, passenger fender patches, driver side fender... oh, and maybe replace the front valance... unless I can somehow straigten it (got to love tow hooks! idiot tow-truck driver)
Thanks for the comments all. If you actually saw the quality of my welds you might change your mind about my skill level. :thinker: Getting better as a I go though. This week I finished removing the remnants of the torsion bar cross member, left door jamb (yup more work due to bad previous body work), and the left front inner rocker. Since there was a mouse nest in the right rocker of course there is one in the left. No mouse remains in this one. Looking for a new door jamb since the one from my parts car I saved is all rotten at the bottom (discovered after I cut it from the car). So I’m on a bit of a hold. Oh well, luckily the big Woodward Dream Cruise is next Saturday and it is at the end of my block. Many motorized distraction for the next week and I see little to no progress happing.
I've been using a Clarke WE 6523 gas / no gas with .030" fluxcore wire in the no gas mode. I picked it up on craig's list for a decent price. Stay away form the harbor frieght crap. Good tools = good results. My suggestion is to get some metal of similar thickness as to you will be welding and practice. Going slow helps. I found an auto dimming welding helmit is very benificial.
Good to know you have a quality welder HRDCHGR. I’ve been using a flat stiff paint scrapper (thick putty knife) to scrape of the flack. I’m using original metal where I can find it and AMD for the rest.
Progress is looking good! Now I know why I can't ever find any welding/jig vise grips at Menards. You bought'em all! Question for ya, I also put AMD outer rockers on my roadrunner. Sectioned in a couple feet on one side and a majority of the other. On your new AMD rockers, the area that takes a step down from the jam and transitions under the door on the outside have a 90* angle? My factory rockers did, but the AMD was more like 95*. Played Havoc on matching old/new sections and trying to get a decent door gap on the bottom.
As far as welding, MIG would be the best bet, but if fluxcore is what you got..it will work. You guys probably already know, but you can pick up anti-spatter in a aerosol can which will help a lot. IMO, you're able to achive a more appealing weld than flux-core with MIG. TIG is the cats meow if you're up to that level.
Thanks for the comments Propwash. I think I left a few clamps in the bin when I bought them…. As to the fit of the outer rocker I found it fit pretty good. I took some comparative measurements to the old one and they were pretty close from what I could tell but my old rocker was in pretty bad shape. I did find that the side facing the inner rocker was a larger dim than the original. This gave me some trouble in trying to install the brackets on the inside of the rocker. The inner rocker was a little taller than the original. Will need to trim about 1/8” off the height. Since I replace the whole outer rocker I didn’t have any match-up issues. I have to do some patching on my left outer rocker but I’ll be using original metal from a parts car for that.
As to the welding, my welder has a gas set-up but I’ve never used it or done that kind of welding before. Guess I’ll have to hook it up and do some practice runs to see the difference. I presume the gas allows the weld to flow better? Thanks for the tip on the anti-splatter spray. I’ll try that.
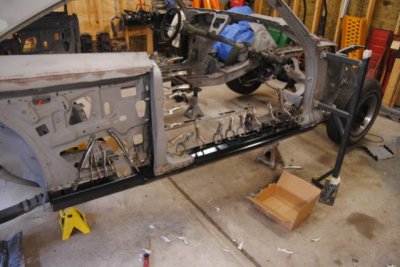
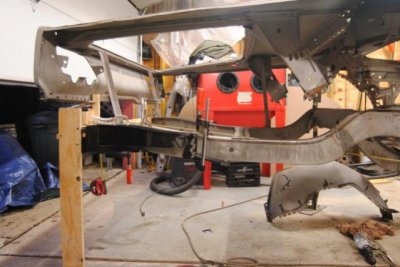
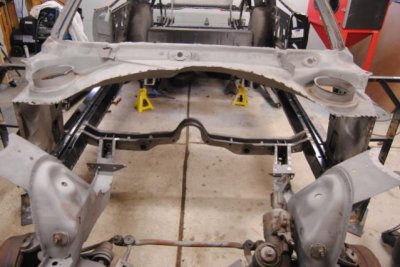
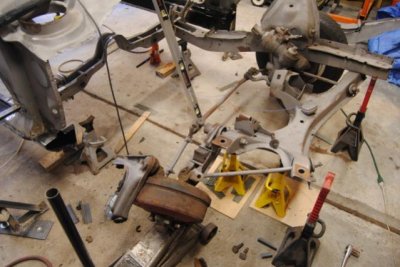
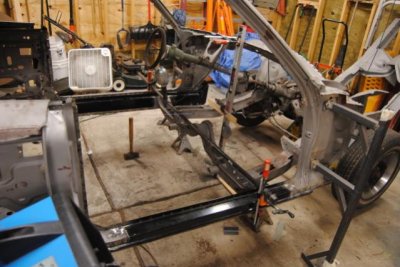
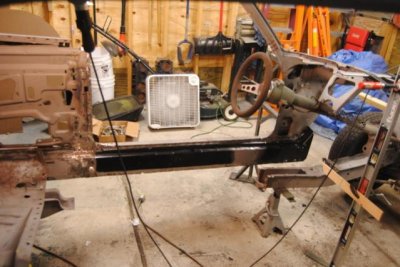
Thanks for the comments. Busy on the R/T recently. Replaced inner rocker and patched the outer rocker on the left side. Replaced the left door jamb. Installed the torsion bar cross member. Replaced both front frame rails. Removed back seat floor pan and both inner wheel wells. Partial replaced the right rear frame rail and replacement of the right rear spring mount. So just minor progress… :grin: Working on the partial replacement of the left rear frame rail and replacement of the left rear spring mount. Donny that measurement diagram has been really helpful!!! Thanks again! After the rear frame work is done I’ll be putting the rear end back in it, put the wheels back on it, and roll it outside for some sandblasting touch up since the car has been bare metal for 3 months now. After the touch up I’ll hit it with the DP90 epoxy primer before it cools off too much to paint. Then I’ll start working on the sheet metal for the fire wall, inner fenders, and radiator frame. Enjoy the pics!
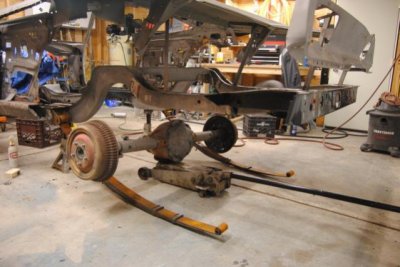
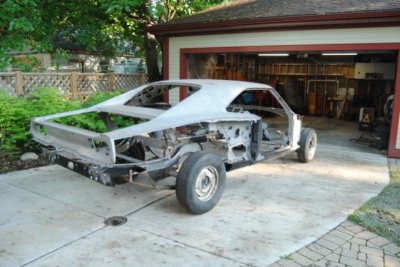
Thanks for the comments. Sometimes the faith is all that is getting me thru on this project.:th_krazy: Well after about 3 months on jack stands my R/T is standing on its own 4 tires!!! I finished up the frame work, installed the rear cross member, reinstalled the rear suspension, put the tires on, and did a looooooooooot of grinding since my last post. A few misc things to install before, weather permitting, I’ll do touch-up sand blasting. DP90 primer after that. Enjoy the pics.
Amazing! I sadly have not even touched mine in the past month. I will not be dismantling the entire body like you have though. I plan on using a lot of encapsulator and ospho for the light surface rust.
as for the holes.... on my roof, I don't know If I will be brave enough to cut that out and tack in a skin.
I have been practicing welding for the last month and feel ok about it, but not 100% confident.
Also have holes in the trunk floor pan, was thinking of laying down some of that MarineTex product (or AllMetal Filler) and sealing it up.