• When you click on links to various merchants on this site and make a purchase, this can result in this site earning a commission. Affiliate programs and affiliations include, but are not limited to, the eBay Partner Network.

Taking Up New Residence

Started on my driveshaft. I'll continue tomorrow outside. That coating is about 50mm thick. Cleans off easily with a Scotch Brite. Looks like chromoly?
20170904_181251.jpg
 
Looks nice and will be worth the effort!
Protect your lungs though, that's some nasty stuff that's better on the outside than in.
 
Looks nice and will be worth the effort!
Protect your lungs though, that's some nasty stuff that's better on the outside than in.

I'm going to try some gas on it tomorrow, to see how that takes it off. I know, no smoking!
smiley-dance004.gif
 
Last edited:
Heat gun, propane torch or jell paint stripper, it's messy, got to let soak in.

I've done the front section of the underside and the rear portion where the gas tank sits, with a heat gun. That really worked great, just don't let any drop into your long sleeve shirt like I did. Taught myself a couple of new cuss words!
 
Ordered a different set of drums for the front. They are more expensive but are the ones listed for the front. Napa part #440-1056.

I was trying to use the same drums that I had used on the rear but the center hole was bigger and it wasn't a perfect fit for the front hubs. These fit tight. Only a couple of mm difference but these are what you need to use for a good fit. I don't know why the front hubs are just a tick smaller than the rear but they are.
20170905_180631.jpg


The dust caps that I received were .030 larger than the originals and wouldn't even start into the hub. Chinese junk! So I ended up useing the old ones, just knocked out the dents the best that I could and polished them up.

The tire shop called me at 9:00am and told me my tires were in. She's taking on a new attitude!
20170905_184417.jpg

20170905_184525.jpg


Tomorrow I'll try to get back to the drive shaft.
 
Don't know if you covered this yet; but what brand, style and size tires did you go with?

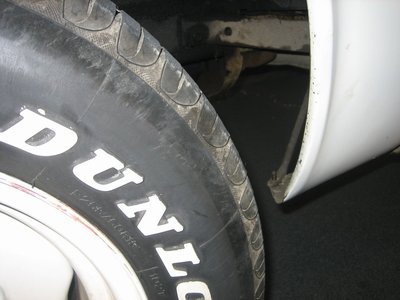
Cooper Cobras

225/70/15 on 7"w 4 1/4" BS (fronts)

275/60/15 on 8"w 4 1/2" BS (rears)

The fronts run real close to the front of the wheel well opening when the wheel is turned inward but should be ok. Passenger side is closer than driver side. I'll probably massage that a little so it doesn't grab.
20170905_183111.jpg


Wheels turned straight.
20170905_111452.jpg


The driver side on the rear has a good 1/2" clearance from the leaf spring. Passenger side only a 1/4", should be ok but one of the spring clamps is really close. That will need some attention.
20170905_111420.jpg
 
Ah yes the front fender clearance issue. I run 255/60/15 all the way around. The front tire bit all the time! I trimmed that corner of the fender and no more worries. No factory race car here, so I had no problem cutting the fenders. You can't even tell.

Fender Trimming 002.jpg
 
:thumbsup: Moon Caps or leaving as is?
 
I'm trying to remember,,, I got a set of chrome dust caps at Autozone for the 64 that I think were Mr. Gasket. Fit great.

IMG_0176.jpg
 
:thumbsup: Moon Caps or leaving as is?

As is. I want it to look like it's coming down the return lane!

I'm trying to remember,,, I got a set of chrome dust caps at Autozone for the 64 that I think were Mr. Gasket. Fit great.

View attachment 511321

Thanks Darter. I ordered the correct size, I believe there are two sizes. It's a big difference between the two so you can't go wrong. These are just out of tolerance.

I'll check into Mr Gaskets.
 
Working on the drive shaft.

Removed rear universal joint. (I'll go into this more when I install the new one)
20170906_122301.jpg


Cleaned it up useing my 90* die grinder and a medium Scotch Brite. Penetrating oil, parts cleaner, gas, wouldn't touch it!
20170906_160102.jpg


Ready to replace the torn rubber boot. Remove the clamps and cut the old one off with a razor.
20170906_160141.jpg

20170906_161204.jpg


Then carefully remove the cover by prying the tabs open just enough to get it off.
20170906_162011.jpg


Carefully slide the housing back and don't let the joints with needle bearings fall off. Now I cleaned it up a bit so you can see what's what.
20170906_162450.jpg


I marked one side and that same side of the housing to keep parts where they were.
20170906_163251.jpg


Remove the slides. You will find a small spring washer behind each one.
20170906_163804.jpg


I used a vacuum cap with a smaller one inside of it to get the right size to hold the needles in place while I remove the joints. Then I made note to which one goes where. These look good and the pin doesn't show any wear. If they did I would be buying the whole rebuild kit.
20170906_164718.jpg

20170906_165054.jpg
 
Auto Transport Service
Back
Top