My 67 coronet gas gauge doesnt work at all, my 70 coronet gas gauge was working, filled it up, and has been stuck on full ever since. My 71 Road Runner gas gauge works, but doesn't line up. Full tank pegs the gauge to the right, 1/2 tank shows full, and empty shows 1/2 tank. I have just been topping them off everytime I go a ride.
You are using an out of date browser. It may not display this or other websites correctly.
You should upgrade or use an alternative browser.
You should upgrade or use an alternative browser.
What modifications for your car have you kept putting off ?
- Thread starter Kern Dog
- Start date
- Local time
- 11:00 AM
- Joined
- Jan 29, 2018
- Messages
- 22,925
- Reaction score
- 82,958
- Location
- Midland Ontario, Canada
Finding the time and energy to put the Superbird back together...
cr8crshr
Well-Known Member
- Local time
- 8:00 AM
- Joined
- Feb 13, 2009
- Messages
- 7,460
- Reaction score
- 14,050
- Location
- Northwest Nevada
When I had my 66 Ply Sat, I wanted to upgrade the steering using the Burgman/Borgeson steering upgrade as the original did work after refreshing it but was still sloppy most of the time. The new owner did improve it after I had sold it and it is now down under in Kiwi land. But I never got around to it so there ya go!!!cr8crshr/Bill


Home - Bergman Auto Craft - Home of Quality Muscle Car Parts


Home - Bergman Auto Craft - Home of Quality Muscle Car Parts
David Womby
Well-Known Member
Fitting electric power steering in place of current unassisted steering column. I have the unit on the bench. I just keep finding little jobs to do to avoid tackling it.
David
David
GetX'd
Making Life Great Again!
- Local time
- 8:00 AM
- Joined
- Jul 20, 2014
- Messages
- 11,896
- Reaction score
- 13,143
- Location
- Laguna Beach, CA
It’s like when your wife emits a child. “Ok I’ve got that out of the way - Check the box”. Ha ha not by a long shot pal. Now that you’ve retired there will be endless big and little things you’ll find need doing. They’re never ”done” … But we know you’ve already discovered that. The gift that keeps on giving (and taking ($))Awhile back when I posted my ( I am retired ) thread I said something about my 67 was done.
You guys called me on that one lol.
I'm going to mini tub that sucker this winter.
- Local time
- 8:00 AM
- Joined
- Apr 13, 2012
- Messages
- 40,913
- Reaction score
- 153,492
- Location
- Granite Bay CA
What is that?The metermatch I've had since the springtime. And until recently the Borgeson steering box was on the list too.
Edelbrock intake, and Holey carb for my Challenger. I have an Oval air cleaner to mod, to fit under the hood clearance. Had it for years, but wanted the car to make 50yrs in stock trim...
I also have a 3:55 diff I was going to swap out the 3:23's...

I also have a 3:55 diff I was going to swap out the 3:23's...
Last edited:
- Local time
- 8:00 AM
- Joined
- Apr 13, 2012
- Messages
- 40,913
- Reaction score
- 153,492
- Location
- Granite Bay CA
I've wanted to switch to those factory racing mirrors that came either chrome or painted. They were more common on A bodies and were first available mid 1970 model year.


funknut
Well-Known Member
I have lowering blocks and u-bolts bought, just haven't installed them.
I need to find a different distributor to get more vac. advance.
Still haven't finished installing/wiring the heater controls.
I've burned #5 plug wire a couple times, need to do something about that.
Oh, and new mufflers.
Kind of hit a wall with the tinkering and have just been enjoying driving it now that it's reliable enough to jump in and fire it up.
I'm sure with winter around the corner I'll find time to poke at it a bit more.
luvabbody
Member
It's not a B body but I'm thinking a cat back system for my SRT-10 pickup.


- Local time
- 11:00 AM
- Joined
- Aug 23, 2011
- Messages
- 4,538
- Reaction score
- 11,553
- Location
- Eastampton, NJ
Pay my way to and from Hawaii, and I’ll give and install my Metermatch kit and fix your non-working gas gauge.My 67 coronet gas gauge doesnt work at all, my 70 coronet gas gauge was working, filled it up, and has been stuck on full ever since. My 71 Road Runner gas gauge works, but doesn't line up. Full tank pegs the gauge to the right, 1/2 tank shows full, and empty shows 1/2 tank. I have just been topping them off everytime I go a ride.


- Local time
- 9:00 AM
- Joined
- Feb 22, 2021
- Messages
- 3,487
- Reaction score
- 7,295
- Location
- Roswell, New Mexico
- Local time
- 8:00 AM
- Joined
- Jan 16, 2011
- Messages
- 75,692
- Reaction score
- 118,407
- Location
- NorCal Sierras
#1 Dash wiring & gauges, new fuse box, I keep putting it off


#2 my custom headers build, new Milodon oil pan, keep putting it off
freaken' bolt in rack & pinion was a bad choice, done now no going back
I love how it drives
BUT;
for performance exhaust systems, headers/oil pans options are extremely limited
& pricey
combine this stuff 1-7/8" to 2" stepped to the collectors, as close to equal lengths as possible

using these to start with, be making it like a 63 S/S style iron manifolds,
header probably up & swept up & back, then down the firewall into the existing 3" exhaust

these Heddman Shorty headers, go right into the rack, I will flip them upside down,
I'll cut them down severely
& merge in the 1-7/8" u-bends upswept, then down into 2" into 4-2-1 collectors

4-2-1 collectors scavenging style

these (4-2-1 collector & extensions) part, will be cut shorter to fit the car, flared & fit

fit it all in this space (drivers' side is the issue) & make something simular for the other side (Pass Side)
the org. now semi ported org. HP manifolds, are choking it down really, realy bad

final product 'sort of like these' (below) heavy bastards 70#s,
that don't really fit a 68-70 B-body
but with much longer tubes & scavenger collectors

done it all on many cars before
getting older (I'm 64 now) I don't care as much I assume
used to do stuff as soon as it arrived, not wait ever
Now busy with other stuff, dad's health & constant dr. visits don't help
or flat out procrastination, more like
it's gonna be a total PITA is why
under dash is a PITA, especially since someone else has been in there
& the tight fits/cuts, burns & bruises, working in the engine compartment
then there's the house deck needs some repairs & stain
& house needs paint
I hate to paint, been putting it off too long
#2 my custom headers build, new Milodon oil pan, keep putting it off
freaken' bolt in rack & pinion was a bad choice, done now no going back
I love how it drives
BUT;
for performance exhaust systems, headers/oil pans options are extremely limited
& pricey
combine this stuff 1-7/8" to 2" stepped to the collectors, as close to equal lengths as possible
using these to start with, be making it like a 63 S/S style iron manifolds,
header probably up & swept up & back, then down the firewall into the existing 3" exhaust
these Heddman Shorty headers, go right into the rack, I will flip them upside down,
I'll cut them down severely
& merge in the 1-7/8" u-bends upswept, then down into 2" into 4-2-1 collectors
4-2-1 collectors scavenging style
these (4-2-1 collector & extensions) part, will be cut shorter to fit the car, flared & fit
fit it all in this space (drivers' side is the issue) & make something simular for the other side (Pass Side)
the org. now semi ported org. HP manifolds, are choking it down really, realy bad
final product 'sort of like these' (below) heavy bastards 70#s,
that don't really fit a 68-70 B-body
but with much longer tubes & scavenger collectors
done it all on many cars before
getting older (I'm 64 now) I don't care as much I assume
used to do stuff as soon as it arrived, not wait ever
Now busy with other stuff, dad's health & constant dr. visits don't help
or flat out procrastination, more like
it's gonna be a total PITA is why
under dash is a PITA, especially since someone else has been in there

& the tight fits/cuts, burns & bruises, working in the engine compartment
then there's the house deck needs some repairs & stain
& house needs paint
I hate to paint, been putting it off too long
Last edited:
I've probably mentioned it in our phone chats a few times haha! Work has been super busy (a good thing) which has been interfering with my upgrade time..I've been sitting on parts for an EFI conversion as well as my the still-in-the-box GVOD kit that I scored (at a nice discount of course!) from a local member. But, with that stuff comes some wiring projects, fuel system upgrades, driveline and gear swap (might cheat there and just put a new s60 out back lol) which of course will warrant new suspension stuff and those pesky sub-frame ties I've been meaning to get welded in...in other words, the projects are stacking up!

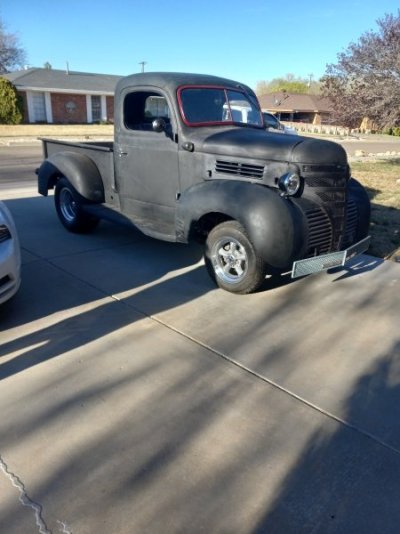
Hey STMP, how about some info on that Stepwise ? Looks like a Keeper !!!Complete disassembly and reassembly for body and paint.
It took quite a while to build the chassis.
It's all together and driveable now. Just can't seem to muster the energy
to dive into the process.
View attachment 1561117
- Local time
- 8:00 AM
- Joined
- Apr 13, 2012
- Messages
- 40,913
- Reaction score
- 153,492
- Location
- Granite Bay CA
It's not a B body but I'm thinking a cat back system for my SRT-10 pickup.
View attachment 1561102
View attachment 1561103
Oh, hell yeah. I have a standard 1500 5.7 but I love the look of the SRT-10 trucks.
I bought the body cladding from a junked SRT truck to duplicate the look. That is planned for mine soon.
Mine:
SRT 10 in the same color:
Last edited:
6PKRTSE
Well-Known Member
I have a little more than that. My next build as well.You got more than I got.

6PKRTSE
Well-Known Member
Wanting to go with EFI and dual 4500 throttle bodies, but still love the old school look of carbs. I am a multi carb guy anyway.

- Local time
- 9:00 AM
- Joined
- Feb 22, 2021
- Messages
- 3,487
- Reaction score
- 7,295
- Location
- Roswell, New Mexico
Sure, glad to give you kind of anHey STMP, how about some info on that Stepwise ? Looks like a Keeper !!!
outline.
Started out as mock-up using only
the sheetmetal and front rad support.
The original frame was bent to where
it couldnt be reused.
Used the lower support to (new frame)
attaching points as the main reference
for the frame to start the CAD design.
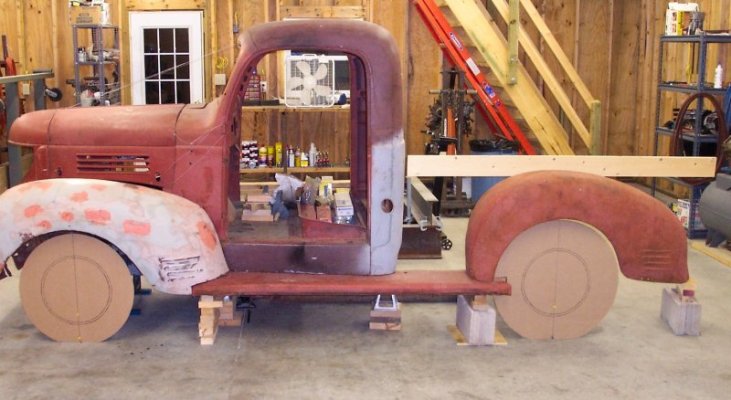
Keeping all parts perfectly level, it was
a matter of setting all parts in place to
locate the cab mounting bolt holes in
their 3 dimensions. (shortened the
wheelbase from 116" to 108"). You can
see the overlap of the running board
under the rear fender. Tire diameter set
the original ride height.
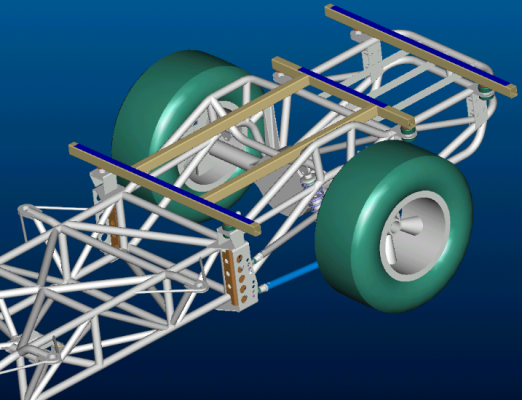
Then on to the CAD design. Attaching
points for; front upper and lower
A-arms, Rack & pinion, shock mounts,
miter box steering, running boards, etc,
set from individual components
dimensions.
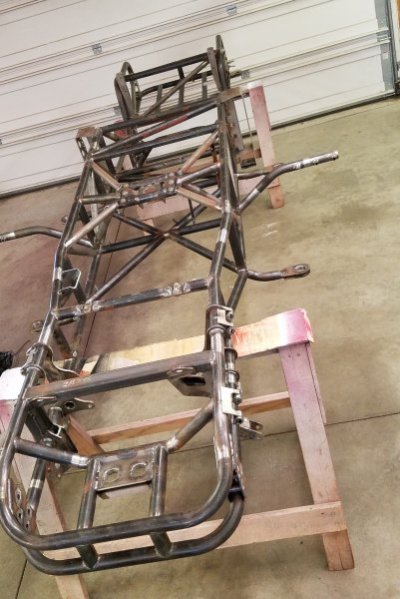
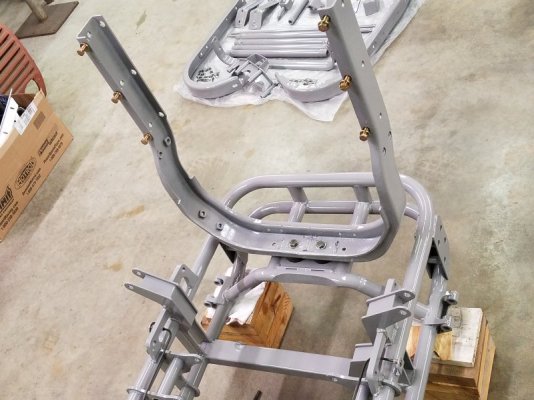
The finished weldment. (note the two
holes in the plate at the front of the
frame). These were the main reference
control points.
After powdercoat with front rad
support installed. At this point the
brake lines were stubbed out to the 4
corners.
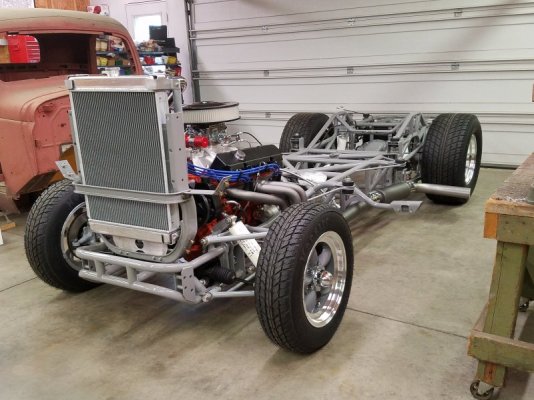
The rolling chassis. (note the PVC
tubing to hold the shocks at ride
height).
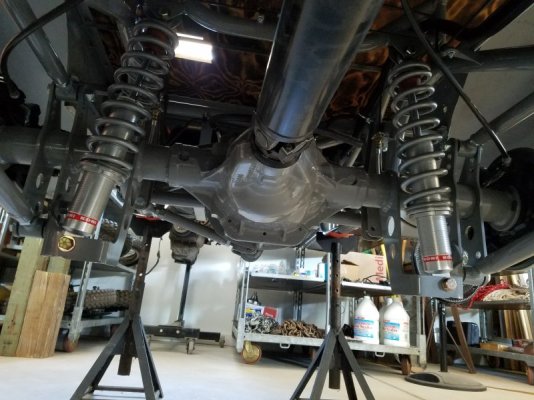
The springs were the last main
componets to be installed as total
weight at the wheels is needed
to get the correct spring weights'
frequencies.
What an Awesome Build !!!!!!!!!!Sure, glad to give you kind of an
outline.
Started out as mock-up using only
the sheetmetal and front rad support.
The original frame was bent to where
it couldnt be reused.
Used the lower support to (new frame)
attaching points as the main reference
for the frame to start the CAD design.
View attachment 1561307
Keeping all parts perfectly level, it was
a matter of setting all parts in place to
locate the cab mounting bolt holes in
their 3 dimensions. (shortened the
wheelbase from 116" to 108"). You can
see the overlap of the running board
under the rear fender. Tire diameter set
the original ride height.
Then on to the CAD design. Attaching
points for; front upper and lower
A-arms, Rack & pinion, shock mounts,
miter box steering, running boards, etc,
set from individual components
dimensions.
View attachment 1561318
The finished weldment. (note the two
holes in the plate at the front of the
frame). These were the main reference
control points.
View attachment 1561328
After powdercoat with front rad
support installed. At this point the
brake lines were stubbed out to the 4
corners.
View attachment 1561344
The rolling chassis. (note the PVC
tubing to hold the shocks at ride
height).
View attachment 1561356
The springs were the last main
componets to be installed as total
weight at the wheels is needed
to get the correct spring weights'
frequencies.
View attachment 1561376
Similar threads
- Replies
- 72
- Views
- 3K
- Replies
- 27
- Views
- 4K
- Locked
- Replies
- 6
- Views
- 7K

