Great work your doing malex. :headbang:
You are using an out of date browser. It may not display this or other websites correctly.
You should upgrade or use an alternative browser.
You should upgrade or use an alternative browser.
1964 Plymouth Belvedere Project.
- Thread starter malex
- Start date
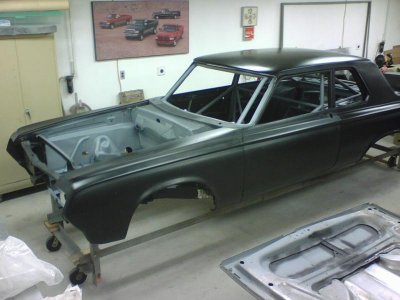
Thanks for the compliment Aldal! Today I fab'd up a car dolly. Just have to finish up the wheel casters and the Plymouth can come off the rotisserie for the next step.
Lots of progress!
Lots of progress!


 Now that the car is on it's dolly the sheet metal will be reworked, installed and fit over the next number of weeks. Also made a trip across the border yesterday to pick up another shipment of parts needed to complete the Max Wedge to my preference. Looking forward to installing the hemi scoop onto the hood and fitting onto the car. The scoop will end up being about 4" in height, which will give better clearance for the air cleaners.


Ron 73
Deceased, But not forgotton
Man, I am seeing some great work being done here tonight, not been around a few days, You have that looking grand sitting there, good work bud!!! I like the headers, One day ill be thinking of those again, going to be awhile with me, but they look real nice...
Moving forward on the Plymouth. The right side door and fender have been reworked and installed now. Things slowed down though once getting started on the hood. Very time consuming to modify and fit the 5" VFN scoop which is now 4". The mounting tabs were removed and replaced with aluminum angle that I fiberglassed in place. It won't be blowing off! A few more days and all exterior sheet metal will be installed, fit and ready for the next step, high build primer.


- Local time
- 6:36 AM
- Joined
- May 29, 2013
- Messages
- 6,527
- Reaction score
- 13,319
Looking good. I've been waiting for updates here! That scoop looks mean enough with 4". I can't even picture 5" in my head! Did you put some form of structure under the hood for the scoop? The reason I ask is I have a '66 hood that was already cut when I got it and I thought it would be too flimsy cut way back, but I see your opening goes back the same.
Looking good. I've been waiting for updates here! That scoop looks mean enough with 4". I can't even picture 5" in my head! Did you put some form of structure under the hood for the scoop? The reason I ask is I have a '66 hood that was already cut when I got it and I thought it would be too flimsy cut way back, but I see your opening goes back the same.
Hi Dgril. What I did is box the opening to the inner structure. I'll attach another pic from the underside that shows what I did. It is rock solid

 .
.carnalsupply
Well-Known Member
Hi Dgril. What I did is box the opening to the inner structure. I'll attach another pic from the underside that shows what I did. It is rock solidView attachment 237901View attachment 237902.
Terrific progress as always!
Wondering if you'd mind taking some good closeup detail shots of the hood mods and scoop mounting; I'll be mounting my scoop soon enough and would love to see exactly how you're doing yours?
Terrific progress as always!
Wondering if you'd mind taking some good closeup detail shots of the hood mods and scoop mounting; I'll be mounting my scoop soon enough and would love to see exactly how you're doing yours?
Hi Bob, sure, I will attach a couple of pics.


The pics should help. My scoop came from VFN. It started out as a 5". The reason that I went 5" is because I wanted to have adequate clearance to be able to run air filters large enough to breathe. I'm using an Indy 440-25 intake on the stroked wedge. I can see a Hemi and a cross ram under the hood down the road, which was kept in consideration during this install.
The scoop came with small mounting tabs fibreglassed in place but those were gone once I started altering the height of the scoop. The height of my scoop now is about 1-5/8" rear, and 4-1/4" front. The opening is 3 1/4".
For attaching the scoop I used 3/4" aluminum angle, which runs the full length of the scoop and across the back. The aluminum angle was increased to 115 degrees to match the scoop along the sides and rear. To get the angle to match the contour of the hood I cut a number of cuts along into the angle. Once that was all good I used 3 temporary screws on each side to hold the aluminum in place on the scoop. From there I fibreglassed the aluminum angle to the scoop with several layers of matting. The cuts that I made were covered in fibreglass and the temporary screws were removed after the fibreglass cured. I ended up with a very solid scoop that matched the hood bang on. I used 3/16 X 1/2 machine heads to secure the scoop to the hood. 5 down each side and 3 across the back.
For the hole it is 19-1/2"W X 25"L. This size allowed me to use half of the underhood reinforcement, and I welded in the sides and rear. The hood is very solid this way. The one front cross brace is no longer there but there is another one just ahead anyways. I used one of the existing holes in the hood centre for my centre stud. I fibreglassed a barrel nut (I guess we can call it) on the inside of the scoop and that now strengthens and securely holds the scoop opening. I have read of some guys loosing scoops but I'm confident mine isn't going anywhere. I have read where another member threaded the holes in the aluminum angle, eliminating the need for nuts. That fellow did an excellent job by the way! I do plan on finishing this all off with a plenum to seal the hood to the carbs but that is down the road.
Hopefully this helps you when you tackle yours Bob!
- - - Updated - - -
A good time for an update on this project. Blocking is almost complete. A few areas needing a little more attention. The next step is to remove all panels and get the chassis back up on the rotisserie.
That will allow me to finish sanding the underside and engine compartment, with painting to follow! Progress!


Very nice, Can't wait to see it in color. What color is it going to be?
Doug
Doug
Very nice, Can't wait to see it in color. What color is it going to be?
Doug
Hi Doug. I'm leaning towards a champaign silver as the main color at this point. Interesting, on the 23rd it will be 5 months snce the initial sand blasting.
Hi Doug. I'm leaning towards a champaign silver as the main color at this point. Interesting, on the 23rd it will be 5 months snce the initial sand blasting.
At one time mine was going silver with a red gut. You are WAY FASTER than I was. Your current status looks very familiar though.
doug
Attachments
Yes, colour is something that can change at the last second.. I will have red seats with black interior, so I'm going to have a little red on the exterior as well. Got some ideas on that.
All the sheet metal is back off now and the Plymouth is back on the rotisserie for the final time. Hopefully we'll see some paint going on in the next week or two. Weather plays an important part in my paint schedule so I'm hoping things work out. This morning it was -42 with the windchill..


All the sheet metal is back off now and the Plymouth is back on the rotisserie for the final time. Hopefully we'll see some paint going on in the next week or two. Weather plays an important part in my paint schedule so I'm hoping things work out. This morning it was -42 with the windchill..
A few more days spent on the 64 with another step completed. The trunk, underside and engine bay is all sanded and ready for paint. The roll bar has also been painted and will be masked up next.
The paint booth fabrication is now into full swing and the entire frame is cut and brackets are made. While the booth width is a fixed size, the length is adjustable. Got to love making progress!


The paint booth fabrication is now into full swing and the entire frame is cut and brackets are made. While the booth width is a fixed size, the length is adjustable. Got to love making progress!
Ron 73
Deceased, But not forgotton
Sure is looking SWEET bud!!! And i agree "Got to love making progress!"
I hope to soon be able to say the same, you have it under control real well i see....
I hope to soon be able to say the same, you have it under control real well i see....
Sure is looking SWEET bud!!! And i agree "Got to love making progress!"
I hope to soon be able to say the same, you have it under control real well i see....
Thanks Ron. Yes the Plymouth project is coming along pretty smoothly. It's nice to finally have all the metal, body work, priming and blocking complete!
I've spent the last couple of days making the frame work for a slip-together paint booth for this job. While the frame work was pretty straight forward, designing a good intake, exhaust and booth entrance door for that matter has made the job more challenging, but I have it covered! The whole frame work is made out of 1 X 1 sq. tubing, with 1-1/4" joins. Being slip together the booth also becomes size adjustable too, which will make the next steps of this project go smoothly! Trunk, interior, underside and engine compartment all at one time. So a big step coming up. Colour is like a week away!
Ron 73
Deceased, But not forgotton
Thanks Ron. Yes the Plymouth project is coming along pretty smoothly. It's nice to finally have all the metal, body work, priming and blocking complete!
I've spent the last couple of days making the frame work for a slip-together paint booth for this job. While the frame work was pretty straight forward, designing a good intake, exhaust and booth entrance door for that matter has made the job more challenging, but I have it covered! The whole frame work is made out of 1 X 1 sq. tubing, with 1-1/4" joins. Being slip together the booth also becomes size adjustable too, which will make the next steps of this project go smoothly! Trunk, interior, underside and engine compartment all at one time. So a big step coming up. Colour is like a week away!
I look forward to seeing all this dressed and ready! You have the envy bug, tickling a might.. Your paint booth sounds cool, my brother in law has a nice home shop of his own and made a paint booth just about how you are describing yours inside his shop, right now i guess my sister said he has been doing some sand blasting in it and then soon some paint on a ....ready?.... Oh i hate to say it lol, a 65 Mustang for his grandsons first car.. Pretty neat set up with the paint booth though, I wouldn't mind myself but just no room... Your headed for the best part of this journey... ENJOY buddy!!!!!!!!!
jason lewis
Well-Known Member
Champagne silver?Do you have a sample?
Similar threads
- Replies
- 31
- Views
- 2K
- Replies
- 7
- Views
- 440
- Replies
- 21
- Views
- 2K


