• When you click on links to various merchants on this site and make a purchase, this can result in this site earning a commission. Affiliate programs and affiliations include, but are not limited to, the eBay Partner Network.

1964 Rusty Bucket transformation

Gents, here is an update......anyone that is willing to crawl around under a car to paint it, belongs in an asylum......lol, complete with straight jacket......and all of the good drugs associated with the straight jacket....lol. Well anyway back to the real world.
They where going to scrap an old pipe fitter fabricated Liebert unit frame at work....so it ended up in the back of my truck. It will make a nice heavy duty roll around dolly for the 64. I had some left over wheels from restoring a 72 GMC truck (avatar). After considerable wire brushing, cutting and fabing, I now have a handy car dolly to roll the car around on. For the picture hounds out there:
DSC_0954.JPG

DSC_0955.JPG

DSC_0956.JPG

DSC_0957.JPG


Hopefully, this will make it easier to roll into and out of the poly. paint booth.
 
Gents, here is an update......anyone that is willing to crawl around under a car to paint it, belongs in an asylum......lol, complete with straight jacket......and all of the good drugs associated with the straight jacket....lol. Well anyway back to the real world.
They where going to scrap an old pipe fitter fabricated Liebert unit frame at work....so it ended up in the back of my truck. It will make a nice heavy duty roll around dolly for the 64. I had some left over wheels from restoring a 72 GMC truck (avatar). After considerable wire brushing, cutting and fabing, I now have a handy car dolly to roll the car around on. For the picture hounds out there:
View attachment 421337
View attachment 421338
View attachment 421339
View attachment 421340

Hopefully, this will make it easier to roll into and out of the poly. paint booth.
.

Hi Crumley! Excellent dolly, will work excellent for you. A great job on your 64!
Speaking of poly paint booths...

IMG_1695.JPG

The old wood box in the corner, that was my cfm restrictor. Without it the fan would pull too much air and trip the motor out. The other side of the box on the outside of the booth I had a 12" pile tube that exited out my side garage door (leaning against the booth wall). Needed 5 16X20 furnace filters for intake to keep from sucking the poly in. Yeah pretty redneck but... It worked.
IMG_1668.JPG


IMG_4065.JPG
 
Gents, it has been awhile since I posted an update.
Malex, that is still is an awesome looking car....If I keep at it, I will try to achieve that level of build.
Carl, it's better to see metal being used as opposed to being scrapped........the welds on the frame aren't the best but they will do.

The LH door has been a bit of a pain in my rear end. A large side grinder was used in the past to make repairs. The grinding marks are deep. So the door required skimming with all metal and a lot of sanding...for the picture hounds:
DSC_0958.JPG

Well at least the LH door surface is now flat.
The RH door only required a spot or two of filler, to fill the factory dings.
DSC_0959.JPG

The poly paint booth is hung and attached to exhaust and inlet fans.
DSC_0963.JPG

The 64 sitting in it's new home.
DSC_0960.JPG

DSC_0962.JPG
 
Can't wait to see the results! Will be great! Last summer I painted my buddies 66 in this back- yard home-made red-neck booth. Car turned out perfect and zero dust. Yours will come out
Just fine!

IMG_0277.JPG
IMG_0283.JPG
IMG_0290.JPG
 
Gents, I am looking for some fiberglass parts for the Belvedere....hood, trunk lid, front and rear bumpers.
I have done a search here for glassman (sled city fiberglass) and every time I try to send a PM it comes up, person not available.
Am I entering something incorrect? As we all know, computers = grabage in = garbage out.....lol.
Crumley, his mail box has been full for 3 years, that I'm aware of. That's the problem. But you can get him here.
1-614-875-0369 His name is Larry. I'll be calling him too.
 
Malex, thank you for the phone number...I will be in contact with him.
Thanks, Carl, due to honey do items, looking at lake property (a place to retire) and everything else. I try to work on the 64 as much as possible...lol.
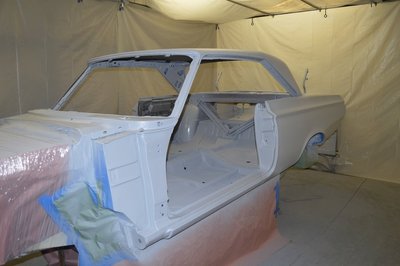
I did manage to get 2 layers of epoxy primer down, one yesterday and the other today. Pictures:
DSC_0964.JPG

DSC_0965.JPG


DSC_0966.JPG


There are a couple of boo-boos where the air hose hit the panel after spraying. I should be able to sand them out after the epoxy has dried...... DSC_0967.JPG
 
Looking great! I just ordered up a hood and bumper from SledCity and Larry says the mold is out - thinking it just might be for your 64 Crum.
 
One brightside aspect of the honey do lists will be giving the primer plenty of time to shrink down. Even though two part components are said not to shrink, they still do. Hope you have an awesome 4th!
 
Thank you gents for the encouragement...
I made some time to get the doors in 2 layers of epoxy primer. Pictures:
DSC_0968.JPG

DSC_0969.JPG

DSC_0970.JPG

DSC_0971.JPG
 

That's a great looking dolly you built - I really hate it when those "pesky" trash items fall into the truck bed and are used to make useful stuff . . . Nicely done too ! ! !
 
Hi Crumley, not sure if anyone asked this yet, but did you have any issues with the primer adhering to the POR-15? Just going through the thread now and wanted to ask.

Thanks, J
 
Malex, thank you for the phone number...I will be in contact with him.
Thanks, Carl, due to honey do items, looking at lake property (a place to retire) and everything else. I try to work on the 64 as much as possible...lol.
I did manage to get 2 layers of epoxy primer down, one yesterday and the other today. Pictures:
View attachment 442444
View attachment 442445


View attachment 442446

There are a couple of boo-boos where the air hose hit the panel after spraying. I should be able to sand them out after the epoxy has dried...... View attachment 442447

Hey Crumley. Question. Did you Happen to place an order with Sled City?
 
I know I have been slacking on the updates. Between work, honey do's and spending every other weekend on Smith Lake, Alabama.
I still manage to get some things done on the build. Currently, wet sanding the epoxy primer. For some reason (novice) the epoxy primer came out almost like a textured finish on the horizontal surfaces. As long as the surface was in the vertical position the gun sprayed fine. So I have been sanding out the heavy orange peel, trying the get the surface flat again.....
I have also begun stripping the front fenders....no pictures, really nothing to see.

MGKelly, so far, I haven't had an issue with the primer adhering to the POR15. I try and scuff it real good before painting over. There are guys on here who have bad experiences with the stuff.
I have had POR15 come off in sheets on a frame around the engine area. This was my mistake, due to not getting the frame completely clean of oil and grease.

Malex, no sir, I haven't placed an order with Sled City for fiberglass parts. Going to see how the original fenders turn out. May need add fenders.

I have also been tighter with the $$$$$$, due to buying lake front property....lol.
 
Auto Transport Service
Back
Top