You are using an out of date browser. It may not display this or other websites correctly.
You should upgrade or use an alternative browser.
You should upgrade or use an alternative browser.
$500- 68 charger
- Thread starter daytona kid
- Start date
daytona kid
Well-Known Member
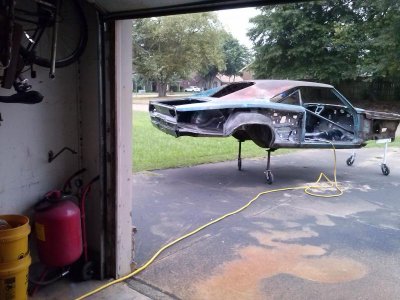
Looking great Kid. Nice job on the blasting - no more gunk, grime, or rust. Kind of reminds me of my project a few months ago.
Yea, but there is still a lot more to be blasted on mine. Just kinda blasting as needed. I am thinking of have a blasting company come to my house after I get it on the rotis. They will do it for about $300. And they can bring sand, glass, pecan hulls or what ever I want. They will do pecans where I want and switch to cheaper sand everywhere else. They will even use dry ice if you want, which leaves no mess other than what comes off the car.
hunt2elk
Well-Known Member
Yea, but there is still a lot more to be blasted on mine. Just kinda blasting as needed. I am thinking of have a blasting company come to my house after I get it on the rotis. They will do it for about $300. And they can bring sand, glass, pecan hulls or what ever I want. They will do pecans where I want and switch to cheaper sand everywhere else. They will even use dry ice if you want, which leaves no mess other than what comes off the car.
That is a good idea, and very reasonable. I had to haul my shell 35 miles to get the roof, tops of quarters, doors, fenders, hood, and decklid media blasted. I then had a local guy with a sand blasting outfit come to me and do everything else.
Man I don't miss that, I used to do my own blasting "Urhh, after finding someone local I don't touch it anymore". There's not to many things you can do that will compare to the cleaning abilities of blasting. If you don't already know, Epoxy primer does an excellent job over blasted metal (flows out nice and smooth's it in one coat plus it's durable).
daytona kid
Well-Known Member
Thought I'd share some of my collection of sites that have helped me, parts,etc.
http://www.classicindustries.com/#
http://www.ballisticfabrication.com/
http://www.restorationperformance.com/servlet/StoreFront
http://www.eastwood.com/
http://uscartool.com/
https://www.autometaldirect.com/
http://chucker54.stores.yahoo.net/restoration1.html
http://dantesparts.com/partsforsale.html
http://www.herbsparts.com/
http://www.tonysparts.com/moparparts.asp
http://www.rosevillemoparts.com/index.php/c/restoration-a-b-e-body-/cPath/347
http://www.autopartsnetwork.com/
http://www.stephensperformance.com/
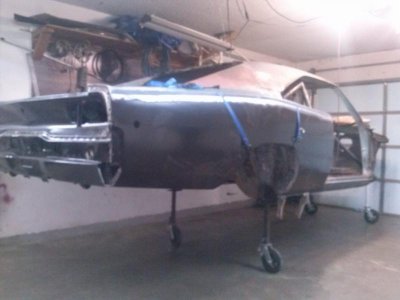
Test fit of new skin going good.. A little more tweaking and it will be ready to go on for good.
Attachments
Last edited:
Very nice, what a leap that will be. If you don't have a plan already I'll share how I did mine (worked out great). Once I got them test fitted and was happy I drilled all of the spot weld holes 5/16", clamped it on in all locations then put self drilling screws in about every third hole. It allows for adjustment and clamps it on very tight, the holes left by the screws weld shut easily while spot welding. It worked out great for me but mine were also full quarters. With yours you have allot more to keep straight but having the pinch areas screwed tight will mimic the spot welds allowing you to find any possible distortions etc. Good luck
BigBlock61
Well-Known Member
I know I'm watching all of this and listening intently for when I get ready to do mine.
daytona kid
Well-Known Member
Very nice, what a leap that will be. If you don't have a plan already I'll share how I did mine (worked out great). Once I got them test fitted and was happy I drilled all of the spot weld holes 5/16", clamped it on in all locations then put self drilling screws in about every third hole. It allows for adjustment and clamps it on very tight, the holes left by the screws weld shut easily while spot welding. It worked out great for me but mine were also full quarters. With yours you have allot more to keep straight but having the pinch areas screwed tight will mimic the spot welds allowing you to find any possible distortions etc. Good luck
Thnx for the tips., but this is the 2nd side skin to go on. I am doing them 1 at a time. And I opted for the butt-weld seam on them. I was going to do a lap seam but the butt seemed to be the popular method. I can't quote the reasons but it made sense to me at the time. I watched Hunt's 1/4 skin job and it looked good so I went with it. I do use a lot of sheet metal screws tho.
I was only referring to the factory spot weld areas, like I said mine were full quarters meaning no seams at all "just spot welds". I would definetly but weld and not overlap. "Second one" how did I miss that? SorryThnx for the tips., but this is the 2nd side skin to go on. I am doing them 1 at a time. And I opted for the butt-weld seam on them. I was going to do a lap seam but the butt seemed to be the popular method. I can't quote the reasons but it made sense to me at the time. I watched Hunt's 1/4 skin job and it looked good so I went with it. I do use a lot of sheet metal screws tho.
- Local time
- 7:52 AM
- Joined
- Jan 1, 2013
- Messages
- 8,050
- Reaction score
- 3,466
- Location
- Mascoutah, Illinois
X2, I love the inner wheel housing metal work, it will fit some serious tire in those !!
X3 those will hold some massive meats .. and esp if you moving the springs inward too
daytona kid
Well-Known Member
Can you just move the springs a little, and not do a whole mini tub?X3 those will hold some massive meats .. and esp if you moving the springs inward too
I was going to mini tub it also but changed my mind, for now. I decided it would be easier for me now to hold off on that and go stock, but I new this would be the only time I could do the outer house de-hump. I may do the mini tub down the road, after I get it rollin. I kinda worry about the value of the car going down with things that can't be put back to near stock. And the mini tub is a pretty big mod as far as undoing it. I'm trying not to do much on the car that is not stock or not easily undo-able. I feel I crossed the line with the de-hump, because it will be easily seen from in the trunk.
- Local time
- 7:52 AM
- Joined
- Jan 1, 2013
- Messages
- 8,050
- Reaction score
- 3,466
- Location
- Mascoutah, Illinois
Can you just move the springs a little, and not do a whole mini tub?
I was going to mini tub it also but changed my mind, for now. I decided it would be easier for me now to hold off on that and go stock, but I new this would be the only time I could do the outer house de-hump. I may do the mini tub down the road, after I get it rollin. I kinda worry about the value of the car going down with things that can't be put back to near stock. And the mini tub is a pretty big mod as far as undoing it. I'm trying not to do much on the car that is not stock or not easily undo-able. I feel I crossed the line with the de-hump, because it will be easily seen from in the trunk.
You already gained some good room with what you have done perhaps search mopar spring re-location kit. It moves the spring perches inboard about 3" .. here's an example but I'm sure there are more how-to's
http://www.bigblockdart.com/techpages/springs.shtml
Here's another less radical way to get .850" more clearance and would be easily un-doable
http://www.moparmusclemagazine.com/...p_0303_installing_offset_hangers/viewall.html
I haven't used either so can't comment on if this causes any problems but note the cautions in that first article about being careful to get the right alignment
Here's a current thread right here on FBBO
http://www.forbbodiesonly.com/mopar...7-Best-Leaf-Spring-Relocation-Kit-For-B-Bodys
daytona kid
Well-Known Member
I like that 2nd idea, the .850 offset, but can't find anything like it for B-bodys. Anyone know where to get a kit for B-bodys?
daytona kid
Well-Known Member
daytona kid
Well-Known Member
That is my thinking also.I would leave the bars installed. It should give an extra insurance that things will not flex.
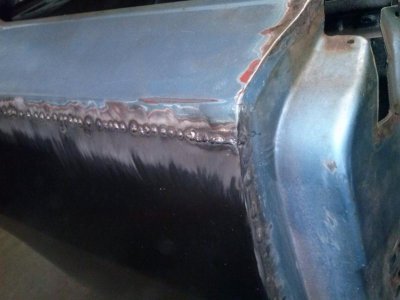
Welds are looking better than the other side. Wish I had started with argon.
Attachments
daytona kid
Well-Known Member
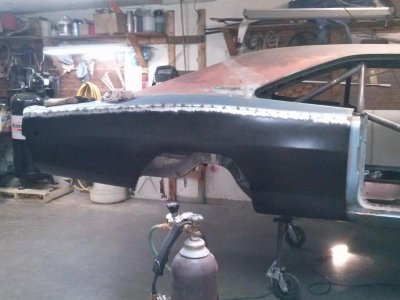
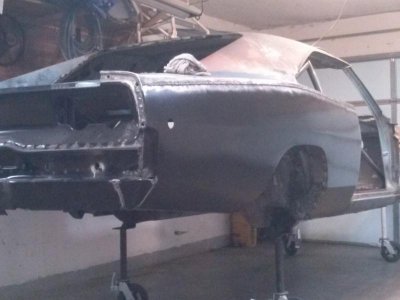
All done with the skin, other than a lot of grinding. Those darn lower corner pieces are tuff to get even close to right.
This seams like a big step to me., Kind of a relief to be done with most all panel welding work, other than the rear window. I will have to research the window repair and figure out what parts I can find for it. It will be a couple of weeks before I can get the rotis., then major blasting, clean up and prep for epoxy primer. The rest of the body- doors, frnt fenders, hood and trunk lid are in good shape so they should go easy, but will do those nearer to finishing, after refurbishing and reassembling most everything else.
This seams like a big step to me., Kind of a relief to be done with most all panel welding work, other than the rear window. I will have to research the window repair and figure out what parts I can find for it. It will be a couple of weeks before I can get the rotis., then major blasting, clean up and prep for epoxy primer. The rest of the body- doors, frnt fenders, hood and trunk lid are in good shape so they should go easy, but will do those nearer to finishing, after refurbishing and reassembling most everything else.
Attachments
cdr
Well-Known Member
looks very good,make sure the 1/4 end cap lines up,i did not,so now i have to drill out my welds in the rear.

