• When you click on links to various merchants on this site and make a purchase, this can result in this site earning a commission. Affiliate programs and affiliations include, but are not limited to, the eBay Partner Network.

$500- 68 charger

I wish I had taken some pictures of the tin job I did back in the day on my 69 RR. I made 1 pc for the rear window shelf that was bent and came down to the roll bar tubes. The next sheet went below the tubes down to the floor with a bend to where the front of the rear seat was. Then I made to pieces for either side of driveshaft hump. Used my bead roller to put some stiffening rolls on them then pop riveted it together with some beads of silicone to help seal and stop rattles. Took me a full weekend but turned out ok. Use cardboard to make templates.
 
Last edited:
Thanks.. Actually there will be no armrest due to my bad planning, because my door roll-bars are going to be in the way, I think. But I could possibly figure out a fix for that in the future. That's on my "maybe do later list".

I guess you don't need armrests when you're just driving 10 seconds a quarter mile at a time, right???
 
Thanx guys, Pretty much everything on my interior was shot or missing and that stuff costs big bucks. So I may have to do without more than just armrests, for awhile. Magician, lol , funny when I was younger I was an amatuer magician, kinda like the guy below, if I could just make a big pile of money appear the car would be done soon.
https://www.youtube.com/watch?v=Gtm4vp1X6fQ
 
The dude that makes those seats is pretty well known and he does amazing work on other beading projects.
He also has a signature series bead roller by Mittler.
 
I wish I had taken some pictures of the tin job I did back in the day on my 69 RR. I made 1 pc for the rear window shelf that was bent and came down to the roll bar tubes. The next sheet went below the tubes down to the floor with a bend to where the front of the rear seat was. Then I made to pieces for either side of driveshaft hump. Used my bead roller to put some stiffening rolls on them then pop riveted it together with some beads of silicone to help seal and stop rattles. Took me a full weekend but turned out ok. Use cardboard to make templates.

That sounds like what I was thinking of.. One benefit to the couplers on my roll bar/s is that I should be able to cut and dimple 2 holes in one large piece of aluminum for the rear bars to go thru to their trunk/hump mount plates. Then stick the bars thru from the trunk thru the holes when installing them. Guess I may be looking for a bead roller., and will definitely be using lots of silicone and cardboard. Thnx for the helpful/encouraging ideas.
 
Do you remember what thickness the aluminum was that you used or that most guys use for paneling like that?
 
I think it was .030, I got some drops from a place that made enclosed trailers.
 
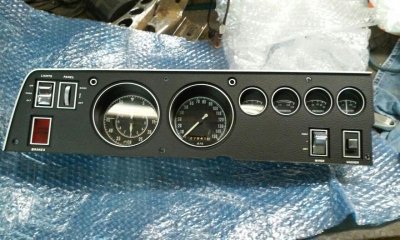
I've been looking at these on ebay and found this one for an ok price. Everything looks good on it except the odometer numbers are a little yellowed. I wonder if there is an easy fix for that, if not I guess I can live with it. Yes it is for a 70 but I kinda got tired of looking and jumped on this one mostly due to the fact that it is in such good shape. Thinking about covering the bezels with carbon fiber or making some polished or brushed aluminum ones. Or I could just buy the rest of the bezel panels for a 70. I hate to not have year correct but I sorta like the difference in the 70 better.
 

Attachments

  • 20151117_152555_resized.jpg
    20151117_152555_resized.jpg
    74.7 KB · Views: 301
Looks great the way it is.

Yep, but I don't have the other pieces to match it, radio cover and above the glove box. My 68s are different and would look funky together. I may buy the matching ones, but darn they cost a lot, for a piece of plastic.
 
I think you can buy decals for the faces of the gauges Kid.
 
Last edited:
Found this stuff, heard good things about it. Will be trying it out on the roll bars.
http://www.activepowersports.com/sp...EBTJL6ODghk3aqbmZGpXXHAe8fJ-0eKrnMaAvue8P8HAQ

I've used the Spaz Stick Mirror Chrome and love it. I use it for painting chrome on R/C cars where you start off with a clear body and paint from the inside. This is how it gets it's shine. I'm interested in seeing how it would work on the outside. I would suggest painting the bars black first and then hitting them with the chrome. This is how it's done on my R/C cars. From the inside paint on the chrome and then back it with black.
 
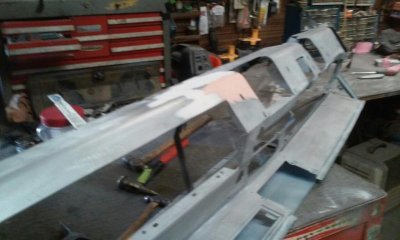
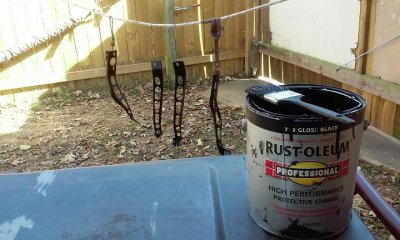
I've got the dash ready for the painter. And I had a bud plasma cut holes in my front bumper braces. Since I'm going with a fiberglass bumper I wanted to lighten them up. After grinding them smooth and blasting I brushed on some oil based paint that was leftover from the trailer mods., brush on oil base is the poor man's powder coat. It really looks pretty good on some parts and very durable.
 

Attachments

  • 20151126_113716_resized.jpg
    20151126_113716_resized.jpg
    43.5 KB · Views: 224
  • 20151126_113620_resized.jpg
    20151126_113620_resized.jpg
    69.9 KB · Views: 238
Auto Transport Service
Back
Top