• When you click on links to various merchants on this site and make a purchase, this can result in this site earning a commission. Affiliate programs and affiliations include, but are not limited to, the eBay Partner Network.

'64 Fury Pro-Touring

i'll let you know how mine will turn out. looking for a dash that i can play with. i agree the right welder is needed unless i can find a glass one to mold things together. my second thought of course is to use the glove box with a sliders so drop open the door and pull out pad that is fixed to a slider plate. keep us updated on what you do i'm sure there are many trying to figure out the same thing.

I've thought about using the glove box as well but doubt I'll do so since it's such a long reach from the drivers seat; my seats are set back 4"-6" compared to stock making for a REALLY long reach to the glove box.

No worries, I'll definitely post whatever I come up with!
 
Just a quickie post of trial fitting the finished gauge panel into the newly painted dash:

IMG_0672.jpeg
 
Been working on a bunch of different things on the Fury so I thought I better get the blog caught up.

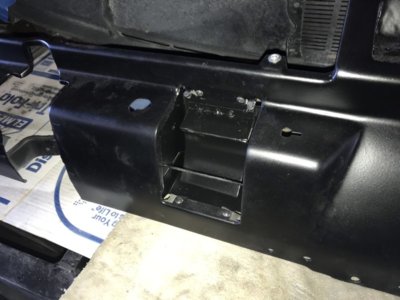
I used the same "Chrome" Rust-O-Leum paint on the bumpers I used on the gauge bezels, and I'm really happy with the appearance. No, I don't expect them to fool anyone into thinking they're really chrome but I sure do like them much more than I did when they were red. The only problem I have is I can't clear-coat the bumpers to protect them and the paint is exceptionally delicate, it acts as if it never actually dries and can/does rub off pretty easily. For the time being I'm satisfied but I'll keep my eye out for something different to use in the future.

Bumper01.JPEG


Bumper02.JPEG

Notice below I got all the rear trim installed along with the lock cylinder and license plate bracket. The stainless trim between the tail lights is missing the blackout treatment so that's something I might update later on.
Bumper03.JPEG

So I'm pulling the parts together for the dash and I seem to have somehow lost the receptacle that mounts the ashtray! Right, how the hell did I lose that, of all things, but I did, which means finding one to buy or making one myself, so I figured I'd try and make one before simply buying one (if you can find one), and here are the results.
The first picture is obviously prior to bending; I arrived at this shape after making a template based on what I thought I needed and what I remembered:
IMG_0683.JPEG

The receptacle, after making the initial bends. I felt like leaving the seam in the sides open would allow me to fit the receptacle more easily as well as add some "spring" to the finished piece, the importance of which will become evident later on when I attach the "slider".
IMG_0685.JPEG

Test fitting the receptacle in the dash and it fits perfectly.
IMG_0686.JPEG

My favorite thing in the world, Cleco's, come to the rescue again. It's clear how nicely the receptacle fits into the dash, no gaps, etc.
IMG_0687.JPEG

The ashtray itself has to have something to both guide it into place as well as pivot on, so I bought a stick of 1/8" steel rod and inserted it through holes I drilled in each side of the receptacle.
IMG_0689.JPEG

I tacked the rod in place, slid the ashtray into the receptacle, and it fit/pivoted perfectly; I was stoked!
IMG_0690.JPEG


Once I'd finished the basic shape of the receptacle I moved on to fabbing the "slider", which you can see in place below. The slider is where the spring-loaded "tongue" of the ashtray rides, and it's the pressure from the tongue pushing against the slider that holds the ashtray in place.
IMG_0691.JPEG

The holes in the side of the receptacle are from another piece of 1/8" rod I used to hold the slider in place. I slid the rod through the receptacle, tacked the slider to the rod, then added the flat piece running from the rod up to the top of the receptacle. Once the slider was tacked together I cut the rod from each side, leaving a gap between the receptacle and the slider for the ashtray to recess into. Also, the rod acts as the stop mechanism, the tongue from the ashtray hits the rod and stops the ashtray from opening too far.
IMG_0692.JPEG

I inserted the ashtray into the receptacle for a final check on the fit and functionality; all is good.
IMG_0693.JPEG

Below you can clearly see how the tongue of the ashtray runs along the curved part of the slider and stops in the open position at the rod. To remove the ashtray you simply depress the tongue and slide the ashtray out.
Really thankful for my spot-welder, which I used to hold the slider in place; you can see evidence of the welds but that will all be covered before I'm done.
IMG_0694.JPEG

The receptacle is all painted and slid into the dash. Even though you can't really see them (unless you're really looking for them) I chose to use black oxide pan-head Allen-head bolts as opposed to Phillips head screws; I just think they make for a much cleaner appearance. Also got some new rubber bumpers from Joe Suchy so the ashtray closes flush with the dash and doesn't mar the paint.
In the shots below you may notice the riv-nut just above the ashtray/receptacle; these are for the 1/4"-20 12-point bolts I'm using to mount the gauge panel.
IMG_0696.JPEG

The real test, does the ashtray close correctly and if so, is it flush with the face of the dash? Yep! Victory comes in many different flavors, and this one was exceptionally sweet!
IMG_0697.JPEG

Ashtray opens cleanly with no issues.
BTW - I don't smoke and as long as I own my Fury NOBODY will smoke in it, but I could not bare the thought of a) having a gaping hole in the dash where the ashtray goes, or b), solidly mounting the ashtray just to plug the hole; neither of those 2 choices were ever really an option I was considering.
IMG_0698.JPEG

I'm not sure why but I didn't take a picture of the new glove box I installed, but below is a picture of the dash with the glove box door in place as well as the Sport Fury logo.
I was really concerned the glove box and the right glove box door hinge would hit the front down-bar of the roll cage, but luckily they have just enough clearance so I didn't have to modify either of them in the slightest; another small but sweet victory!
IMG_0699.JPEG

I'm going to be out of the shop almost all of March so this will be the last update for a while, but I did special order an Edelbrock Pro-Flo 4 system (special ordered with 60lb injectors) and I expect it will arrive while I'm away from the shop. When I get back I'll mount the ECU on the firewall, get the wiring taken care of, then install the dash. After that I think I'm going to bring the car home and vacate the shop.

IMG_0695.JPEG
 
I got back from my business trip and was met by my new Edelbrock Pro-Flo 4 FI set-up! After having used an Accel DFI system in the past I can't tell you how pleased I am at the quality of the Eddy kit, it's light years ahead of the Accel, though admittedly, Edelbrock did forget to include a temp sending unit in the kit. No big deal, I called them, told them what happened, and they're sending me one without question or issue.

Word of advice: if you're planning on ordering one of these kits with up-sized injectors (stock are 35lb/hr and I wanted the 60lb/hr option) from Summit or Jegs you MUST tell the sales person it is a special order that needs to ship directly from Edelbrock. It took over a week for the Summit team to figure this out (Jeg's took even longer) and get back to me with how things had to happen, but in the end, I got my system.

Here's what I got:

Kit #35901 includes the 7" Android touch screen, which comes pre-loaded with the Pro-Flo 4 software.
IMG_0718.JPEG

The intake came fully assembled with injectors, rails, TB, and sensors in place. I did end up switching the fuel cross-over line to the front of the fuel rails since my fuel hard-lines stop at the firewall, making for an easy, and fairly well hidden fuel line up to the rails.
IMG_0719.JPEG

Wow, what a difference to the old DFI system! The wiring is clean, uncluttered, nicely laid out, and the size of the ECM is shockingly small:
IMG_0720.JPEG

Instead of trying to guesstimate where the sensor leads needed to be, and how long they needed to be, I chose to toss the engine in, add the heads, intake, and distributor (dual sync included with the kit), and then run the leads.
IMG_0721.JPEG

Once the engine was in and I knew I had more than enough harness length, I decided to mount the ECM inside the car, at the right end of the relay board, and run the leads through the firewall. I think it makes for a much cleaner, uncluttered look in the engine compartment.
IMG_0722.JPEG

The only problem, if you want to call it that, is getting the two primary harness connectors through the firewall. I wanted to keep the hole in the firewall as small as possible but the two connectors meant drilling a 2" hole, which to me would be unacceptable.
IMG_0723.JPEG


IMG_0725.JPEG

So after clearly marking everything I "de-pinned" both plugs, drilled a 1" hole in the firewall, put a grommet in place, slipped the harness through, including a couple of other harness leads for my oil and temp gauges, then re-assembled the connectors.
IMG_0727.JPEG


IMG_0729.JPEG

I've spent some time cleaning up the routing and will get some more pix tomorrow.
 
Sweet work done like a pro. Your project is going to be a great ride
 
Try this for getting through the firewall. My picture stash on the computer is not cooperating. Will text it.
 
Try this for getting through the firewall. My picture stash on the computer is not cooperating. Will text it.
Hey Carl,

Yea, excellent “grommet”, and would have saved my having to de-pin, but far larger than I wanted to use; my goal is to keep the firewall as clean as I possibly can, whether it’s grommets, wires, reservoirs, etc.
Thanks again for the continued support and suggestion!
 
You’ve done excellent work on this Beast from HELL! I love it!
 
Definitely making progress, though now that I'm doing final assembly as opposed to test-fitting, that progress is painfully slow! Regardless, I've been working on the car and will continue for another couple before I head out of town again, so here's a quick update.

Except for two 120 amp Bussman circuit breakers (arriving tomorrow) the wiring harness is complete, loomed, and ready to go. If you look near the shifter hole you'll see all the Weather-pak and Metri-pak connectors for the gauges as well as the column and ignition plugs.
The only real question I have at this point is whether I used the correct switched 12v lead from the fuse box to the Pro-Flo ECM, but just in case I've run a second lead that comes from a different source to replace the first if it doesn't work (that's the pink straggler on the passenger floor board).
IMG_0737.JPEG

After years of waiting, I finally got the dashboard back in the car for good! It fit perfectly around the rollbar and I didn't even have to modify the glovebox to fit!
IMG_0738.JPEG

Got the steering column permanently mounted, though I did drop it onto the brake pedal and tore up the paint so I had to waste an hour or so sanding, prepping, and re-painting the column, but it came out looking terrific. Oh yea, I also mounted the ignition switch since I don't have to do any clean-up or restoration on it; all the other switch bezels need some attention so that's what I'll be focusing on tomorrow.
IMG_0739.JPEG
 
Yesterday marked a MASSIVE milestone in the building of the Fury, I now have 99% of the wiring complete and the dash and steering column are installed for the final time, so below are more pix showing the progress.

The bezels for the various switches were in pretty decent shape but I had to re-paint the text, which was faded and worn. Really happy with the finished results, they look wonderful.
IMG_0740.JPEG

It took a couple of hours of careful work but I got all the switches installed and wired. If you look to the right of the ashtray you'll see a non-factory toggle switch, and this is for the high/low beams. The original foot operated switch would not fit due to the down-tube of the roll bar so I decided to put the toggle (LED lit, green for low, red for high) in place of the blower motor switch, which isn't used (no heater).
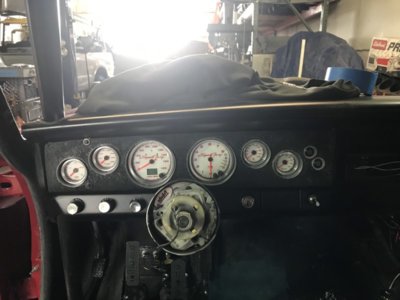
You can see the loomed wiring harness inside the dash, behind the installed Ididit tilt steering column; all the time and effort looming the harness really paid off when it came time to install the gauge cluster.
IMG_0741.JPEG

Gauge cluster installed and ready to go. The two circular buttons on the right end of the panel are for the seat heaters.
IMG_0742.JPEG

Though not permanently installed I wanted to make sure the steering wheel lined up as it had before, and all good! I've heard some negative comments regarding Alcantara lined steering wheels but I LOVE the way this wheel feels in my hands.
IMG_0744.JPEG

I'm back on the road for a while but as soon as I get back I'll get the two 120 amp breakers installed (already have the mountings and wiring in place) then move on to another area, most likely trim/body related. IMG_0743.JPEG
 
Looking great Bob! Can't wait to see it finished, been watching since day one!
Thanks Josh, I really appreciate it. Hope the GTX is coming along as well.

Fury's getting put away in my garage for a while, I'm helping some friends with their start-up and will be traveling around the country extensively with little time to work on it :(
 
Thanks Josh, I really appreciate it. Hope the GTX is coming along as well.

Fury's getting put away in my garage for a while, I'm helping some friends with their start-up and will be traveling around the country extensively with little time to work on it :(
Well sad to say, the GTX hasn’t gotten much love lately. I moved out of Vegas to Oklahoma. She’s been sitting tucked away in the garage pretty much the whole time I’ve been here, I need to start getting back to her. Last work I have done was repair that nasty dent in the fender, it came out pretty good. Started digging into the passenger quarter to find out it looks like a golf ball in quite a few spots.
 
Hey Bob!
Good to see the 64 has come along so far! I haven't been following along that much, sorry to say but it is nice to see that you've kept right at it and it's all looking terrific! Good job my friend!
 
Great to see you back at it. Like that steering wheel too. Is the brand Alacantara??
 
Well it's happened, I pulled the Fury from the shop, along with all my tools, and put them all in a storage locker. I've taken a position with a start-up and it has me traveling around the country endlessly so there just isn't time to get back here and work on it. It breaks my heart to do it but other than selling it there just wasn't much choice.

Here's a parting pix until I pull the Fury out and get it finished:

Into Storage.jpg
 
Auto Transport Service
Back
Top