You are using an out of date browser. It may not display this or other websites correctly.
You should upgrade or use an alternative browser.
You should upgrade or use an alternative browser.
69 Coronet 440 project
- Thread starter BigBlock61
- Start date
roadrunnerman
Well-Known Member
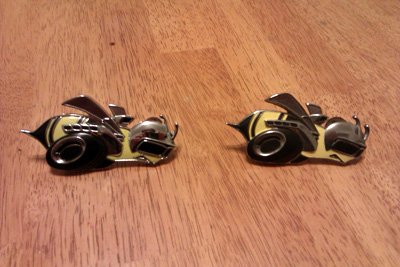
That is very cool. Not sure if they remanufacture them or not but I know they are hard to find.
BigBlock61
Well-Known Member
That is very cool. Not sure if they remanufacture them or not but I know they are hard to find.
The shiny one is NOS and the other is Year One. I have the boxes they came in.
1mightymopar
Well-Known Member
Awesome car, love the white interior. Good luck with the father son project, can't waite to do that with my boys!
BigBlock61
Well-Known Member
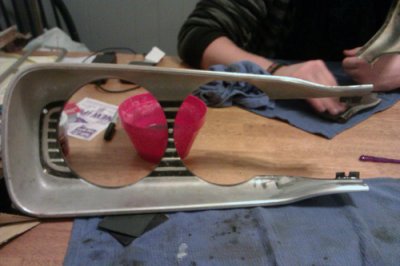
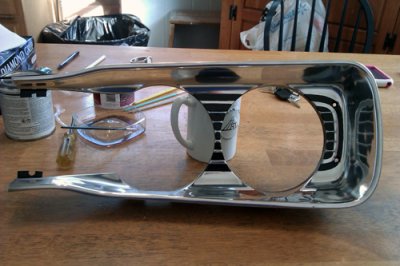
With it being winter here in Detroit it's too cold for me too do anything serious to the Coronet. I've been bringing the aluminum trim pieces in the house so I can polish them. Here is the left headlight trim that I just finished. Now for a clear coat, then wrapped up to be stored away till I'm ready to put it back on the Coronet. It was lots of sanding and then polishing with Mothers Mag & Aluminum Polish. Then a quick coat of Shop-Line Black paint.


Commando 65
Active Member
Wow nice job on the Crome ! Hope to see that thing cruising the motor city soon !!!!!
Ron 73
Deceased, But not forgotton
If your whole car turns out as well as the work you did there, the envy bug will be biting! Great job!!
roadrunnerman
Well-Known Member
That turned out great.
BigBlock61
Well-Known Member
Today was such a nice day here in the "D" that I decided to do some work on the Coronet. My son Erik and me removed the spiderwebed front windshield today. Guess what we found underneath?
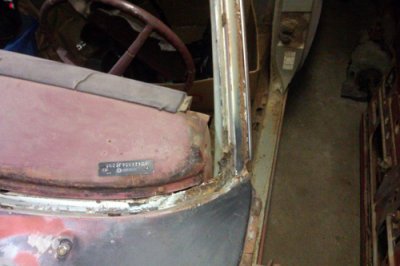
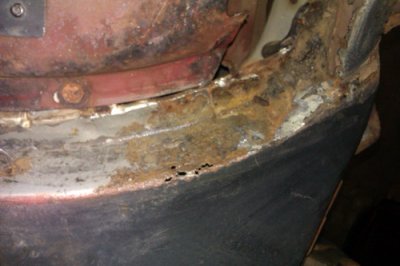
More rust holes and a ton of body filler. ops: Next I want to remove the dash and see what shape the firewall is in. I do like the idea that the original color can be seen in the window frame. It's Metallic Silver. Every car I own right now is silver lol.


More rust holes and a ton of body filler.
MNBiker
Well-Known Member
The headlight bezel looks great! How fine of sandpaper did you use before using the Mothers?
BigBlock61
Well-Known Member
The headlight bezel looks great! How fine of sandpaper did you use before using the Mothers?
I started with 320, then 400, then 800, and finally 1000. I was considering 1500 but I think it turned out fine without it.
BigBlock61
Well-Known Member
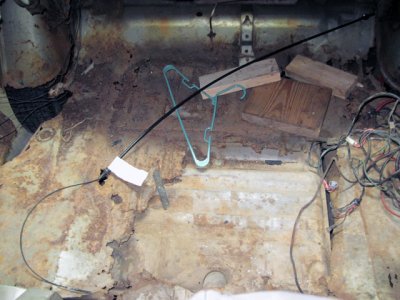
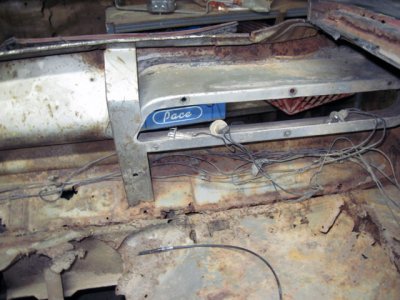
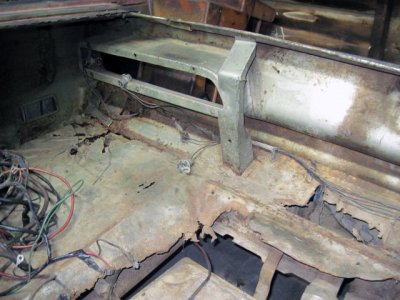
Hello all, it's been awhile since I've posted on the Coronet. With the warmer weather finally here I've decided I need a game plan so this doesn't overwhelm me. After getting out there to see what I have, I've decided to start on the back and work my way forward. The trunk is completely rotted out and the tail light panel has a few small holes in it. My question to you here is how should I proceed? I've read on here about getting the frame straight and level. Is it as simple as putting the car on jack stands and shimming till it's level or is there more to it. I'd like to weld in frame connectors and torque boxes. Should I start there first and then move to the back or could those be added later? I'm new to body work but I've been a mechanic for 25 years and not a completely horrible fabricator, so I'm sure I can do this. What do you guys think of Shermens and Associates for the body panels? They are local to me here in Detroit and was wondering if anybody has used them before?


roadrunnerman
Well-Known Member
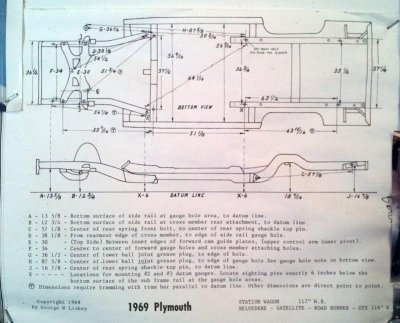
If you are going that route, then you can probably get it straight, just take your time and take plenty of measurements. I would get about 4 pairs of jack stands if you don't have access to a frame jig. There is a diagram that has been posted on here that DONNY had uploaded for the measurements you will need. Frame connectors and torque boxes should be welded on after you have everything fixed/replaced. That way the car will be straight and stay straight. Getting the frame straight is going to be the major solution to having everything else straight on the car.
I have not personally dealt with Shermans, so I can't help you on that, but i'm sure somebody else here can.
I have not personally dealt with Shermans, so I can't help you on that, but i'm sure somebody else here can.
Propwash
Well-Known Member
- Local time
- 3:22 PM
- Joined
- Oct 29, 2009
- Messages
- 9,710
- Reaction score
- 4,325
- Location
- Island of Misfit Toys
Roger (Roadrunnerman) has some good advice. No rolling Jig or rotisserie, get 4 jack stands. The bigger the better, usually equates to how tall you can raise them. The higher up, the more room you'll have underneath to navigate around. Get the car level. Use a level (I prefer the digital with the included water bubble). Looks like your rear package tray would be a good place to put the level for your side to side leveling. Setting it on the flat area of the rocker inside the door opening is a good place to level front to back. Use rubber shims between the jack stand head and the bottom of the car to tweak the balancing. I just use chunks of mudflap. I don't use metal to shim being it would be more prone to slipping off.
If your frame rails are still attached to the rear crossmember, that's a good thing. At least they're still tied in parallel to each other. If the rear crossmember is still tied into the rear tail/fill panel and trunk pan, that's even better. Odds are it's still straight back there, unless the car was damaged/twisted in the past. Next, use a plumb bob and mark from key points on the frame rails (in the same spots) to the floor. Mark the floor with a permanent marker where the plumb bob centers out. Mark the area on the rail where you held the string. Now, measure between the mark on the frame rail and the mark on the floor. Take pictures, mark the floor, document it, make a drawing..what ever suites your fancy, but never the less, don't lose that data. The more reference material and measurements you take the easier it will be to re-install and re-install correctly. Also plumb bob mark/measure other critical areas like the center cross support, shock crossmember, shackle mounts, fill panel ect...ect... the more the better. One you're done with that, examine your results and see where your at as far as being straight. Start with all of that first, then worry about removing what's left of the trunk pan, extension panels and what ever else may need replacing/repair
Good luck
BigBlock61
Well-Known Member
Propwash and Roadrunnerman Thanks for the advise That's exactly what I wanted to know. No I don't have all the fancy stuff that would make life easier like a frame jig but I do have 4 quality MAC jackstands that will raise the car 2 feet in the air. I'll get a hole of some heavy duty rubber for the jackstands because that just makes sense. Ok plum bob, CHECK, level, CHECK, string, CHECK, bigazz sharpie, CHECK  Today I'm going out there to remove the things that are in the way, like the gas tank and possibly the rear end. My biggest workaround is my one car garage. What, I like a challenge lol.
BigBlock61
Well-Known Member
A huge thanks to DONNY for sending me all the measurements for the frame of a 69 B-body. Once I get the car on the jack stands and level I can check to make sure everything is straight. I'm going to post the pic he gave me encase someone else can find it useful. I've brightened it up and cut out all the non essential stuff. It's large so I hope it posts ok.

BigBlock61
Well-Known Member
Hello all,
First off a heart felt moment of silence for the people of Boston. What a tragedy and hopefully the perpetrators will be brought to justice.
I think my Taurus is getting jealous of the Coronet. It decided to not start on me yesterday at work. It's one thing when it breaks down at home, but to break down and leave me stranded at work is just mean. Had to call my daughter to come and rescue the car and me. Thankfully there are no pictures of her 2001 Hyundai Elantra towing my 97 Taurus wagon down I 94. Yup the foreign car had to tow the American car. At least it was a Ford and not a Mopar. Looks like it turned out to be a bad battery and the Transmission Range Switch was toast. Got them both replaced today and the car fired right up, fingers crossed.
This also reminds me that if I'm going to use my jack stands for the Coronet, maybe I need to buy some more for the day to day stuff. :tongue5:
BigBlock61
Well-Known Member
Went out to work on the Coronet today before the rain started. I'm stripping the underneath side so I can work on the body. Someone welded in a trailer hitch and then cut it out later. As I was removing those pieces I found the right rear frame rail has some rot in it. I did some quick measurements and the frame is still straight and right where it should be.
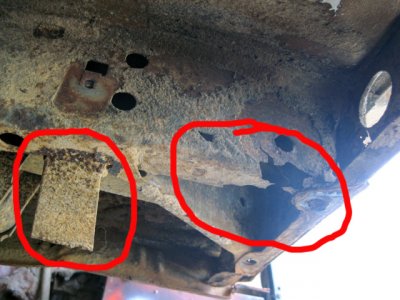
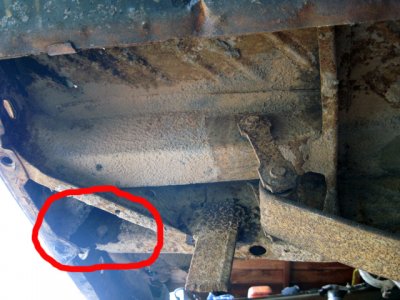
My question is can I cut out 6 to 8 inches and weld in a new frame piece? It looks like it would be easy enough to do. Then the next question is does anyone have a spare RR frame rail where the last 10 inches are in good shape? If so how much? I really don't want to buy and replace the whole rail if I don't have to.
Looking at the other rear frame rail I noticed a rusted bolt sticking out of the shackle mount and I was puzzled on what it was. Then it hit me, it's the fitting for air shocks. I guess this car had air shocks on it at some time.
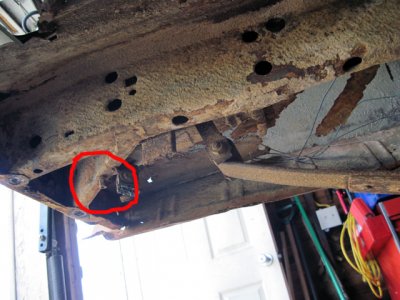
This picture I just love. It makes me giggle every time I look at the car. A coil over shock on one side and a normal shock on the other. I think I'm going to keep it like this lol.
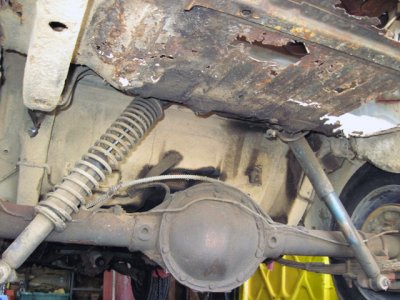
:iamwithstupid:


My question is can I cut out 6 to 8 inches and weld in a new frame piece? It looks like it would be easy enough to do. Then the next question is does anyone have a spare RR frame rail where the last 10 inches are in good shape? If so how much? I really don't want to buy and replace the whole rail if I don't have to.
Looking at the other rear frame rail I noticed a rusted bolt sticking out of the shackle mount and I was puzzled on what it was. Then it hit me, it's the fitting for air shocks. I guess this car had air shocks on it at some time.

This picture I just love. It makes me giggle every time I look at the car. A coil over shock on one side and a normal shock on the other. I think I'm going to keep it like this lol.

:iamwithstupid:
Propwash
Well-Known Member
- Local time
- 3:22 PM
- Joined
- Oct 29, 2009
- Messages
- 9,710
- Reaction score
- 4,325
- Location
- Island of Misfit Toys
LOL! that is pretty funny on the shocks..Brilliant!. You sure can graft in a donor section! These cars love to rot back there...might be a little tough to find a decent section someone will dice up for you, but definitely possible for sure. I don't know your intentions on how perfect your car needs to be, but going off your pictures I would just graft in some 14 gauge steel to repair that area, if that's the only real issue with the rails. Would be plenty cheap and easy enough to shape/bend just using a decent vise and some simple hand tools. For the ears at the end of the rail where they take 90* turns to meet the rear crossmember, just cut out the shapes and fillet weld to the end of the straight rail section and then to the crossmember, if you don't want to incorporate them into the chuck of straight rail. Just IMO though.... Not too bad looking under there, nice!
BigBlock61
Well-Known Member
Propwash I just want a straight car with no rust on it. It's not going to be concourse, but I'd love to be able to take it to a car show and be proud of what I've done with no excuses. I'm not in a big hurry to get her done, but this site definitely motivates me.
Similar threads
- Replies
- 7
- Views
- 460
- Replies
- 31
- Views
- 2K
- Replies
- 15
- Views
- 1K
- Replies
- 21
- Views
- 981

