• When you click on links to various merchants on this site and make a purchase, this can result in this site earning a commission. Affiliate programs and affiliations include, but are not limited to, the eBay Partner Network.

69 Roadrunner restoration

Jason69 rr did you buy the car in California ? Is it done or is it a project car?
 
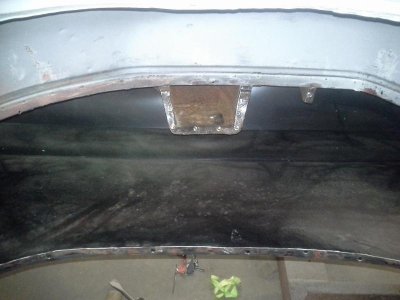
It's been a while since I had a chance to update this thread. The engine 440, is now completely rebuilt, alum heads, voodoo cam, roller rockers etc. the previous owner welded the rear deck panel to the quarters, so I decided to replace the panel as I wanted the correct look of the factory seem. The new amd piece fit decent, not perfect but decent. One corner was about a half inch too high so as you will see in the pic I had to slice it and dolly the corner in.

- - - Updated - - -

Deck panel
 

Attachments

  • image.jpg
    image.jpg
    44.2 KB · Views: 384
  • image.jpg
    image.jpg
    32.9 KB · Views: 388
  • image.jpg
    image.jpg
    43.7 KB · Views: 397
  • image.jpg
    image.jpg
    42.7 KB · Views: 377
  • image.jpg
    image.jpg
    51 KB · Views: 394
  • image.jpg
    image.jpg
    49.5 KB · Views: 418
  • image.jpg
    image.jpg
    43.7 KB · Views: 391
  • image.jpg
    image.jpg
    56.1 KB · Views: 382
  • image.jpg
    image.jpg
    52.5 KB · Views: 386
Outer Wheelhouse replacement

The previous owner had replace the quarters, but decided to patch the outer wheel houses in a very poor way. So I decided to replace them before I go any further.image.jpgimage.jpgimage.jpgimage.jpgimage.jpg

- - - Updated - - -

Wheel house finished in epoxy primer, seam sealer next. As you can see in the pic below, one of the wheel houses (AMD) needed the corner made longer, it was over a inch too short, I made up three pieces to lengthen it. I also had to patch a small area of the inner house.
 

Attachments

  • image.jpg
    image.jpg
    33.7 KB · Views: 381
  • image.jpg
    image.jpg
    44.7 KB · Views: 385
  • image.jpg
    image.jpg
    27.2 KB · Views: 376
  • image.jpg
    image.jpg
    35.2 KB · Views: 374
Real good work your doing with this one, Good luck man!!
 
looking good, keep it up
 
Looking good.

I see earlier in the thread you were wondering about the AMD fenders. I didn't see whether you've ordered them yet or not.

FWIW, I'm not too happy with mine. I ordered a pair just recently.

Packaging is a bit of an issue. There is essentially no support/packaging. Just thrown in a big box with one layer of bubblewrap taped to the outside, with a couple of small foam blocks stuck on some protrusions. Make sure you look them over carefully before accepting them from the shipper.

The big issue on mine were that neither one matched the curve of the door. The driver's side fender is too crowned, and the pass is too flat. So if they are aligned at the top of the door and at the rocker/bottom of door, in the middle, the door is proud of the fender on the pass side, and vice versa on the driver's side. Hard to make any adjustments with the support right at the back edge of the fenders too.

And, although I don't have any actual measurements to back it up, it appears to me that the style line on the repro fenders are not as distinct/highly-embossed as the originals.

If I had to do it all over again, I would have put the extra work into fixing the ones that were on it.
 
mopurist, I actually bought a pair a bout a month ago, I have them and there does not appear to be any damage, I am nervous of the fit though, I have not tried them yet. How long ago did you buy yours? I'm hoping mine will fit well
 
hey dean, just went thru you whole thread. car looks great, you did some awesome work and the car is very solid for sure, the fenders I bought seem to be ok as well hopefully yours will be too. was the car from NFLD or did you get it somewhere else? seems to be to in to good of shape for it to be from there unless someone looked after it. I am still picking at mine but trying to finish the challenger, I bought a 18 spline 4-speed, quick time bell and a McLeod twin disk flywheel package so I will play with that when I get home tomorrow. I will keep watching your progress(it gives me some incentive)thx bruce
 
Hey Bruce, I bought the car in southern Illinois , last year I picked it up myself, I had it bought before I went on my trip, it was a bit of a gamble since it was a 8400 km (5200km) mile return trip. The guy started the restoration, but wasn't going to do it with as much detail as I am planning, so there were some disappointments, I had to replace the floor pan because of his patch work and the outer wheel houses because he pieced them in a poor way, along with the deck panel. But all in all my plan from day one was a rotisserie restoration, so no big deal, just a little more money and time on the panels. I soon need to decide on a color, I'm might lean towards rallye green. I really hope my fenders fit ok. Your progress looks great, I'm sure yours be a sharp car.
 
hey dean, yeah I had to go to Alabama for the challenger there was not much to chose from close to me. same as me I had to take the guys word but it was exactly as he said when I arrived and I am glad I went that way instead of having to deal with a lot of rust. color is a tough job for sure but it's a roadrunner and they all look good no matter what color it will be.I am finding it hard to find a bench seat there is a 69 Monaco close to me that has buckets but not sure if they would be the same? do you know the dimensions of the holes where the buckets go thru the floor? I am hoping they will fit. thx Bruce
 
Bruce,
I should be in the garage, tomorrow evening, I will take those measurements for you and post them here.
 
Bucket seat measurements

Here are the bucket seat measurements Bruce is looking for, side to side 13 3/4 inches and front to back 10 3/4 inches, this is from the center of the whole to center of hole.
 

Attachments

  • image.jpg
    image.jpg
    30.1 KB · Views: 306
Looking super, I hope in two-three years im where you are! i have to get the plates off mine before floor replacement for the buckets, wondering what kind of pain they cause getting them off and replaced! Good luck, It sure looks like you have things going your way! :)
 
mopurist, I actually bought a pair a bout a month ago, I have them and there does not appear to be any damage, I am nervous of the fit though, I have not tried them yet. How long ago did you buy yours? I'm hoping mine will fit well

Mid August.

I had seriously considered going back to the originals and selling the AMDs. In the end, I stuck with the AMDs, in large part because there isn't someone like RediStrip nearby, and the old ones had rust under the rear stiffeners that would need to be addressed.

Here's to hoping yours are better than mine. (Not saying mine are total junk, but they are certainly a bit more off than I had hoped.)
 
Hey guys,
I got a little more time in at the roadrunner. I chemical stripped the engine bay and welded in the floor. Hopefully prime those areas tomorrow. I still need to find the proper location of the 4 speed console brackets.
What did you use for the strip?
 
Moparalysis, I used aircraft paint stripper, there were several layers of paint and if you let this stuff sit for a few minutes it really breaks down and lifts the paint. I scrapped off most of the paint and then used a wire wheel on the grinder to clean the rest. Hope this helps.
 
Here are the bucket seat measurements Bruce is looking for, side to side 13 3/4 inches and front to back 10 3/4 inches, this is from the center of the whole to center of hole.

hey thanks a lot dean, that makes it easier for sure
 
Auto Transport Service
Back
Top