• When you click on links to various merchants on this site and make a purchase, this can result in this site earning a commission. Affiliate programs and affiliations include, but are not limited to, the eBay Partner Network.

And so it begins..... my new garage

747mopar

Well-Known Member
Local time
12:29 PM
Joined
Oct 30, 2012
Messages
13,800
Reaction score
19,225
Location
ohio
This is along time coming but finally the excavator showed up today:thumbsup:. Spent the last month tearing down the old barn (poorly built and falling apart) making room for my new home. A little surprise slowed the process though..... once I pulled it over and started cleaning up the mess I quickly realized it wasn't a wood I was familiar with but was Wormy Chestnut! Anybody who knows me knows I like unusual looking lumber and carefully stickered it all for later use, likely a kitchen table and chairs?? All other wood was burned as rain permitted.

The other slow down came from the foundation, evidently concrete was dirt cheap when this barn was built.... they used no fill but instead leveled the barn with solid concrete!!! 3/4" holes were drilled in the right spots and blown apart with good ol pistol powder, lot's of fun:lol:. I'll be cleaning up concrete 100 ft away for quite a while.


The backhoe finally showed up and got all of the concrete cleaned, he figures he'll be done before the weekend so here we go.

ill be watching this thread with great interest...

so you're a regular Barnwood builder, eh?? {insert headbang smilie here}

and hey, you'll be finding concrete for a few years to come...but it was much worth it! lol

good luck on your new build and of course...

:xscuseless:
 
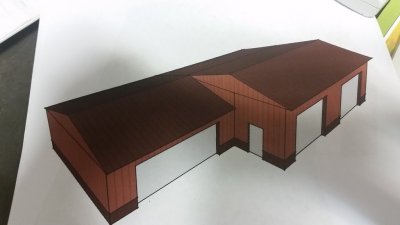
Here's a pic and here's the plan. The larger portion with the 2 garage doors will be 32 wide X 34 deep, stick framed, fully insulated, drywalled, A/C, heat, bathroom, 2 post lift and a storage loft sitting on a full foundation. The 24 X 24 lower portion with the 16' door will likely be poll barn style and non insulated for parking only.
20160801_160604.jpg
Here's the lift that I've decided to go with, it's a Worth 2 post symmetrical with an additional 12" of width added.
D Jackson 10CF 1 [72632].jpg
 
Last edited:
good luck with the build. I'm jealous, I'm stuck in a 2 car garage for now. I might be able to build a small outbuilding but have access to get the car back there.
Well that answers that question. :thumbsup:
 
Here's a pic and here's the plan. The larger portion with the 2 garage doors will be 32 wide X 34 deep, stick framed, fully insulated, drywalled, A/C, heat, bathroom, 2 post lift and a storage loft sitting on a full foundation. The 24 X 24 lower portion with the 16' door will likely be poll barn style and non insulated for parking only.View attachment 355556 View attachment 355557


View attachment 355556 View attachment 355556

homer drooling (small).jpg


Im with Riverdawg...my poor Newport has to live outside cuz I only have two inside spots. :BangHead:
 
View attachment 355558

Im with Riverdawg...my poor Newport has to live outside cuz I only have two inside spots. :BangHead:
I'm not far from that now. When I was still living with my parents (18-19) we built a 32X100 garage that's servived me well but have to share it with my brother and dad which is where the problem is. With my dad retired now and my brother getting divorced they both have more time to work in the garage not to mention we keep getting more toys so now it's time to build.

Tired of my Charger being covered in dust needing washed continously and need a home for my boat, tractor and side by side as well. Can't wait!
 
This thread will be full of questions as I go. I've built homes, garages, etc but am putting emphasis on insulation and sealing it up tight so might be looking for ideas. I'll stick frame it with 2X6s, trusses on 24" centers but instead of plywood I'll be siding it in metal over perlings. Tin over perlings usually means drafts so that's one area I need to address, I'll put up faced R19 but to cut down on drafts wonder if house wrap will do or if foam board under the tin would be better? Also the foundation, will it be beneficial to put foam or just a barrier under the pad and does the vertical footer wall need insulated as well to keep cold out of the floor. One thing to keep in mind is this will be a low budget build so keeping cost minimal is important.
 
In the shop built I put vapour barrier over the gravel then 2" rigid foam which really helped to retain the heat and keep moisture from permeating through the slab. I wish my current shop was built like that as i find moisture seeping through periodically.
Good luck!
 
Do you mind if I echo the jealous posts..... 2 car garage living in Los Angeles doesn't give you much room to park - let alone work on the car.

But I enjoy your posts and wish you good luck on building such a sweet facility.
 
You might want to check into having the walls/dialing sprayed with foam. I'm sure the initial cost might hurt but could possibly save you tons in the long run.
The reason I'm saying this was I was on a bus I ads trip touring a mfg facility and they had a tin building with a really low roof insulated with the foam. It was probably 8' @ the wall and may be 13-14' at the peak & about 3000sqft. Outside was 102 and there was probably a 20 degree difference. Both ends had the doors open with a shop fan and it was comfortable!
Our shop has the roof and wall insulated with the plastic face fiberglass and it's hot as hell and in the winter it gets pretty chilly...the building seems to hold the chill even after its warmed up outside...it's crazy...
 
Don't forget the floor heat!!!!


I was going to suggest putting down EPS board and running the PEX tubing before the pour. Yes, it will add a little expense, but you can install the boiler and manifold 10 years from now. Once the slab is poured, you ain't sneaking the tubing under there later.
 
Don't forget the floor heat!!!!


Just kidding:rofl:
LOL. I can't believe how quickly I'm blowing threw the budget as is! Haven't bought anything but lumber and the lift as of now but punching the numbers shows I'm going to be pushing it. I've got a backwards uproach to building things, figure out how much I want to spend then figure out how to get it done for that...... Always a challenge.
 
You might want to check into having the walls/dialing sprayed with foam. I'm sure the initial cost might hurt but could possibly save you tons in the long run.
The reason I'm saying this was I was on a bus I ads trip touring a mfg facility and they had a tin building with a really low roof insulated with the foam. It was probably 8' @ the wall and may be 13-14' at the peak & about 3000sqft. Outside was 102 and there was probably a 20 degree difference. Both ends had the doors open with a shop fan and it was comfortable!
Our shop has the roof and wall insulated with the plastic face fiberglass and it's hot as hell and in the winter it gets pretty chilly...the building seems to hold the chill even after its warmed up outside...it's crazy...
My brother in law did that to his house, talk about sealed tight!!!
 
As five window says, at least put the tubing in the concrete! What's another grand$ ?? Lol
 
that is going to be awesome dev, but you know what happens when you get all done......."SHOULD'VE BUILT IT BIGGER".........lmao
 
As five window says, at least put the tubing in the concrete! What's another grand$ ?? Lol
All in all, the tubing is relatively cheap - it's the foam board that is a little salty.
I have hydronic heat in my shop and it was the best decision I've ever made.
 
The term you are looking for is purlins, not perlings. Just busting you balls a little. House wrap over the purlins would help with draft. Skip the kraft faced insulation and run a 6mil plastic vapor barrier on the inside of the studs. You never want to install kraft faced insulation on the face of the studs, only on the sides. If you overlap it on the face of the studs, it makes it hard if not impossible get the sheetrock tight to the stud. Eventually this leads to the screws and nails "popping" after it is mudded. You are right with your thinking on getting a good tight envelope to seal the building. If you have any questions feel free to PM me, I've been doing this stuff for a long time. Jason
 
Auto Transport Service
Back
Top