• When you click on links to various merchants on this site and make a purchase, this can result in this site earning a commission. Affiliate programs and affiliations include, but are not limited to, the eBay Partner Network.

Can of rusty worms

the glass wasn't too difficult to put in place. Takes lots of time to get the bottom into the groove and work the top corners. Basically pushed out the gasket at the top corners with my fingers until the glass slid down a little. Pushing it inwards helped to seat the windshield. Used lots of glass cleaner to keep the rubber lubed while working the glass.

IMG_4517.JPG

IMG_4519.JPG
 
added some dumdum in between the glass and the gasket for extra sealing. There were slight gaps around the glass that might tighten up when the gasket is locked into place but I wanted to be sure!

IMG_4523.JPG


gasket locked in easily by lightly pushing the gasket lock inward.

IMG_4525.JPG
IMG_4526.JPG


happy to have this milestone reached!

IMG_4527.JPG
IMG_4528.JPG
 
Nice to see chrome back on!

IMG_4529.JPG

IMG_4530.JPG


Re-adjust the carpet after the previous owner didn't place it properly.
That's enough for one day (actually two!)

IMG_4531.JPG
 
Nice! Looking like a car again!!!! Shouldn't you have welded the roof on before installing the glass? ;)
 
You're doing a great job there Glen. :thumbsup:
 
Glen, Great job on the windshield....and doing it on a vert!
 
Been spending time opening the pool and trying to start up an electrical business, so less time time on the 64. Managed to get a few things done.
brake lines are connected up and bled. fubar'd the fuel line so I replaced the damn thing again! Got the new ss emerg brake cable and installed the pedal assembly. Painted the trunk, starting with a bed liner and then spackle paint. Looks pretty good to me.

As I bought it with carefully hidden issues...

trunk1.jpg


After a little digging and tank removal...

IMG_3665.JPG
IMG_3660.JPG


IMG_3820.JPG


out with the old...

IMG_3919.JPG


bedliner and spackle...

IMG_4532.JPG


IMG_4533.JPG


Once the front end linkage is buttoned up, I guess I'll dive into the electrical, although I'm tempted to drop the drivetrain in. I was thinking about replacing the fuse box, but am not sure what to go with. Anyone have suggestions? I'd like to split some circuits with additional fuses.

I've also been trying to track down OEM style wire terminal connectors that have the retaining 'hooks' to push into plastic bulkheads, etc., and OEM coloured wiring but cannot find anything online. I'd rewire the harnesses if I could find these things.
 
Glenwood: Man have I been out of touch (Retirement lake house looking) with whats been going on here on For B Bodies Only....you have come a long way with your build. The progress is looking awesome. Keep at it, this gives me motivation to continue pounding away on my build..
By the way what is dumdum and where does a person get it?
 
Thanks Crumley. I'm determined to drive it this year.
dumdum is a rubberized strip caulk that will stick to metal, paint, glass etc. I used a proform product but I believe 3M makes the same thing. I got the idea from Jim's Coronet 500 build. It's a lot cleaner and easier to manage than the urethane stuff, but takes more time and effort to apply. Hopefully it doesn't leak!
 
Found some time to clean up the rear chrome and install. After which, I inspected the rear wire harness, soldered some wire-twist/taped connections by a PO and tested.

IMG_4564.JPG
 
I pulled every terminal out of the headlight harness from the light and bulkhead connectors to inspect and clean. The harness is in good shape and had little corrosion. After a good scrubbing with electronic cleaner, the wire ends of each terminal was coated with dielectric grease and the flat blades sanded lightly with 600 grit. This original harness has the wire for the windshield washer bag separate from the taped harness for some reason. I do not have the original washer bag so I have to find an alternative reservoir. I was thinking of locating behind the grill, out of the engine bay, so I would have to replace this wire. The original horns are also missing, so it should be fun finding them.

I bought a new bb harness for electronic ignition last year but am disappoint with the quality. I checked each wire against the original for accuracy, color and gauge. None of the wires have tracers as does the OEM, which is understandable I guess. Otherwise, the main color, accuracy of bulkhead port and gauge are correct. The very first connector I looked at had two wires crimped into one terminal and one wire just fell out. So for the next several hours, I took every single wire terminal out of its plastic housing and re-crimped them properly. Tedious work, but a necessity to avoid a fire! Each had the wire stripped too long, which may interfere with the mating terminal when pushed on, so these had to be snipped. Each terminal was then coated with dielectric grease where the wire is exposed to keep out moisture.

Comparing old the bulkhead with the new.

IMG_4553.JPG


Horn relay needs replacing. I hope they are still available.

IMG_4555.JPG


New bulkhead has the blade terminals crooked and twisted. I removed each, re-crimped, coated and straightened out before re-installing.

IMG_4560.JPG


IMG_4558.JPG


Wire has been stripped too long and needed snipping.

IMG_4562.JPG


The harness has the horn wiring taped with the alternator and distributor wiring. I may untape and reroute the horn wiring. Hard to tell what to do with it until I get the engine in. I don't really like wiring setting on the engine to the alternator and distributor, but this harness may be too short to route along the inner fender.

IMG_4563.JPG
IMG_4559.JPG
 
Last edited:
Cleaning the connections helps alot. I did that on my Challenger years ago. Pulled the terminals out of the housings, heated and cleaned them with tinning fluid, soldered them, neutralized after, packed them with dielectric and re-assembled.
 
Who made the engine harness you are having trouble with? You are fixing it correct although you shouldn't have to in the first place.

Biggest issue with my harness were the female spade connectors being loose so I tightened the fit with some pliers and cleaned the connections. The floor dimmer was loose and caused some weird issues including a hot connector.

I might have an extra horn relay, let me look.

It was ordered through Mega parts. I don't really trust these reproduced harnesses anyway, so I prefer to check them over like the originals. I didn't notice any loose spades yet, but I haven't connected everything yet. Next, I'll inspect the original dash harness. Hopefully nothing crispy in there!
 
Next, I'll inspect the original dash harness.
Pretty much what I did on mine. Actually had the original, plus an extra, both having cut/bad wires. Used a sheet of 2' x 8' plywood, to lay a harness on, nails to locate lead-offs on the harness, and each wire end. Just to make sure, what I finished with, would fit the same. Worked out great!
Actually used the best wires off both harnesses, to get one complete. It's a mess to deal with, but needed! Some wires were completely replaced. So far all is good, after testing. Only issues are a few instrument lights not working...but, can be from no power, bad bulbs, or connections.

btw...got mail yesterday. Didn't have to, thanks a bunch!!!
 
Pretty much what I did on mine. Actually had the original, plus an extra, both having cut/bad wires. Used a sheet of 2' x 8' plywood, to lay a harness on, nails to locate lead-offs on the harness, and each wire end. Just to make sure, what I finished with, would fit the same. Worked out great!
Actually used the best wires off both harnesses, to get one complete. It's a mess to deal with, but needed! Some wires were completely replaced. So far all is good, after testing. Only issues are a few instrument lights not working...but, can be from no power, bad bulbs, or connections.

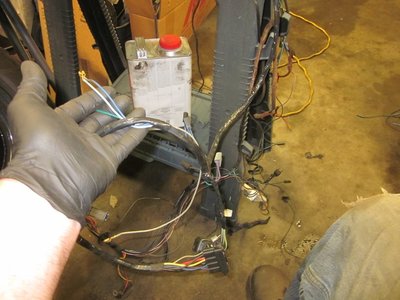
That's a good idea Miller. My old engine harness has fried wires from the horn relay and down to the starter from heat. The starter control and power wiring are not included in with the harness, so I'll have to make them up and I'll use 10 gauge instead of the 12ga the factory used. I also have to make up the battery cables and ground jumper. I'm contemplating running a bonding ground wire front to back and various points in the engine bay and under the dash to a common terminal base to ensure good grounding where sheet metal is relied on. I'd like to replace the fuse board if I find something I like with more circuits. I'm pulling apart the dash harness today which looks to be in good shape. I'm paying close attention to the ammeter wiring. I'd like to find a way to replace the ammeter with a voltmeter in the cluster. I'll likely either put a fusible link in series with it or bypass it altogether.

Thanks again Miller for sending me the little rubber heater valve seal from NAPA USA. Such a stupid little thing that I cannot find locally or get Napa Canada to order. I was able to repair and rebuild this crushed heater valve and test for leaks successfully. Now I'll have some heat control!

20150308_141606.jpg

20170106_152854.jpg
20170106_153450.jpg
 
Last edited:
Glad to help out! It's all the little stuff, that makes it all work. Can't imagine why it would be so hard to get a simple part like that, from where your at.

Yeah, I hear you on all the wiring stuff. A real treat! Actually not that bad, once you get into it. Main thing I see is all the little details on the wiring, need to keep track of. A little wild how some of that stuff is connected together.

New horn relays are out there...should be easy to find. If not...:D
 
Auto Transport Service
Back
Top