• When you click on links to various merchants on this site and make a purchase, this can result in this site earning a commission. Affiliate programs and affiliations include, but are not limited to, the eBay Partner Network.

Don's 1969 Charger Restoration

Sounds like you are bringing back many memories with this repair. It looks like your brakes are the same places where my grill was broken.
Your doing a great job. I like how you are filling in the gaps. You will make it look brand new when you are done. :thumbsup:
Thank you sir. Hopefully those memories are good memories and not nightmares!
For me it usually starts out as a nightmare, and as I work the problem it doesn't seem so bad.
And by time its done I am amazed at what I just accomplished
 
So once the mounting brackets dried I sanded them down to shape and used a hot stapler to add strength to the joint

P2120269.JPG

P3100033.JPG

P3100034.JPG

P3170035.JPG

I clipped the staples off ground them down then put another coat of 3M plastic filler, then sanded back down to clean them up (sorry no pics of this)

The next area to fix is the drivers side dog ear.
What I did was transfer the pass side outer perimeter to some graph paper.

PC060024layout2.JPG


then I transferred that into a cad-cam system,

PC120028cadlayout.JPG


and using the cam system cut the shape into a block of ABS, I mirror imaged the shape to get the driver side
P3090027.JPG

P3090026.JPG
 
Next I made some section templates of the pass ear (flipping them gives me the drivers side)
and started whittling away material until the template was close
P3090024.JPG


P3090025.JPG


P3090028.JPG

P3090029.JPG

P3090030.JPG

P3090031.JPG

P3090032.JPG

its getting there

P3180069.JPG

P3180070.JPG
 
Looking good Don:thumbsup: Still can't get over the amount of work your putting into this car!
 
Don, wanted to drop a line and say great work. Your work with the ABS is really amazing. I never would have thought that possible. This is why I love this place!
 
Looking good Don:thumbsup: Still can't get over the amount of work your putting into this car!
Thanks Devin

Don, wanted to drop a line and say great work. Your work with the ABS is really amazing. I never would have thought that possible. This is why I love this place!
Thanks Paul, and your right this site and all the members are amazing! That's how I learned
Thanks Don, I still need to get with you if you have those parts (PM me)

Great idea with the hot staples to make the repair strong! Stellar work as usual Don!
Thanks Pat!

Looking good.
Thank you sir
 
Now that I have the rough shape of the ear done it's time to see how to mate it to the bucket.

P3180072.JPG

P3180073.JPG

P3180074a.jpg


P3180076.JPG

Now that I have it close, I need to whittle a profile into the bucket that will accept my patch better than the jagged edge left, when the ear was broke off

P3190077.JPG

P3190080.JPG
 
To double check the attitude of the ear.(pitch or yaw for you airplane fans) I came up with a position fixture.

Sorry I did not get any pics, but basically I positioned the PASS side bucket onto a sheet of plywood and
shimmed the bucket up using a block of wood,(2x4) Till I got the ear to lay flat (as my patch is flat on the bottom)
So now that the bucket is shimmed up so that the bottom of the ear is flat on the plywood.
I transferred all outer edges down to the plywood.

Now I have to MIRROR image everything to get an accurate position for my ear
Hope this makes sense!

Anyway here is the paper with the mirror imaged outer edge of the ear

P3190082.JPG

and the ear "patch" in position

P3190083.JPG


So once I was happy with the position and how the seams fit, I v-notched all the joints and pushed a bunch of hot staples into it

P3190084.JPG

P3190086.JPG


P3190087.JPG

P3190089.JPG


Then I ground off the studs and filled all the joints with 3M plastic filler

P3190090.JPG


Here is the best pic I have of the finished ear

P5110160.JPG
P3190092.JPG
 
Thank you all for the encouragement!

I think the hot staples will add a lot of strength, and hopefully help to hold it all together.
I went back and made sure that every joint has staples.

P2120270.JPG

P2120271.JPG
 
would never have thought of the staples good strengthening idea! let me know when your ready for parts i'm good till i complete this project. have new gas tanks, wheel well chrome, two partial grills, 15" slots, dash pad, i won't be using plus alot misc that has changed as things went along so I'm good till this summer then u better come and see me. would rather sell it reasonable to someone who is trying to complete a project, not fatten there bank account. keep up the good work, i wanna see some paint on this soon.
 
Don,
Thank you so much for the generous offer, AND I WILL be coming to see you!
Believe me, I want to see it in paint to. But I have run into a few snags with the body that is really setting me back! It's mostly inexperience on my part on how to proceed. I just need time to figure it out.

My goal for the last 2 years has been by the end of the year to have it as a roller. Didn't make it again this year, but hay there's always next year (Detroit Lions motto)
 
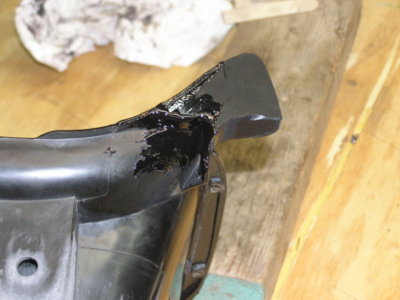
Ok the next thing to fix is the drivers side headlight door stop.
Apparently this is commonly broken. Why it happens on the drivers side only? Maybe because it is a little heavier than the passenger side because of the emblems? Or possibly to much pressure from the vacuum actuators.... who knows. All I know is, I don't want it to break again. So I decided to make the stop out of steel! (another member did this, I don't recall who, but thank you)

Here is a comparison of passenger and drivers headlight doors with the missing stop
P3220103.JPG
 
Auto Transport Service
Back
Top