You are using an out of date browser. It may not display this or other websites correctly.
You should upgrade or use an alternative browser.
You should upgrade or use an alternative browser.
DRUM Brake Overhaul - Now, for something totally different...
- Thread starter moparedtn
- Start date
- Local time
- 1:49 PM
- Joined
- May 14, 2011
- Messages
- 18,218
- Reaction score
- 35,463
- Location
- On the Ridge, TN
From the 1970 FSM:IF I remember right, your adjusters are made to adjust going forward. If the bottom arm was above star wheel, it would adjust in reverse.
- Local time
- 1:49 PM
- Joined
- May 14, 2011
- Messages
- 18,218
- Reaction score
- 35,463
- Location
- On the Ridge, TN
CAUTION!!
I decided to take the car to town on a test run (and to pick up the other brake tool I need for the fronts).
I checked the master cylinder first, topped off fluids...
I go to back Fred out of the garage - and I always back him out into an uphill embankment directly
behind the garage - and when I went for the brakes, I got NOTHING.
Zilch. Nada.
Grab something substantial, Gertie - we're going for a RIDE!
Pedal went all the way down and the warning light lit up on the dash!!
I'm thinking:

I had expected there to be at least some pedal, with the rest to be taken up by some rolling brake
pedal slams so the adjusters could do their thing....
Well, turns out it was a good thing I always back out of the garage uphill.
A futile trip across the front of the property and some gyrations with the brake pedal didn't
appreciably improve things, so back in the garage (CAUTIOUSLY) I went.
Up went the whole rear axle, then wheels and drums off....which revealed pristine new brakes,
sitting there like all was well; I almost thought I saw them thumbing their noses at me.
Grrr....
Then I really got PISSED....
I then proceeded to crank on the adjusters....and crank on the adjusters....pause, then crank
on the damn adjusters some more, test fitting the drums each time.
When I could barely get the drum back on the first side, I stopped and went to the other side.
Lather, rinse, repeat....
Slapped both drums on, ran a couple lugs up on them to square them against the axle flange,
then headed back into the car.
Well, I'll be damned. Car now had an actual firm brake pedal - and it was repeatable!
Got the wife involved at that point and had her sit behind the wheel while I manned each side,
spinning each drum by hand and telling her to SLAM on the brakes. Repeatedly...
Every time she hit the brakes, I felt it all the way through my shoulders, since I was the
horsepower turning the damn drums by hand.
SLAM! Sunova.... SLAM! Motherfluck.... SLAM! Sunofapreachersdaughter....
Once I was satisfied Fred wasn't going to get a repeat chance to kill me, we called it good
and I got him back down on all fours, then went for a "yard drive" once again.
Much hoonery ensued.... me taking off hard, then slamming on the brakes, over and over.
Across the yard, up and down the gravel drive, sliding sideways and generally acting like
I'd lost it...
Wife reported the rears were locking FIRST, as they should be at this point since they had the
new stuff and the fronts old stuff.
She also had some manner of less than complimentary commentary about my driving skills....
oh well, all is right in the universe again.
If you stumble across this thread years from now and you've made it this far, if you don't remember
anything else that has been written thus far in it, remember THIS:
Run those flucking adjusters up until you damn near can't get the drums on.
You'll thank me for it, if even posthumously....
I decided to take the car to town on a test run (and to pick up the other brake tool I need for the fronts).
I checked the master cylinder first, topped off fluids...
I go to back Fred out of the garage - and I always back him out into an uphill embankment directly
behind the garage - and when I went for the brakes, I got NOTHING.
Zilch. Nada.
Grab something substantial, Gertie - we're going for a RIDE!
Pedal went all the way down and the warning light lit up on the dash!!
I'm thinking:

I had expected there to be at least some pedal, with the rest to be taken up by some rolling brake
pedal slams so the adjusters could do their thing....
Well, turns out it was a good thing I always back out of the garage uphill.
A futile trip across the front of the property and some gyrations with the brake pedal didn't
appreciably improve things, so back in the garage (CAUTIOUSLY) I went.
Up went the whole rear axle, then wheels and drums off....which revealed pristine new brakes,
sitting there like all was well; I almost thought I saw them thumbing their noses at me.
Grrr....
Then I really got PISSED....
I then proceeded to crank on the adjusters....and crank on the adjusters....pause, then crank
on the damn adjusters some more, test fitting the drums each time.
When I could barely get the drum back on the first side, I stopped and went to the other side.
Lather, rinse, repeat....
Slapped both drums on, ran a couple lugs up on them to square them against the axle flange,
then headed back into the car.
Well, I'll be damned. Car now had an actual firm brake pedal - and it was repeatable!
Got the wife involved at that point and had her sit behind the wheel while I manned each side,
spinning each drum by hand and telling her to SLAM on the brakes. Repeatedly...
Every time she hit the brakes, I felt it all the way through my shoulders, since I was the
horsepower turning the damn drums by hand.
SLAM! Sunova.... SLAM! Motherfluck.... SLAM! Sunofapreachersdaughter....
Once I was satisfied Fred wasn't going to get a repeat chance to kill me, we called it good
and I got him back down on all fours, then went for a "yard drive" once again.
Much hoonery ensued.... me taking off hard, then slamming on the brakes, over and over.
Across the yard, up and down the gravel drive, sliding sideways and generally acting like
I'd lost it...
Wife reported the rears were locking FIRST, as they should be at this point since they had the
new stuff and the fronts old stuff.
She also had some manner of less than complimentary commentary about my driving skills....
oh well, all is right in the universe again.
If you stumble across this thread years from now and you've made it this far, if you don't remember
anything else that has been written thus far in it, remember THIS:
Run those flucking adjusters up until you damn near can't get the drums on.
You'll thank me for it, if even posthumously....
- Local time
- 1:49 PM
- Joined
- May 14, 2011
- Messages
- 18,218
- Reaction score
- 35,463
- Location
- On the Ridge, TN
A drive to town to fetch the missing retainer spring tool in Fred today was uneventful - but
always a freaking blast, too.
The rear brakes were totally silent and the pedal was good - especially with one pump, for
some reason.
I'll be doing the fronts this weekend, probably Sunday!
always a freaking blast, too.
The rear brakes were totally silent and the pedal was good - especially with one pump, for
some reason.
I'll be doing the fronts this weekend, probably Sunday!
I just spit out my Jack n Coke,,lmaoCAUTION!!
I decided to take the car to town on a test run (and to pick up the other brake tool I need for the fronts).
I checked the master cylinder first, topped off fluids...
I go to back Fred out of the garage - and I always back him out into an uphill embankment directly
behind the garage - and when I went for the brakes, I got NOTHING.
Zilch. Nada.
Grab something substantial, Gertie - we're going for a RIDE!
Pedal went all the way down and the warning light lit up on the dash!!
I'm thinking:
View attachment 1125041
I had expected there to be at least some pedal, with the rest to be taken up by some rolling brake
pedal slams so the adjusters could do their thing....
Well, turns out it was a good thing I always back out of the garage uphill.
A futile trip across the front of the property and some gyrations with the brake pedal didn't
appreciably improve things, so back in the garage (CAUTIOUSLY) I went.
Up went the whole rear axle, then wheels and drums off....which revealed pristine new brakes,
sitting there like all was well; I almost thought I saw them thumbing their noses at me.
Grrr....
Then I really got PISSED....
I then proceeded to crank on the adjusters....and crank on the adjusters....pause, then crank
on the damn adjusters some more, test fitting the drums each time.
When I could barely get the drum back on the first side, I stopped and went to the other side.
Lather, rinse, repeat....
Slapped both drums on, ran a couple lugs up on them to square them against the axle flange,
then headed back into the car.
Well, I'll be damned. Car now had an actual firm brake pedal - and it was repeatable!
Got the wife involved at that point and had her sit behind the wheel while I manned each side,
spinning each drum by hand and telling her to SLAM on the brakes. Repeatedly...
Every time she hit the brakes, I felt it all the way through my shoulders, since I was the
horsepower turning the damn drums by hand.
SLAM! Sunova.... SLAM! Motherfluck.... SLAM! Sunofapreachersdaughter....
Once I was satisfied Fred wasn't going to get a repeat chance to kill me, we called it good
and I got him back down on all fours, then went for a "yard drive" once again.
Much hoonery ensued.... me taking off hard, then slamming on the brakes, over and over.
Across the yard, up and down the gravel drive, sliding sideways and generally acting like
I'd lost it...
Wife reported the rears were locking FIRST, as they should be at this point since they had the
new stuff and the fronts old stuff.
She also had some manner of less than complimentary commentary about my driving skills....
oh well, all is right in the universe again.
If you stumble across this thread years from now and you've made it this far, if you don't remember
anything else that has been written thus far in it, remember THIS:
Run those flucking adjusters up until you damn near can't get the drums on.
You'll thank me for it, if even posthumously....
A bit of air in rear brake lines? Shoes not seated yet to drums?A drive to town to fetch the missing retainer spring tool in Fred today was uneventful - but
always a freaking blast, too.
The rear brakes were totally silent and the pedal was good - especially with one pump, for
some reason.
I'll be doing the fronts this weekend, probably Sunday!
- Local time
- 1:49 PM
- Joined
- May 14, 2011
- Messages
- 18,218
- Reaction score
- 35,463
- Location
- On the Ridge, TN
Ain't no telling - but I've bled hell out of the thing, more than once and by more than one method.A bit of air in rear brake lines? Shoes not seated yet to drums?
I even power bled it once - ok, the wife was the power, but hey....
Once I get the fronts done AND replace the front hoses, we'll bleed 'em again for sure.
Does this thing have some sort of check valve I need to prop open when doing so?
- Local time
- 1:49 PM
- Joined
- May 14, 2011
- Messages
- 18,218
- Reaction score
- 35,463
- Location
- On the Ridge, TN
UPDATE 6-22-21:
Bet you all thought I'd taken a powder on this, eh? Well....
Insert usual "life got busy" excuses here, but no matter, I'M BACK BIYOTCHES!
Or however the young folks say it....
Ok, on to the front brakes, right? SAFETY FIRST, my motto!
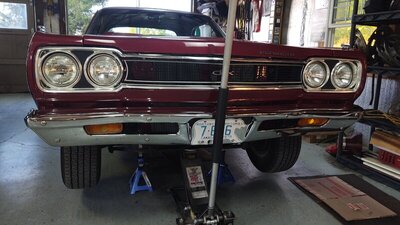
Up Fred went, then perched on jack stands.
Yes, I said jack stands...why are you snickering?
Let's see what I have to work with, starting with right (passenger side):
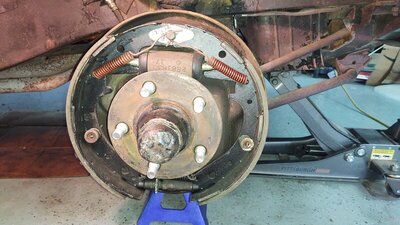
Hmmm, looks perfectly reasonable in there. Hub and drum has been separated previously and new studs
installed (keep in mind when I say "new", I mean several years ago, just new to me).
Shoes are more of the typical replacement relined crap, but good meat on them. Everything (including
what looks like the original wheel cylinder) is dry and where it should be.
Further shocking - the hose shows a date of 2009 and looks damn near new!
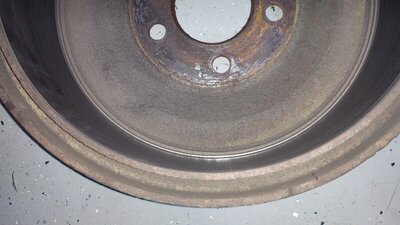
The drum itself shows evidence of being machined back 7 or so years ago when the mechanic supposedly
did the brake job (I need to cut the dude a break actually - all evidence so far indicates he did perfectly
acceptable work, given the budget at the time).
More importantly, they have a little more meat than the other pair of 11x3 drums I have, so they'll be
reused here.
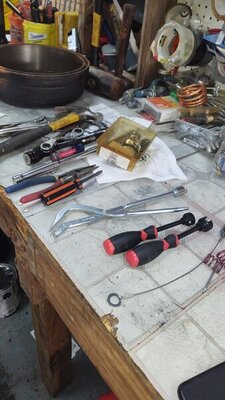
Assorted Chinese and hand tools at the ready, LET'S DO THIS!
Bet you all thought I'd taken a powder on this, eh? Well....
Insert usual "life got busy" excuses here, but no matter, I'M BACK BIYOTCHES!
Or however the young folks say it....
Ok, on to the front brakes, right? SAFETY FIRST, my motto!

Up Fred went, then perched on jack stands.
Yes, I said jack stands...why are you snickering?
Let's see what I have to work with, starting with right (passenger side):

Hmmm, looks perfectly reasonable in there. Hub and drum has been separated previously and new studs
installed (keep in mind when I say "new", I mean several years ago, just new to me).
Shoes are more of the typical replacement relined crap, but good meat on them. Everything (including
what looks like the original wheel cylinder) is dry and where it should be.
Further shocking - the hose shows a date of 2009 and looks damn near new!

The drum itself shows evidence of being machined back 7 or so years ago when the mechanic supposedly
did the brake job (I need to cut the dude a break actually - all evidence so far indicates he did perfectly
acceptable work, given the budget at the time).
More importantly, they have a little more meat than the other pair of 11x3 drums I have, so they'll be
reused here.
Assorted Chinese and hand tools at the ready, LET'S DO THIS!

- Local time
- 1:49 PM
- Joined
- May 14, 2011
- Messages
- 18,218
- Reaction score
- 35,463
- Location
- On the Ridge, TN
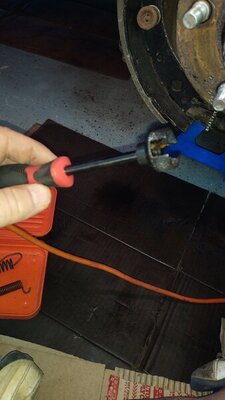
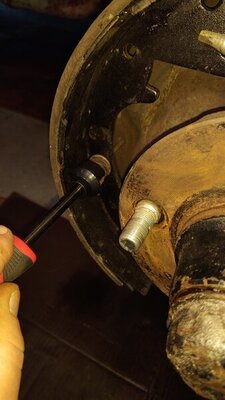
If you don't have one of these, GET ONE. Life gets so much easier when the right tools are employed...
and this here el cheapo brake spring tool sure made things fly versus when I did the rears without it.
Once the top springs on the existing shoes were released using the OTHER cheap Chinese tool, out
came this bad boy, who made quick work of releasing the whole mess from the backing plate.
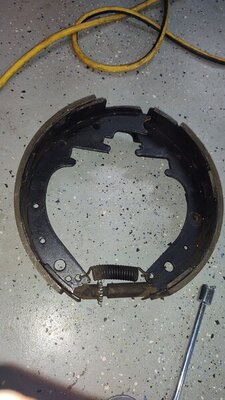
To quote the great Ken "Hawk" Harrelson...."He gone"...
Note the previous generation adjuster wheel and the only means of it being retained in adjustment,
the spring above it.
Take it from me - it don't work very well. At all.
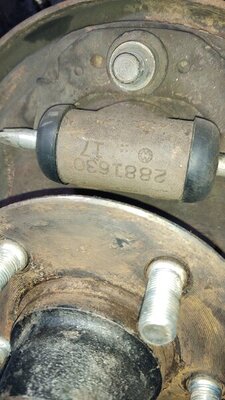
Take a gander at that wheel cylinder. Dry, good looking inside, nice boots - it's obvious it's been
rebuilt before, but it's also apparent it's the original. Amazing....it will remain until it gives me
reason to replace it.
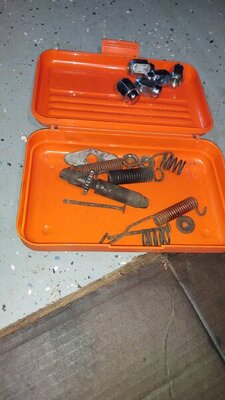
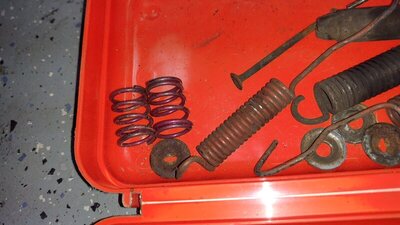
Old hardware to be discarded - and that INCLUDES the new shoe retainer springs, who again proved to be
too tall and of a thicker gauge than the originals, so much so that they totally bind up before the retainer
washer can be locked down over them. The old springs are in good shape and will be reused.
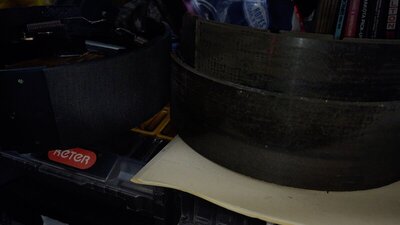
Crappy pic, but that's the new shoes on the left, old shoes on the right. the difference in material is striking.
The new shoes, all kevlar and carbon and metallic and spooky looking...
the old ones, all cardboard-y and pale, with no metallics (hence, no freaking BITE!).
Time to slap new to old!
- Local time
- 1:49 PM
- Joined
- May 14, 2011
- Messages
- 18,218
- Reaction score
- 35,463
- Location
- On the Ridge, TN
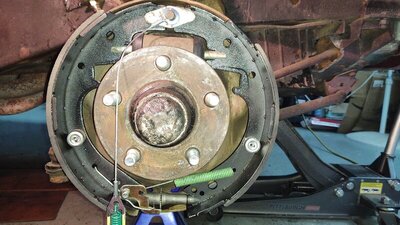
I grabbed the "pre-assembled" right side getup and slapped it up on the car, then installed the shoe retainer
springs and keepers with the handy Chinese tool. After that, DON'T FORGET THE GOOFY WASHER UP TOP!
(I almost did).
Now is the time to loop the self-adjuster tensioner cable thingy onto the top post, before the top springs are
installed - making sure the washer up top is all the way on to the post and snug against the shoes.
I'm impressed with the paint job on the shoes, by the way - thick and isn't chipping or anything.
Note the new and improved self-adjuster assembly at the bottom is now in its' normal position, needing only
to have the cable hooked on.
Let's get those top springs installed!
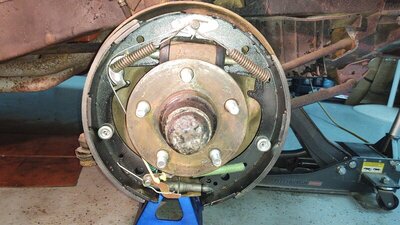
There we go, all done. No fuss, no muss.
From here, I pulled the bearings out of the hub and packed 'em up real good, then reinstalled it.
Before putting the old drum back on, just like with the rears, I ran the adjuster up....and up.....and up
until some pretty good shoe drag was experienced on the drum, then slapped the drum back on for good
and put the wheel back on.
Remember: RUN THAT ADJUSTER UP, Y'ALL! Back it off just shy of locking the drum up....but dragging
pretty good when you spin the wheel.
Feeling real good about myself and all, I headed over to the drivers' (left) side, figuring things would be
an easy lather, rinse and repeat.
It was....at least, until I encountered THE HUB FROM HELL!!
On the drivers' side, the hub and drum had not been separated - and of course, had no interest in doing
so easily for me.
No biggie, I can work with that...
Wheel off, dust cap off, bearing retainer nut removed, outer bearing out, hub/drum removed just fine.
I was greeted with about the exact same conditions for the brakes themselves, including yet another
"modern" hose replacement and everything being dry and clean, so I repeated everything I had done
on the right side to little fanfare.
Again, the drum on that side proved to be in better shape than anything I had to spare, so it was retained.
Adjustments made, all back together, time to reinstall the hub/drum and....
the damn dust cap, which had put up quite the fight coming off, refused to go back on.
Sonuva....
Just what the hell is the problem here?
I take the hub/drum back off and take it over to the bench for scrutiny - and what I found were all sorts
of marks on the bearing area indicative of someone beating hell out of it in the past, to the point where
the openings' lip above the outer bearing race wasn't quite round anymore.
Wonderful...
Decision made, I'll tote the hub/drum over to the machine shop tomorrow and instruct them I want the
hub and drum separated and new studs installed in the hub AFTER they get the dust cap lip straightened
up so that a new cap will install properly again.
A small setback for sure - and probably one I could cure myself if I really wanted to - but given the price
of those hubs these days, I reckon I'll defer to the pros on this one AND get my desired separated hub
and drum anyways, the way I like it.
All in all, a productive evening - if not somewhat tarnished by the last minute discovery of boogery.
Such is the price of fooling with 50+ year old cars - you never know what someone before you has been
up to until you dig into it.
Onward and upward!
Looking forward to seeing how well these new shoes actually BITE - and it appears I'm in the market
for a sweet deal on drums, all the way around, if I truly want this to be as good as it can be.
- Local time
- 1:49 PM
- Joined
- May 14, 2011
- Messages
- 18,218
- Reaction score
- 35,463
- Location
- On the Ridge, TN
Remember how I've stated that this thread is in no way meant to replace or repeat the many other
EXCELLENT threads on here from folks who did this same sort of job to exacting, beautiful standards?
I'd like to recommend at least one of those to you here - John @khryslerkid did a REALLY nice job
on his a few years ago, which can be found here:
https://www.forbbodiesonly.com/mopa...p-new-residence.114133/page-12#post-910743068
Again, I'm just playing Saturday morning shadetree here - some of those other guys are actually
worth emulating, though!
View attachment 1128206
I grabbed the "pre-assembled" right side getup and slapped it up on the car, then installed the shoe retainer
springs and keepers with the handy Chinese tool. After that, DON'T FORGET THE GOOFY WASHER UP TOP!
(I almost did).
Now is the time to loop the self-adjuster tensioner cable thingy onto the top post, before the top springs are
installed - making sure the washer up top is all the way on to the post and snug against the shoes.
I'm impressed with the paint job on the shoes, by the way - thick and isn't chipping or anything.
Note the new and improved self-adjuster assembly at the bottom is now in its' normal position, needing only
to have the cable hooked on.
Let's get those top springs installed!
View attachment 1128207
There we go, all done. No fuss, no muss.
From here, I pulled the bearings out of the hub and packed 'em up real good, then reinstalled it.
Before putting the old drum back on, just like with the rears, I ran the adjuster up....and up.....and up
until some pretty good shoe drag was experienced on the drum, then slapped the drum back on for good
and put the wheel back on.
Remember: RUN THAT ADJUSTER UP, Y'ALL! Back it off just shy of locking the drum up....but dragging
pretty good when you spin the wheel.
Feeling real good about myself and all, I headed over to the drivers' (left) side, figuring things would be
an easy lather, rinse and repeat.
It was....at least, until I encountered THE HUB FROM HELL!!
On the drivers' side, the hub and drum had not been separated - and of course, had no interest in doing
so easily for me.
No biggie, I can work with that...
Wheel off, dust cap off, bearing retainer nut removed, outer bearing out, hub/drum removed just fine.
I was greeted with about the exact same conditions for the brakes themselves, including yet another
"modern" hose replacement and everything being dry and clean, so I repeated everything I had done
on the right side to little fanfare.
Again, the drum on that side proved to be in better shape than anything I had to spare, so it was retained.
Adjustments made, all back together, time to reinstall the hub/drum and....
the damn dust cap, which had put up quite the fight coming off, refused to go back on.
Sonuva....
Just what the hell is the problem here?
I take the hub/drum back off and take it over to the bench for scrutiny - and what I found were all sorts
of marks on the bearing area indicative of someone beating hell out of it in the past, to the point where
the openings' lip above the outer bearing race wasn't quite round anymore.
Wonderful...
Decision made, I'll tote the hub/drum over to the machine shop tomorrow and instruct them I want the
hub and drum separated and new studs installed in the hub AFTER they get the dust cap lip straightened
up so that a new cap will install properly again.
A small setback for sure - and probably one I could cure myself if I really wanted to - but given the price
of those hubs these days, I reckon I'll defer to the pros on this one AND get my desired separated hub
and drum anyways, the way I like it.
All in all, a productive evening - if not somewhat tarnished by the last minute discovery of boogery.
Such is the price of fooling with 50+ year old cars - you never know what someone before you has been
up to until you dig into it.
Onward and upward!
Looking forward to seeing how well these new shoes actually BITE - and it appears I'm in the market
for a sweet deal on drums, all the way around, if I truly want this to be as good as it can be.
I’m looking forward to hearing how well it bites. I got all brakes off and realized how badly my front end needed work. Planning on putting back drums but looking forward to your thoughts on yours when you get done. Thanks for the great thread!
- Local time
- 1:49 PM
- Joined
- Mar 10, 2010
- Messages
- 30,841
- Reaction score
- 54,720
- Location
- Hanover, Pennslyvania
- Local time
- 1:49 PM
- Joined
- May 14, 2011
- Messages
- 18,218
- Reaction score
- 35,463
- Location
- On the Ridge, TN
Mercy.
The local machine shop/ancient "real" auto parts store sure saw me coming this morning...ouch $$$.
I instructed the fella in the machine room that I wanted hub and drum separated, then for the
dust cap part of the hub to be ground back nice and round to counteract past hammerings.
Young fella says "I'll take a hammer to it" - to which I replied I'd do similar to him if he did.

When he asked how I wanted it done, I sighed - then pointed at one of the several hydraulic
presses in the room and said "pick one".
Damn - I'm no expert machinist, but we had us a quick lesson on how to separate hub &
drum, right then and there. He was duly amazed...
He worked on the dust cap lip on the hub some at that point, until I liked it.
"Ok fellas, now go fetch me a new dust cap and some lugs..."
I got a lot of this reaction:
To which I'm like:

I'm in a full-service, longtime actual auto parts store full of employees....
and suddenly, I'm the one giving lessons on all this? *sigh*
Well, they didn't have the Dorman dust shield (despite a full wall of Dorman
cabinets, drawers and displays) but we got some lugs and new chrome lug nuts
figured out and I go to get out of there.
Price tag? $45!! Get outta here....
No wonder the crap big box auto parts are whipping their asses...
Speaking of which, my lady friend who manages the local AdvanceAuto had one
look at the hub and said "computer says no - but I say maybe".
Sure enough, under one of those oddball brand names (read:China) there sits a
pretty new dust cover, which damn near jumps onto the hub like it wants to be there.
$4, out the door...
So, this evening, we shall complete this work on Fred and get on with the next phase!
The local machine shop/ancient "real" auto parts store sure saw me coming this morning...ouch $$$.
I instructed the fella in the machine room that I wanted hub and drum separated, then for the
dust cap part of the hub to be ground back nice and round to counteract past hammerings.
Young fella says "I'll take a hammer to it" - to which I replied I'd do similar to him if he did.

When he asked how I wanted it done, I sighed - then pointed at one of the several hydraulic
presses in the room and said "pick one".
Damn - I'm no expert machinist, but we had us a quick lesson on how to separate hub &
drum, right then and there. He was duly amazed...
He worked on the dust cap lip on the hub some at that point, until I liked it.
"Ok fellas, now go fetch me a new dust cap and some lugs..."
I got a lot of this reaction:

To which I'm like:

I'm in a full-service, longtime actual auto parts store full of employees....
and suddenly, I'm the one giving lessons on all this? *sigh*
Well, they didn't have the Dorman dust shield (despite a full wall of Dorman
cabinets, drawers and displays) but we got some lugs and new chrome lug nuts
figured out and I go to get out of there.
Price tag? $45!! Get outta here....
No wonder the crap big box auto parts are whipping their asses...
Speaking of which, my lady friend who manages the local AdvanceAuto had one
look at the hub and said "computer says no - but I say maybe".
Sure enough, under one of those oddball brand names (read:China) there sits a
pretty new dust cover, which damn near jumps onto the hub like it wants to be there.
$4, out the door...
So, this evening, we shall complete this work on Fred and get on with the next phase!
- Local time
- 1:49 PM
- Joined
- May 14, 2011
- Messages
- 18,218
- Reaction score
- 35,463
- Location
- On the Ridge, TN
There was a time, not too long ago, where there was some real expertise in that store.Sounds like you need to teach a shop class at that shop or get a discount for you edjumacatin them.
Long-timers who knew their ****, not to mention an owner who had run the business for decades
and had a heck of a reputation regionally.
It's now apparent I've outlived most of that.
The owner still owns the place (he's only 5 years older than me) and is expert at the business - but he's also
an absentee owner a lot anymore (understandable - burnout, competing with box stores, etc.).
He wasn't there today either - being a workahaulic type, he was off for the week to "pick up hay" (he owns a
large farm close by and raises hay), leaving the store to a collection of misfits that looked similar to
the bar scene in the first Star Wars film.
It's kind of sad to see, really.
The Rebel
Well-Known Member
There's hope yet! My youngest son is now a senior in HS and is learning the PMT Trade (what we used to call tool & die). He's working an internship this summer at a company that his teacher has connections with. Say's my son is a blessing to have in class & is all business as soon as he gets in class. They've done work for NASA sending parts into space, freekin cool!
From the school's website:
Students enrolled in the Precision Machining Technology program are given instruction in and demonstrate skills and knowledge in machine safety, measuring tools, precision machining fundamentals using; manual milling machines, lathes, and other metal processing machines. Students’ progress using computer numerical controlled (CNC) machining and turning centers as early as the 10th grade and become proficient in their operation and programming upon graduation.
Our programs are constantly evolving to best align with industry standards both regionally and nationally.
- Local time
- 1:49 PM
- Joined
- May 14, 2011
- Messages
- 18,218
- Reaction score
- 35,463
- Location
- On the Ridge, TN
Sounds like dad is doing a good job there @The Rebel 

- Local time
- 1:49 PM
- Joined
- May 14, 2011
- Messages
- 18,218
- Reaction score
- 35,463
- Location
- On the Ridge, TN
Well, Fred is back down on all fours....but of course, not without a little last-minute, 4th quarter
drama.
I forgot to mention earlier, when I was at the machine shop, I had the guy lay a mic on the drum
and it measured 11.05 - within spec, but too thin to take another machining before being out of
spec.
Reckon I'm in the market for all (4) drums....eventually.
Ok, to the evenings' cussin':
First, there was the replacement studs provided by the "real" parts store.
Turned out, they were a little bigger around in the knurled part than needed - ok, considerably
bigger. This made for me whipping out the Dremel, chucking up a sanding barrel that fit inside the
diameter of the stud holes on the hub and having at it.
That gained me at least a starting foothold with them, but in the process of trying to press them in,
my bench vise literally tore itself loose from my bench.
Yay, another project...
I resorted to using my cordless impacts (Ridgid and Makita - Makita whipping the Ridgid's ***) and
washers, along with the new nuts, to draw the studs in as far as I could, hoping Mr. TorqueWrench
would finish the job later.
So much for "real parts store" and "professionals"....
Then there was the freshly procured dust cap.
Turns out, there IS a difference in the right one that nobody had in stock and the one the lady at
Advance gave me - this one isn't quite DEEP enough and was bottoming out on the spindle before coming
fully to rest in the hub.
I did what I could with it and it seems to be staying for the moment - but I will be fetching!
I finally was ready to repack bearings and slap the rest of things together, drivers' side.
Found out the first time, I had gotten a bit overzealous with adjusting the shoes and once the wheel was
installed, the wheel pretty much locked up. Off it all came, backed off the adjuster, back on with everything...
much better. Light dragging all the way around the spin cycle.
Got Fred back on all fours and whipped out the torque wrench, which I set at 90ft-lbs for the moment...
As I cranked on each lug nut, it kept going....and going....and going....until I wondered if the studs were
actually spinning!
Nope, that big ol' torque wrench was pulling the Chinese studs the rest of the way home.
Good enough for me; the last couple days have been a lot on this decrepit old carcass.
Last thing before throwing everything up on the bench for later cleaning up was to jump in and
hit the pedal. A couple pumps and BAM, good high firm pedal!
Counted to 10 and hit it again - and it repeated, this time without a pump needed.
Did that over and over, checking for noises and repeatability...and all seems well.
Reckon we'll see tomorrow evening, when next I'll have time to take a test drive.
drama.
I forgot to mention earlier, when I was at the machine shop, I had the guy lay a mic on the drum
and it measured 11.05 - within spec, but too thin to take another machining before being out of
spec.
Reckon I'm in the market for all (4) drums....eventually.
Ok, to the evenings' cussin':
First, there was the replacement studs provided by the "real" parts store.
Turned out, they were a little bigger around in the knurled part than needed - ok, considerably
bigger. This made for me whipping out the Dremel, chucking up a sanding barrel that fit inside the
diameter of the stud holes on the hub and having at it.
That gained me at least a starting foothold with them, but in the process of trying to press them in,
my bench vise literally tore itself loose from my bench.

Yay, another project...
I resorted to using my cordless impacts (Ridgid and Makita - Makita whipping the Ridgid's ***) and
washers, along with the new nuts, to draw the studs in as far as I could, hoping Mr. TorqueWrench
would finish the job later.

So much for "real parts store" and "professionals"....

Then there was the freshly procured dust cap.
Turns out, there IS a difference in the right one that nobody had in stock and the one the lady at
Advance gave me - this one isn't quite DEEP enough and was bottoming out on the spindle before coming
fully to rest in the hub.
I did what I could with it and it seems to be staying for the moment - but I will be fetching!
I finally was ready to repack bearings and slap the rest of things together, drivers' side.
Found out the first time, I had gotten a bit overzealous with adjusting the shoes and once the wheel was
installed, the wheel pretty much locked up. Off it all came, backed off the adjuster, back on with everything...
much better. Light dragging all the way around the spin cycle.
Got Fred back on all fours and whipped out the torque wrench, which I set at 90ft-lbs for the moment...
As I cranked on each lug nut, it kept going....and going....and going....until I wondered if the studs were
actually spinning!
Nope, that big ol' torque wrench was pulling the Chinese studs the rest of the way home.

Good enough for me; the last couple days have been a lot on this decrepit old carcass.
Last thing before throwing everything up on the bench for later cleaning up was to jump in and
hit the pedal. A couple pumps and BAM, good high firm pedal!
Counted to 10 and hit it again - and it repeated, this time without a pump needed.
Did that over and over, checking for noises and repeatability...and all seems well.
Reckon we'll see tomorrow evening, when next I'll have time to take a test drive.

Similar threads
- Replies
- 18
- Views
- 1K
- Replies
- 44
- Views
- 3K
- Replies
- 26
- Views
- 2K


