My stock tank straps look like they are galvanized steel. Do you need pictures?It took almost S I X.... W E E K S to get this gas tank. W T F ???
I ordered it the same time that I got the trunk floor. May 22nd. It finally arrived today. It has been 18 years since I changed a tank in a Charger. I don't remember if the red car posed as much of a struggle. The gas tank straps as shipped were not shaped correctly. They needed 2 bends that they did not have and without making them, the tank will not fit correctly. I had the red car nearby but it was still a pisser. Once I figured that out....The J bolts wouldn't fit through the holes in the straps. Yeah, lower the tank, get the drill and ream out the hole. GREAT.
The straps are black, stock is natural steel, right?
View attachment 970499
The floor seal is in terrible shape but for now, it stays.
View attachment 970500
I'll get a new one when I go to paint the car.....unless I see one at a swap meet sometime.
Lookie what $5000 buys you....
- Thread starter Kern Dog
- Start date
- Local time
- 12:35 PM
- Joined
- Apr 13, 2012
- Messages
- 40,824
- Reaction score
- 153,051
- Location
- Granite Bay CA
No thank you. My red car has the galvanized ones now that you mention it.

Where did you get that rear anti-roll bar?
- Local time
- 12:35 PM
- Joined
- Apr 13, 2012
- Messages
- 40,824
- Reaction score
- 153,051
- Location
- Granite Bay CA
It came from an '83 Imperial. 3/4" frame hung.


- Local time
- 12:35 PM
- Joined
- Apr 13, 2012
- Messages
- 40,824
- Reaction score
- 153,051
- Location
- Granite Bay CA
I was happy with how it fit in there.
- Local time
- 12:35 PM
- Joined
- Apr 13, 2012
- Messages
- 40,824
- Reaction score
- 153,051
- Location
- Granite Bay CA
I swapped in a different K member this weekend.
Follow along, this is sort of funny.....
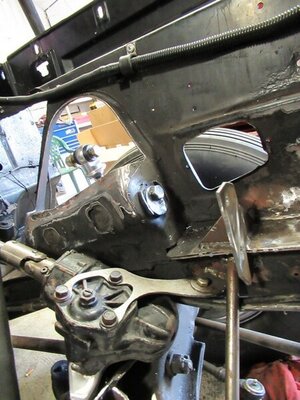
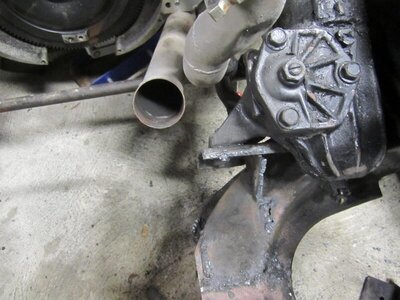
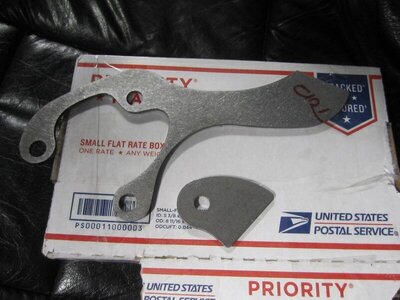
In 2010, I was given a K member and front stub from a 1970 Belvedere. I took that K member and welded up the seams, reinforced the steering box mounts and added a small skid plate. I swapped that K member into my red car:

I took the K member from the red car and did the same thing but after painting it up, I just stored it for future use. Well, I just bolted it into "Jigsaw". This means that each Charger has the K member from the other car.
Check out the reinforcements:

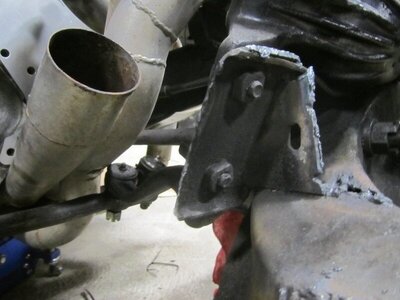
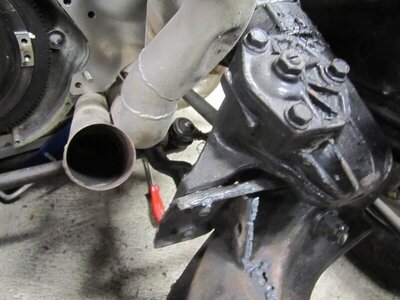
Two K members, sort of a before and after. Note the open areas below the two bolt holes for the steering box. Also notice the sleeve for the lower control arm pin.

I welded a washer around the LCA mount . Since the sleeve stuck out approx 1/8", I used a washer that was the same thickness so the LCA pin could still seat against the K member like stock.
Right side. You can see how the sleeve sticks past the edge of the K member 1/8".


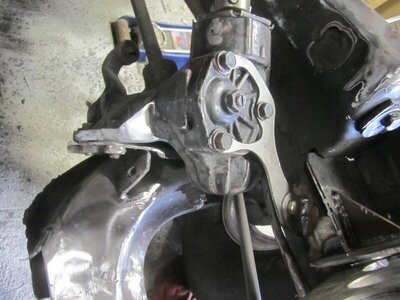
Front side of the steering box mount:


I even reinforced the strut rod mount.


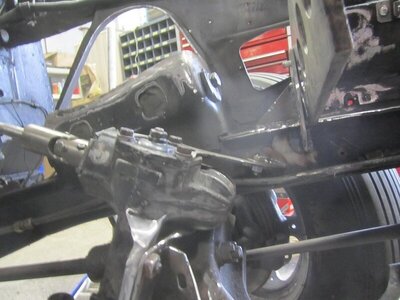
I'm using a set of 11/16" tie rods and sleeves from a 1970 Polara that I parted out last year. I'm also using Fast Ratio Pitman and Idler arms. Here is a curious thing....The Fast Ratio idler arm is an exact match to the idler arm that I pulled from that same Polara.
Follow along, this is sort of funny.....
In 2010, I was given a K member and front stub from a 1970 Belvedere. I took that K member and welded up the seams, reinforced the steering box mounts and added a small skid plate. I swapped that K member into my red car:
I took the K member from the red car and did the same thing but after painting it up, I just stored it for future use. Well, I just bolted it into "Jigsaw". This means that each Charger has the K member from the other car.
Check out the reinforcements:
Two K members, sort of a before and after. Note the open areas below the two bolt holes for the steering box. Also notice the sleeve for the lower control arm pin.
I welded a washer around the LCA mount . Since the sleeve stuck out approx 1/8", I used a washer that was the same thickness so the LCA pin could still seat against the K member like stock.
Right side. You can see how the sleeve sticks past the edge of the K member 1/8".
Front side of the steering box mount:
I even reinforced the strut rod mount.
I'm using a set of 11/16" tie rods and sleeves from a 1970 Polara that I parted out last year. I'm also using Fast Ratio Pitman and Idler arms. Here is a curious thing....The Fast Ratio idler arm is an exact match to the idler arm that I pulled from that same Polara.
- Local time
- 3:35 PM
- Joined
- Dec 14, 2008
- Messages
- 13,090
- Reaction score
- 18,744
- Location
- Long Island,New York
- Local time
- 2:35 PM
- Joined
- Mar 28, 2014
- Messages
- 35,610
- Reaction score
- 58,995
- Location
- South Louisiana
QA1 K-member already owned by me for 2 years this November.
Got all QA1 parts on sale w/free delivery from Summit...almost 2 years ago
Got all QA1 parts on sale w/free delivery from Summit...almost 2 years ago
Rusty 72
Well-Known Member
Nice job! I just read this whole thread. Great work for sure.
There's no better feeling than doing something you thought you couldn't do. In reference to your front end frame swap.
There's no better feeling than doing something you thought you couldn't do. In reference to your front end frame swap.
- Local time
- 12:35 PM
- Joined
- Apr 13, 2012
- Messages
- 40,824
- Reaction score
- 153,051
- Location
- Granite Bay CA
Thank you, Rusty !
I have been wandering somewhat aimlessly with this project but my goal is still to have it running and driving by September 5th.
I took 2 torque converters in to get checked out. Both were sort of rusty inside and the rebuilder said he would prefer a cleaner core. I found another and took it in. It turned out to be what he called a "Pretty rare piece". It is an 11" factory High Stall for a 383 Magnum or 440 Magnum. He said they came in Hemi cars too but those had bigger mounting lugs.
The factory 26" radiator is too messed up to use so I'll reuse the Griffin from my red car. Sorry if I have mentioned this before.
The front end rebuild is done. I used Fast Ratio steering arms from a FBBO friend. The steering box is a nice and tight low mile A body unit. I used the 11/16" tie rod setup from a '70 Polara I parted out last summer. Now the car is back on it's tires so I can move it as needed. I need to install fuel and vent lines and the engine wire harness.
- Local time
- 12:35 PM
- Joined
- Apr 13, 2012
- Messages
- 40,824
- Reaction score
- 153,051
- Location
- Granite Bay CA
Before the engine goes in, I wanted to smooth over the seams of the firewall patch job. It will be harder to do with the engine in there.


It is funny how the body filler blends in with the color of the fender aprons and firewall patch!
It is funny how the body filler blends in with the color of the fender aprons and firewall patch!
- Local time
- 12:35 PM
- Joined
- Apr 13, 2012
- Messages
- 40,824
- Reaction score
- 153,051
- Location
- Granite Bay CA
The body filler work distracted me for awhile. I got to thinking about bodywork...something that I'm trying to avoid at this point.
I am trying to get the car up and running despite the ugly appearance. I want it mechanically sound and reliable.
Still....The fenders were not fully bolted in place and I never adjusted the panels to achieve perfect panel gaps.
I've heard for years that these cars were known for inconsistent gaps between panels but I've never known them to be that bad. I've seen gaps in restored cars look worse than worn original cars. My red car Ginger didn't seem bad when I bought it.


I did take time to align them as best I could after paint work was done.


I am trying to get the car up and running despite the ugly appearance. I want it mechanically sound and reliable.
Still....The fenders were not fully bolted in place and I never adjusted the panels to achieve perfect panel gaps.
I've heard for years that these cars were known for inconsistent gaps between panels but I've never known them to be that bad. I've seen gaps in restored cars look worse than worn original cars. My red car Ginger didn't seem bad when I bought it.
I did take time to align them as best I could after paint work was done.
- Local time
- 12:35 PM
- Joined
- Apr 13, 2012
- Messages
- 40,824
- Reaction score
- 153,051
- Location
- Granite Bay CA
The gaps in Jigsaw seem tighter than in other B body cars that I recall.
The door to quarter gap seems tight.

It looks bad at the fender to door though due to the bend in the door.


That door is going to be replaced. I have a couple others to choose from. I will have to get a reproduction VIN sticker though.
The right side looks better.


Getting there required a shim plate between the hinges and the door. At first, the fender and door were too close.
This gap is tighter than they are on the red car.

The door to quarter gap seems tight.
It looks bad at the fender to door though due to the bend in the door.
That door is going to be replaced. I have a couple others to choose from. I will have to get a reproduction VIN sticker though.
The right side looks better.
Getting there required a shim plate between the hinges and the door. At first, the fender and door were too close.
This gap is tighter than they are on the red car.
- Local time
- 12:35 PM
- Joined
- Apr 13, 2012
- Messages
- 40,824
- Reaction score
- 153,051
- Location
- Granite Bay CA
Anyhow, Back on topic: Fuel and vent lines are next. I could mock up a transmission to be able to measure for a drive shaft OR just measure the one in the red car. It is the same setup....727 to an 8 3/4" axle.
1 Wild R/T
Well-Known Member
70 383 8.75 A/T is listed as 52.03 C2C
- Local time
- 12:35 PM
- Joined
- Apr 13, 2012
- Messages
- 40,824
- Reaction score
- 153,051
- Location
- Granite Bay CA
I'll see how that compares to what I have in the red car.
The firewall looks good KD. I have to do the same thing to my purple R/T.
- Local time
- 12:35 PM
- Joined
- Apr 13, 2012
- Messages
- 40,824
- Reaction score
- 153,051
- Location
- Granite Bay CA
Thank you. It was easier than I expected.
I will probably prime the patch and spray some type of catalyzed paint on it to seal it. The car will likely be painted B 5 blue but not right away. I can't let the porous primer collect oil vapor and other contaminants between now and when I do pull the car apart for paint.
I will probably prime the patch and spray some type of catalyzed paint on it to seal it. The car will likely be painted B 5 blue but not right away. I can't let the porous primer collect oil vapor and other contaminants between now and when I do pull the car apart for paint.
- Local time
- 12:35 PM
- Joined
- Apr 13, 2012
- Messages
- 40,824
- Reaction score
- 153,051
- Location
- Granite Bay CA
Getting ready to push it onto the next stall to put in the fuel and vent lines.


bearman
Well-Known Member
Getting ready to push it onto the next stall to put in the fuel and vent lines.
Doing some great work kd.
View attachment 974877 View attachment 974878 View attachment 974879
Similar threads
- Replies
- 7
- Views
- 2K
- Replies
- 0
- Views
- 3K
- Replies
- 1
- Views
- 5K


