• When you click on links to various merchants on this site and make a purchase, this can result in this site earning a commission. Affiliate programs and affiliations include, but are not limited to, the eBay Partner Network.

Lookie what $5000 buys you....

My guess is that Chrysler must have changed the location of those plugs in 1970. Most likely the 68 and 69 Chargers had the plugs in the same position as the pan they make.

I just checked my red car. The plug holes are in the same spot as Jigsaw and Delta V's car.
Trunk 90.jpg
 
I took out the back seat and had MUCH better access to the front edge of the pan.

Trunk 91.jpg
Trunk 92.jpg


After the trunk is done, I'm still 3 weeks away from the delivery of the gas tank. The engine is still in the machine shop and the guy works part time so I don't have an accurate gauge of when I'd even be able to set the engine. THis leaves me with some free time to ponder what next to do. The sensible thing would be to replace the lower control arm bushings since they are shredded. I have another K member that I intended to swap in, fully welded and reinforced. It is actually the original one to my red car....I pulled it when I had another 1970 K member from a '70 Belvedere that was also welded and reinforced.
Confused yet?
Anyhow...With no engine in place, this is the best time to do this sort of thing.
Also, I'd like to get ahead of that rear tire fitment problem that all 68-70 Chargers have: This odd outer wheelhouse bulge:
WW 2.jpg

I'd like to improve the clearance somehow. I am not cutting off the quarter panels to do it but I think that after scraping the undercoating off, I could cut out some of the bulge and weld in a patch that offers more room. It won't look as good as this:


WW 5.jpg


But it will be an improvement.

Oh, another thing, The firewall:
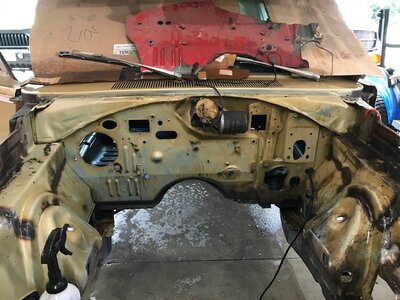
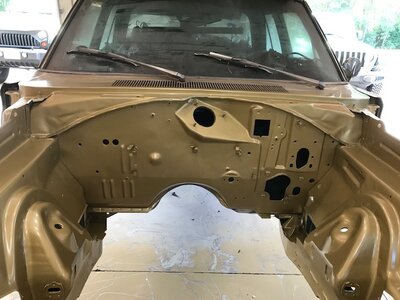
I may one day install a Classic Auto Air system in this car. One thing that I didn't like was that the factory A/C cars had multiple holes in the firewall that required block-off plates to hide. For this car, I might weld over the right side of the firewall with a clean Non A/C firewall from the '70 Belvedere stub that I used to repair this car.
Stub 4.jpg
 
I converted mine to non-AC and pondered the same thought. Virtually none of the holes on either align, so you basically have to smooth the entire firewall and start over. I think the ballast resistor and voltage regulator holes are the only common between the two on the passengers side of the firewall. In the end, I felt filling each individual hole was less surface area to weld and grind so I went with individual patches. There are about 8-10 holes of various sizes to fill. I used a hole saw to make the blanks and then opened all the holes to the same diameter. That was a lot easier than making plugs to the various sizes. A step drill made quick work on the holes. Here are the before and after pictures. On the before you can see how far you would have to go to fill everything as the patch panel is sitting above leaning on the windshield.

IMG_0458.jpg IMG_0517.jpg
 
Looks pretty good.
I have also thought of just patching all the holes. My thinking is that I could see about just laying the NON A/C firewall section right over the original panel. It would fit under the pinch weld at the top, over against the fender apron at the right side, to the pinch weld at the bottom and then straight down the middle of the trans tunnel. If that can be done and actually look decent, I may go for it.
 
dsd1967 is right, plug the holes, patching in the firewall section is more work & won't turn out as well..
 
The trunk has been cleaned out. I blew compressed air down in the dropoff area with the drain plugs out then sprayed water to rinse away all of the grinding grit.

Trunk 94.jpg
Trunk 95.jpg
Trunk 96.jpg

Tomorrow I'll be able to spread seam sealer and hit the bare metal with etching primer.
 
Kern,

Look closely towards the drivers side too. There is a drain hole by the throttle cable pass through that needs plugged and the hole by the electrical bulkhead needs moved down and towards the passenger side too.

Also most of the weld grinding is in the open with patches. No nooks and crannies to have to get a grinding wheel into.

It didn’t take me very long to seal it all up. Having the non ac section is really helpful in getting the new holes located. I took all my horizontal distances from the weld nut on the steering column and vertical from the bottom of the reinforcement ribs on the passenger side.
 
Ha....Toledo! My Dad was from Toledo. Oh, how I miss him.
Still waiting on the 383. The machinist is working part time since he is semi-retired so I didn't expect next day service, No biggie.
I made a cam bearing scraper out of the stock cam:
383 Cam 1.jpg

383 cam 2.jpg

383 Cam 3.jpg


A few years back, I installed a Lunati solid cam in my other car and the cam would not turn. I made a scraper like this one but I don't know what I did with it so I just cut grooves in this one.
 
While I am waiting on the engine, I'm trying to make sense of the wiring. It would be far easier to just buy a new harness. I may do that but for now, I'm learning all the wiring paths and the connections.
 
Kd, your project is coming along nicely. But you do great work on whatever your building.
 
Nice words, Bearman...Thank you.
I wish I was retired though so I could get more done and post up more progress.
 
While I am waiting on the engine, I'm trying to make sense of the wiring. It would be far easier to just buy a new harness. I may do that but for now, I'm learning all the wiring paths and the connections.
I know it is easy for me to spend your money, but new wiring is one of the things that I did not, and would not compromise on when I built my Road Runner. First of all, almost ALL of these cars have had some kind of hacks that have screwed up the wiring. But the main concern I have is fire. 50 year old wiring cracks and can cause fires. I'd hate to lose my car due to that, so I just replaced mine - I didn't want to take that chance.

Hawk
 
Last week I sprayed etching primer on the trunk seams and spread seam sealer at the front and rear edges. The sides got thin coats of Rage body filler.
The window channel rust repair areas also got sprayed with etching primer. A few days later I smoothed over the edges with filler.

RW 018.jpg
IMG_4193.JPG

IMG_4193.JPG
RW 013.jpg
IMG_4195.JPG
IMG_4196.JPG
IMG_4199.JPG
 
I decided to remove the undercoating. I bought THIS today:
N S 01.jpg
N S 02.jpg

I watched a few videos on the use of a needle scaler. Looks like the fastest ans easiest way to remove the stuff.
 
I am still waiting on the machinist to finish with the 383. Bore and hone to size, deck block, install cam bearings, valve job, mill heads, hang pistons on rods. I left him the new Speed Pro pistons over 2 weeks ago.
I'm going to check the combustion chamber volume of the heads that I have here along with the ones getting rebuilt. I bought some stuff today to do it:
CC head.jpg

I have a 60 cc syringe, Vaseline, green food coloring and a 6" X 6" piece of clear Plexiglas.
I'll use wood shims to level the head, smear Vaseline around the combustion chamber, lay the Plexiglas down and fill the chamber with green colored water. I'll obviously have to refill the syringe to get the chambers full since the factory iron heads usually measure between 75-90 ccs depending on how much they are milled.
The ones I have planned for the 383 have been milled at least .030 since the chambers are not as deep as some uncut heads that I checked here at home.
More updates to follow!
 
The guy that cc’d my heads used rubbing alcohol. He said that water has to much surface tension and it’s too hard to get the air bubbles out.
 
The needle scaler is definitely the way to go for undercoating removal. Once you try it, you'll never use another method. But you will generate ALOT of dirt/rust in the air. You will want to use a mask. I use a painting mask. I've tried other masks but I end up flushing all kinds of nasty stuff out of my sinuses with a sinus rinse so I use the respirator and change out filters as needed.
 
Also, here is the method Matt came up with on my 68 roadrunner. The plug method isn't a bad idea.

HA8vJNcl.jpg

9lpb0Jcl.jpg

BEkxEYol.jpg
 
Auto Transport Service
Back
Top