• When you click on links to various merchants on this site and make a purchase, this can result in this site earning a commission. Affiliate programs and affiliations include, but are not limited to, the eBay Partner Network.

New bullet for the "Brick"

For the O/P I plan to use a 20psi n/c switch to supply the ground to the light. The positive side to ign "on", So anytime there is less than 20psi the light should be on. The larger O/P light I've had for years and I can't remember where I got it. I've decided to use the smaller LED - you can buy them from any Semi truck parts/accessory store.

Link to O/P switch - https://www.summitracing.com/parts/qcr-61-735

I got the small LED's from McFadden Dale
Awesome thank you !!
 
Great thread and I love your car! Makes me want to build up another motor lol. Hope to see at next years MATS.:thumbsup:
 
Another step closer - new in the box saved $250 on these!

IMG_20180716_193329049.jpg
 
Haven't done much with the car lately - too damn hot here in Vegas in the summer. Finished the layout for my "idiot" light panel and got the holes drilled. Originally I was going to leave it with a bare aluminum finish but figured it wouldn't look right in the blue dash. I thought I might paint it the same color as the dash but I didn't have any paint left over from my other '66's interior restoration. I decided to paint it Wrinkle finish black. Still collecting parts too - check out this jewelry -

IMG_20180806_201839823.jpg
IMG_20180806_201850027.jpg
 
Update - I took the block to my machinist to make sure the cylinders will go .030. Dennis says its good to go. Now I can bring it back home and do the block fill on it. I'm gonna do a half fill on the water jackets. After that's done back to him for machine work.

IMG_20180925_215853088.jpg
 
Getting ready for the block fill on the left bank - this was a lot harder than I thought it would be.

IMG_20181030_085019978.jpg


I also got started mocking up the rear brakes, took some measurements so I could design my mount brackets.

IMG_20181030_142048258.jpg
 
Picked up this lightweight aluminum forward clutch drum for the trans - saved $60 on this. I will go into more detail with what I'm doing with the trans in the future.

IMG_20181105_192135090.jpg
 
Picked up this lightweight aluminum forward clutch drum for the trans - saved $60 on this. I will go into more detail with what I'm doing with the trans in the future.

View attachment 675950
Gotta Love that front Drum:thumbsup:, I'm going the same route, having Pro~Trans Build mine with billet in put & out put shaft
 
Update -

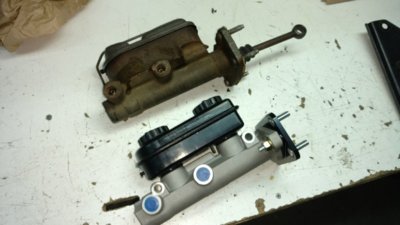
Started working on the brake system, removed old master cyl, line loc & prop valve. Bent up new front brake lines, master to adjustable prop valve lines. I also removed the wiper motor to clean it up ETC.


IMG_20181124_172541461.jpg

Old set up -


IMG_20181130_155825767 - Copy.jpg

IMG_20181211_200721681.jpg

Repairing paint damage from brake fluid seepage.


IMG_20181130_155858714 - Copy.jpg

This is where the new prop valve will go on the left frame rail close to where the original was - I only had to drill the upper hole the lower was already there, just had to tap it 5/16-18. If I want to I can adjust the valve thru the access hole but I routed the brake lines so I could reach down from the top too. The lines behind the valve are the trans cooler lines I had to tweak them a little to not interfere or rub.

IMG_20181218_205625194.jpg


The line loc is now mounted on a bracket that is made specifically for this master - got it from Jegs. I reused the line nuts from the old master cyl and prop valve. Turns out I can re-use my old master cyl push rod too and the pedal will rest in the exact same spot it did before.


IMG_20181214_213417705.jpg

New and refurbished parts ready to be re-installed


IMG_20181218_205929285.jpg


Cleaned up wiper motor - waiting on a new gasket before install. IMG_20181124_173534359.jpg
 
Got some more parts too - light weight sun shell. I tried and tried to find a deal on one but ended up paying full price for this.

IMG_20181218_205401355.jpg
 
Update - I finished the water jacket fill and need to take the block to my machinist for the line bore & deck. I also test fitted the Jesel timing cover & rear main seal retainer. There is an issue with the retainer I need to resolve and I learned you have to do some grinding for the belt drive cover to fit the block. If you are planning to use a Jesel Belt Drive on your build here is where you need to grind -

IMG_20190112_163646505.jpg

Roughly half way round this oil galley hole boss

IMG_20190112_163652137.jpg

And right here at the hump inboard the cover locating pin (both sides)
 
I am really enjoying your build. Will it be ready for MATS 2019 ?
 
I LOVE your car, nice build, thanks for posting.
I am trying to copy your setup, the line loc mounting plate is sweet.
Do you remember if this is the master you used?
https://www.jegs.com/i/JEGS/555/631455/10002/-1
Also, did your master come with a residual pressure valve?
 
Last edited:
I LOVE your car, nice build, thanks for posting.
I am trying to copy your setup, the line loc mounting plate is sweet.
Do you remember if this is the master you used?
https://www.jegs.com/i/JEGS/555/631455/10002/-1
Also, did your master come with a residual pressure valve?

The master in the picture looks just like mine. I got mine from Mancini Racing, it came with the adapter plate too. It does not have a residual pressure valve.
 
Picked up this lightweight aluminum forward clutch drum for the trans -

I had this style part fail on mine. The splines that are expanded on the input hub started to pull thru the aluminum. The fix was pretty simple. The groove in the hub just above the expaned splines was machined slightly deeper to hold a flat snap ring. Then the the inside of the drum was relieved the thickness of the snap ring, aprox .060". Over 350 passes since. Make sure you put a steel front planet carier in it if you're using a trans brake. They will strip out the splines.
Doug

View attachment 675950
 
Sounds like we are in the same boat. I am just about ready to install the drive train in my 63 and April is coming up fast !
 

Thanks for the tip - what did you use for the snap ring, is there a p/n?

Thanks.
 
Auto Transport Service
Back
Top