The old days we would put them in if they fit reasonably good, our lady's awaited us lol, to be honest most of the time all was well but now i wonder how long we had them before trading our buddies for there ride, and like buying a used car get there problems while they got ours... i got the bitter end a couple times trading like that rofl, stupid is as stupid does.
You are using an out of date browser. It may not display this or other websites correctly.
You should upgrade or use an alternative browser.
You should upgrade or use an alternative browser.
Restomod charger pics
- Thread starter 747mopar
- Start date
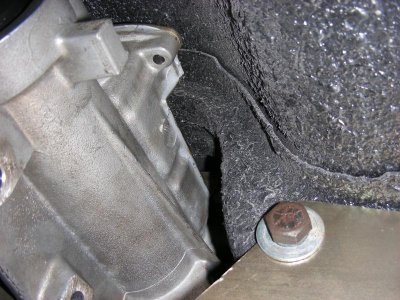
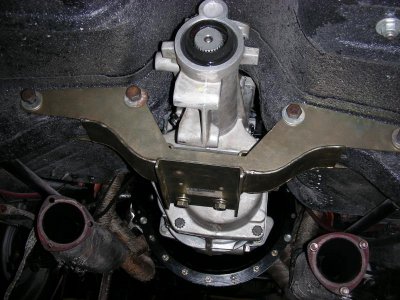
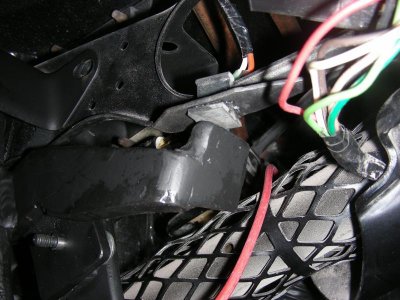
Good progress tonight, got all of the cutting done in order for it to fit. One thing is for certain, this is far from a bolt in ordeal even with the Keisler modification which sure made it easier. I think it would be a pretty easy install for a 4 speed car that already had the hump but not for an auto car. As you can see allot of cutting had to be done
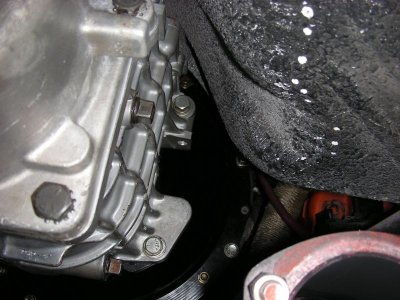
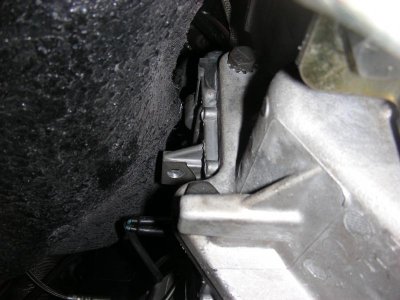
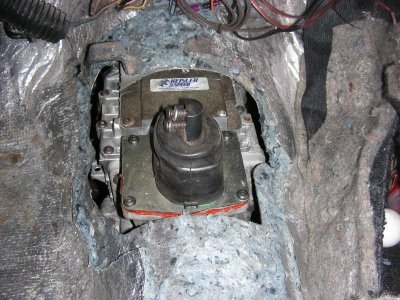
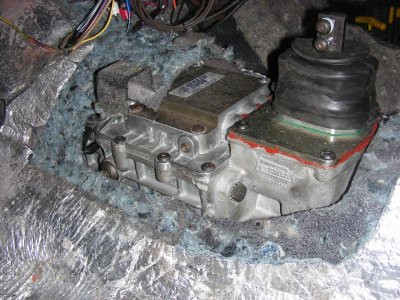
You can see how the Keisler mod to the rear shifter location really helps with the cross member, no mods needed.
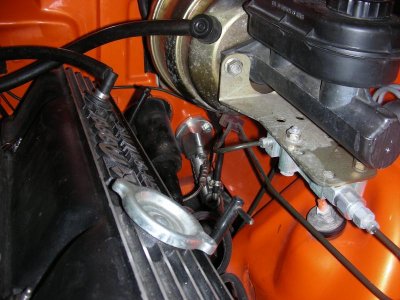
The master cylinder setup kicks ***, just line it up with the original clutch linkage hole, drill 3 holes and bolt it in. I elected not to put any holes in my fender for the reservoir but instead drilled a hole in the brake booster bracket (tucks it out of the way nicely). All in all a really nice setup.
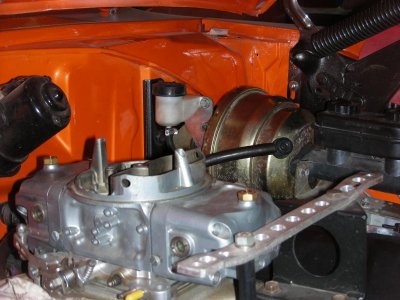
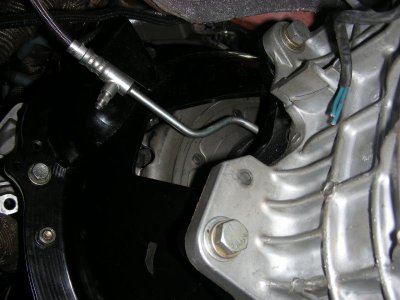
As you can see in the one pic the Holley is long gone and instead sits an 850 Demon DP :headbang:. I'll work on the pedals next and start making a panel to cover the hole. The console will need some mods now, I'll have to make a new wood top moving the cup holders to the rear and the shifter to the front (no biggie).
- - - Updated - - -
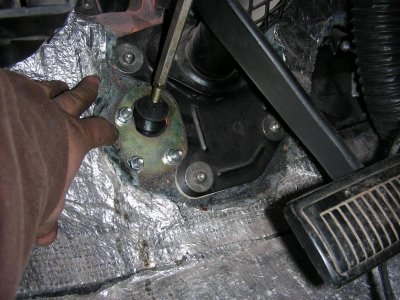
Another thing I have to figure out is a neutral safety switch? I see the spot where it's supposed to be so I think I just need to order the switch. It's an open contact so I'll just ground one side of it to the tranny and then the other routed to the neutral safety relay so it will work just like the original. Reverse switch is just a matter of hooking up the same 2 wires and I'm running a GPS Speedo so I made a plug to fill that hole.


You can see how the Keisler mod to the rear shifter location really helps with the cross member, no mods needed.

The master cylinder setup kicks ***, just line it up with the original clutch linkage hole, drill 3 holes and bolt it in. I elected not to put any holes in my fender for the reservoir but instead drilled a hole in the brake booster bracket (tucks it out of the way nicely). All in all a really nice setup.


As you can see in the one pic the Holley is long gone and instead sits an 850 Demon DP :headbang:. I'll work on the pedals next and start making a panel to cover the hole. The console will need some mods now, I'll have to make a new wood top moving the cup holders to the rear and the shifter to the front (no biggie).
- - - Updated - - -
Another thing I have to figure out is a neutral safety switch? I see the spot where it's supposed to be so I think I just need to order the switch. It's an open contact so I'll just ground one side of it to the tranny and then the other routed to the neutral safety relay so it will work just like the original. Reverse switch is just a matter of hooking up the same 2 wires and I'm running a GPS Speedo so I made a plug to fill that hole.
Clutch master alignment . . . question . . .
747Mopar . . . I see that you've got the clutch master installed and connected - mine is not aligning quite right . . .
Installed the master in the hole that was in the floor . . .
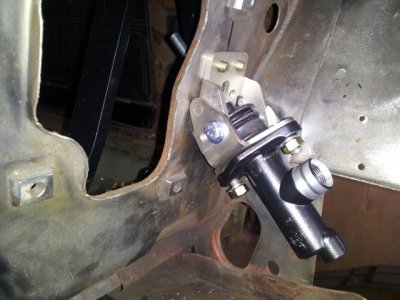
But the alignment would cause an angle in the connector ( probably not good for the master - it needs to be straight in )
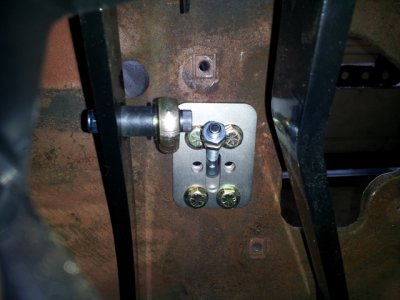
Do I need to add a little more length to the connector at the clutch pedal ?
I haven't gotten back to this yet but I know that I will need to get it resolved . . . so I wonder how yours aligned so nicely ?
Ahhh . . . you still have only the Auto brake pedal in right now . . .
so I'll have to wait and see how the alignment goes when you add the "man pedal" - ( smile )
Forgot the most important part . . . LOOKING GOOD 747Mopar ! ! !
747Mopar . . . I see that you've got the clutch master installed and connected - mine is not aligning quite right . . .
Installed the master in the hole that was in the floor . . .

But the alignment would cause an angle in the connector ( probably not good for the master - it needs to be straight in )

Do I need to add a little more length to the connector at the clutch pedal ?
I haven't gotten back to this yet but I know that I will need to get it resolved . . . so I wonder how yours aligned so nicely ?
Ahhh . . . you still have only the Auto brake pedal in right now . . .
so I'll have to wait and see how the alignment goes when you add the "man pedal" - ( smile )
Forgot the most important part . . . LOOKING GOOD 747Mopar ! ! !
Hey Kahn! Our master cylinders are different, I haven't pulled the rubber boot off but you can move the rod all over the place like it's on a swivel? It also has an offset bushing like yours as well.
- - - Updated - - -
Before installing this I was reading up on the TKOs and they have a neutral safety at the rear of the tranny but I wonder if it is even possible to use now with the mods they did back there (may not be any shift rods back there now?). I'm wondering if I'd just be better off to put a switch on the clutch pedal instead like most cars?
- - - Updated - - -
neutral safety switch in a manual?
looks good man,
Before installing this I was reading up on the TKOs and they have a neutral safety at the rear of the tranny but I wonder if it is even possible to use now with the mods they did back there (may not be any shift rods back there now?). I'm wondering if I'd just be better off to put a switch on the clutch pedal instead like most cars?
BigBlock61
Well-Known Member
The install looks good Devin, as usual you do excellent work. Can't wait for the video. Make sure you mount the GoPro behind the rear tire so as to really catch the smokey burnout. This makes me want to rethink my plans again, and put in a 5 speed.
rebootej
Well-Known Member
Killer man!! Looks awesome!
MT_Mopar
Well-Known Member
Amazing work Devin, last I remember you were looking at a 6 speed Viper tranny, I read you got a good deal on this one. Is it out of another model car? I probably missed what make and model trans your installing. That clutch master cylinder-fire wall transition it pretty slick, I'm digging that.
You got all us auto boys thinkin now!
Nice work.

You got all us auto boys thinkin now!
Nice work.

benno440
Well-Known Member
747Mopar . . . I see that you've got the clutch master installed and connected - mine is not aligning quite right . . .
Installed the master in the hole that was in the floor . . .
View attachment 221169
But the alignment would cause an angle in the connector ( probably not good for the master - it needs to be straight in )
View attachment 221168
Do I need to add a little more length to the connector at the clutch pedal ?
I haven't gotten back to this yet but I know that I will need to get it resolved . . . so I wonder how yours aligned so nicely ?
Ahhh . . . you still have only the Auto brake pedal in right now . . .
so I'll have to wait and see how the alignment goes when you add the "man pedal" - ( smile )
Forgot the most important part . . . LOOKING GOOD 747Mopar ! ! !
I used to have exact same one in mine, I made up a spacer so they lined up
- - - Updated - - -
Hey Kahn! Our master cylinders are different, I haven't pulled the rubber boot off but you can move the rod all over the place like it's on a swivel? It also has an offset bushing like yours as well.
- - - Updated - - -
Before installing this I was reading up on the TKOs and they have a neutral safety at the rear of the tranny but I wonder if it is even possible to use now with the mods they did back there (may not be any shift rods back there now?). I'm wondering if I'd just be better off to put a switch on the clutch pedal instead like most cars?
A tip, yes the rod can move all over the place, because it has a ball tip end, but don't use it if it is not perfectly straight otherwise damage the bore of the master, I learnt that the hard way
Amazing work Devin, last I remember you were looking at a 6 speed Viper tranny, I read you got a good deal on this one. Is it out of another model car? I probably missed what make and model trans your installing. That clutch master cylinder-fire wall transition it pretty slick, I'm digging that.
You got all us auto boys thinkin now!
Nice work.
View attachment 221328
It's a Tremec TKO 600 and all you auto boys just have to remember that if we were to line up (all else equal) you'd likely eat us standards up. I will miss the instantaneous shifts of the auto but really enjoy driving standards plus the overdrive will be well welcomed.
- - - Updated - - -
I used to have exact same one in mine, I made up a spacer so they lined up
- - - Updated - - -
A tip, yes the rod can move all over the place, because it has a ball tip end, but don't use it if it is not perfectly straight otherwise damage the bore of the master, I learnt that the hard way
No worries mate, I'm not going to install it all jacked up. I can see how pushing off center would cause the bore to wear unevenly and fail prematurely. Got my pedal if you want to call it that (the clutch pedal has been chopped off), he thought he had another good one but at least he lent me a good one to copy (more work). Since I have to basically make my own pedal the plan is to just weld an offset mount onto the pedal to line the master cylinder up nice and straight. Hopefully tonight, still taking care of the honey do list and it's snowing!:angryfire:
Pedal - Master not aligned . . .
Here is the misalignment that I'm seeing in my '67 Belvedere . . .
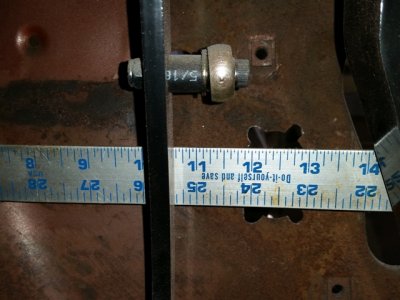
So I thought about moving the master over ( from above it looks like I have all kinds of room )
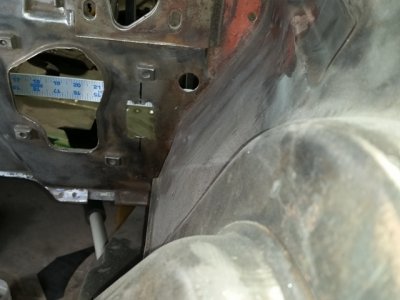
But on the engine compartment side, I'd have to do some work on the inner fender . . . easier to do it now then later . . .
From my picture and my guess-timation . . . looks like you'd need about a 2" spacer instead of the 1/2" spacer they provided . . . pretty long ? ?
Here is the misalignment that I'm seeing in my '67 Belvedere . . .

So I thought about moving the master over ( from above it looks like I have all kinds of room )

But on the engine compartment side, I'd have to do some work on the inner fender . . . easier to do it now then later . . .
From my picture and my guess-timation . . . looks like you'd need about a 2" spacer instead of the 1/2" spacer they provided . . . pretty long ? ?
HYRDGOON
Well-Known Member
- Local time
- 4:16 PM
- Joined
- Apr 20, 2013
- Messages
- 3,372
- Reaction score
- 2,745
- Location
- Breslau, Ontario, Canada
As if I didn't have enough Charger Envy!! Seeing this come together so fast definitely adds to it! Awesome fab work as always Dev and great to see the pace this is moving along!
As if I didn't have enough Charger Envy!! Seeing this come together so fast definitely adds to it! Awesome fab work as always Dev and great to see the pace this is moving along!
Goon . . that's because it's Fer Racin' . . . ( smile )
benno440
Well-Known Member
Here is the misalignment that I'm seeing in my '67 Belvedere . . .
View attachment 221372
So I thought about moving the master over ( from above it looks like I have all kinds of room )
View attachment 221373
But on the engine compartment side, I'd have to do some work on the inner fender . . . easier to do it now then later . . .
From my picture and my guess-timation . . . looks like you'd need about a 2" spacer instead of the 1/2" spacer they provided . . . pretty long ? ?
yeh my spacer was about 2" long, and just cleared the brake pedal but worked well, that was until my internal slave cylinder let go of her seals and i lost my clutch 2 hours from home haha, i went back to mechanical and the pedal is now easier to depress for some reason.
O.K had a few minutes in the garage and was able to turn a brake pedal into a clutch pedal and trim the brake pedal down to match the non auto pedal. After looking at Kahn's pic I now see why he's having a bigger misalignment than me, my pedal (copy of an original) has a thick bracket welded on the side with the attachment points and the forward stop arm on it. The bracket is at least 3/8" thick and has an offset bent into it so it moves everything closer to being lined up which is great. I took pics and will finish everything up tonight (except patching the floor) and get the pics posted tonight.
- - - Updated - - -
Nobody with a RR that sweet and a 500+ cubic inch motor should be envious of anybody! So how long is that wait list for your Passon?
- - - Updated - - -
As if I didn't have enough Charger Envy!! Seeing this come together so fast definitely adds to it! Awesome fab work as always Dev and great to see the pace this is moving along!
Nobody with a RR that sweet and a 500+ cubic inch motor should be envious of anybody! So how long is that wait list for your Passon?
HYRDGOON
Well-Known Member
- Local time
- 4:16 PM
- Joined
- Apr 20, 2013
- Messages
- 3,372
- Reaction score
- 2,745
- Location
- Breslau, Ontario, Canada
Nobody with a RR that sweet and a 500+ cubic inch motor should be envious of anybody! So how long is that wait list for your Passon?
Thanks! Truth is though my biggest fight with whether or not to start all the upgrades to my car is that a 2nd Gen charger will always be "the one" for me, Although I'm really pleased with my RR and would have a real hard time letting it go to chase another car now.
Jamie said realistic time frame is a year. Which really is fine for me that would give me plenty of time to bank the funds. I just need to make sure I specifiy the right bellhousing so need to find the cast # when I have a chance
I can see your dilemma, I owned and fixed up many cars and was never satisfied with any of them until I got the Charger. I did have a 68 RR that ended up being to far gone to salvage (would have needed every piece of metal available and then some) but I think I would have been content with that one as well. Having had both torn all the way down I know that they are basically the exact same car except the exterior sheet metal if that helps. If your still second guessing it after what you've already got I'd start looking because nothing I ever did to a car made me not want my dream car any less, Good luck.
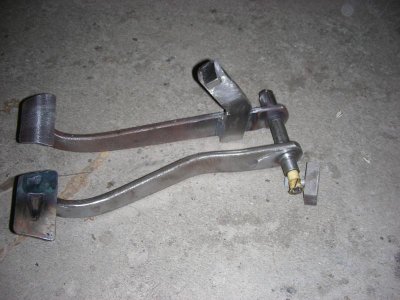
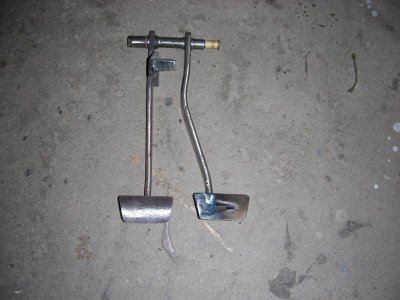
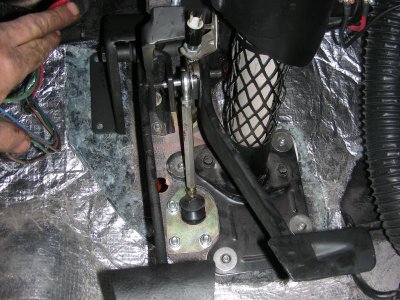
Got the pedals done, like I said the pedals I got off of a buddy had the clutch pedal chopped off but at least I had the pivot with the needle bearing in tact and only needed to turn a brake pedal into a clutch pedal. I used the press to smash the brake lever flat and then cut the pedal off and welded it back on in the correct spot and of coarse welded it onto the pivot. Then it was on to making the pedal stop arm and a bracket to fasten the new hyd linkage too.
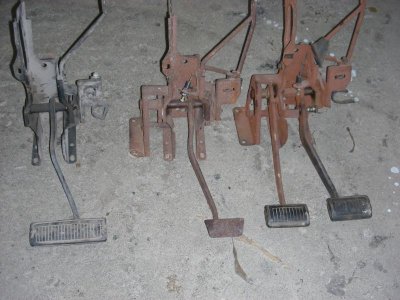
Here's what I started with, the complete assembly is a loner for me to copy (right). The middle one will provide the pivot and bracket and the left one is one I had laying around that will I used to make the missing pedal.
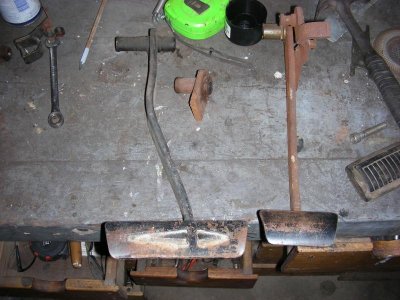
After straightening and adding the stop.
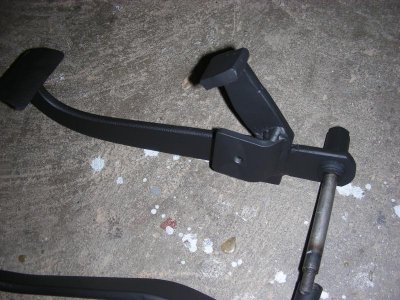
This is what I came up with to get the rod aligned, it's just an offset bracket with plenty of room for mounting locations. I didn't make it exactly where it needed to be because I wanted a small bushing in there to allow the rod end some wiggle room.
Here's the stop, I had this bumper laying around from a bumper kit I bought and never knew where it went........until now.
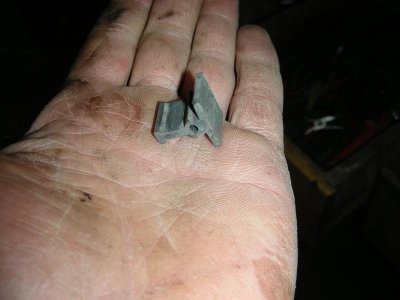
I'm not a fan of having a shoulder bolt just tightened down on a single side especially on something where if it broke you loose all brakes! I threw this little bracket together to make me feel better, it means you have to shear both ends off now.
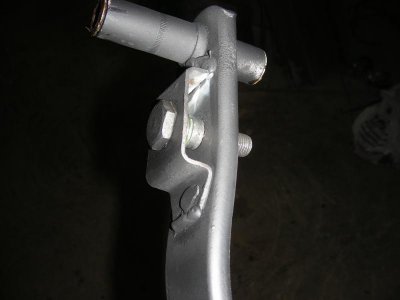
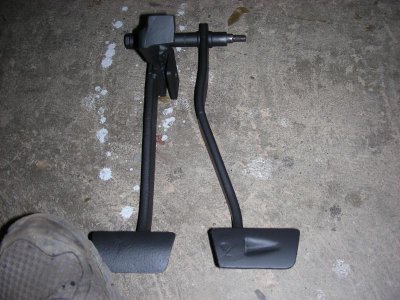
Here's the finished product, I still haven't made the bushing but you can see how straight the rod is. :headbang:
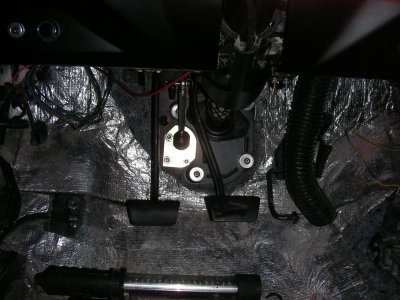
After all of that work I walk outside and nearly bust my butt.............. the white crap is everywhere! Great, there's almost certainly salt on the roads now.
- - - Updated - - -
Forgot to mention after reading the install directions they said if using a diaphragm style pressure plate (not the 3 finger type) do not use the over center pedal spring. Thought I'd mention that because CDRs hawkeye will notice it's missing haha.
Here's what I started with, the complete assembly is a loner for me to copy (right). The middle one will provide the pivot and bracket and the left one is one I had laying around that will I used to make the missing pedal.


After straightening and adding the stop.


This is what I came up with to get the rod aligned, it's just an offset bracket with plenty of room for mounting locations. I didn't make it exactly where it needed to be because I wanted a small bushing in there to allow the rod end some wiggle room.


Here's the stop, I had this bumper laying around from a bumper kit I bought and never knew where it went........until now.


I'm not a fan of having a shoulder bolt just tightened down on a single side especially on something where if it broke you loose all brakes! I threw this little bracket together to make me feel better, it means you have to shear both ends off now.

Here's the finished product, I still haven't made the bushing but you can see how straight the rod is. :headbang:


After all of that work I walk outside and nearly bust my butt.............. the white crap is everywhere! Great, there's almost certainly salt on the roads now.
- - - Updated - - -
Forgot to mention after reading the install directions they said if using a diaphragm style pressure plate (not the 3 finger type) do not use the over center pedal spring. Thought I'd mention that because CDRs hawkeye will notice it's missing haha.
The way i see this Devin is by the time i catch up to you, ill be wore out lol.. I guess this is a good time of year for us doing this stuff, and yep! ill bet on salt on the roads, maybe not it hasn't been that bad yet but i reckon it may be a little different where your at, my email tells me im in for some more now.. I guess i should build a hot rod plow tractor! 
Similar threads
- Replies
- 3
- Views
- 476


