• When you click on links to various merchants on this site and make a purchase, this can result in this site earning a commission. Affiliate programs and affiliations include, but are not limited to, the eBay Partner Network.

Taking Up New Residence

I still can't get over the shape this car is in. Well preserved!

This is the most surface rust under this area because spilled gas washed off the undercoating. Useing only a Dremmel sander, it's bare metal without any pitting.

View attachment 420047
View attachment 420048

I took a video of the underside. It's only been wiped off with mineral spirits after the undercoating removal. (I did sand on the one frame rail a little) You can see the dipping through a hole in the shock mount frame near the end.

Fantastic Kid! Who knew what was hiding under there...And after 55 Years!! Maybe next time you can indulge us with some narration!! LOL
 
Fantastic Kid! Who knew what was hiding under there...And after 55 Years!! Maybe next time you can indulge us with some narration!! LOL
Well, when I bought this car, I paid well over top dollar for it. Took a chance on what the seller had said about it being "rust free". He also stated it had a west coast history. So I figured I would be ahead of the game if I didn't have to replace any sheet metal. It's worth every dollar I spent the more it discover how solid it really is. It would be a perfect media blast and rotisserie project but I'm wanting to get this on the road. Maybe if I was younger and had more funds.

I'll do a narrated video of it when I fire it up for the first time! Lol
I am in exactly the same situation with my car. Also paid top dollar for the California/ New Mexico prominence. But the savings as a result is amazing! I will say mine is very clean underneath,not being undercoated,.....but not like yours!! I am truly Envious. Nice Work!!
 
Very tidy on the underside....looks really good. Amazing condition for the age!
 
Got some color on it today.
20170503_173556.jpg

The strap has some surface rust on the one end. The rest looks new after removing the undercoating.
20170503_194003.jpg

20170503_193950.jpg


I've been saving up parts to sandblast. Looks like I'll be doing some tomorrow.
20170503_194234.jpg

20170503_194202.jpg
 
Got some color on it today.
View attachment 420305
The strap has some surface rust on the one end. The rest looks new after removing the undercoating.
View attachment 420310
View attachment 420307

I've been saving up parts to sandblast. Looks like I'll be doing some tomorrow.
View attachment 420308
View attachment 420309
Kid.. you need to leave the tank out so you can show that off at shows!! Don't cover up all your hard work! Throw a 2 gallon can in the trunk with a bunji cord and a rubber hose!!1 LOL Too Purdy to Hide !!
 
Installed the tank, pipes, shocks, this afternoon.
20170505_160102.jpg

20170505_160132.jpg

20170505_125542.jpg


The problem I had was getting the strap bolt started with the new, thick rubber mat on top.
I really had to exert a lot of pressure on the strap just to get one thread started. Once I accomplished that then I had to center the tank between the frame rails. Front to back location is dictated by the sideways rib under the trunk floor.

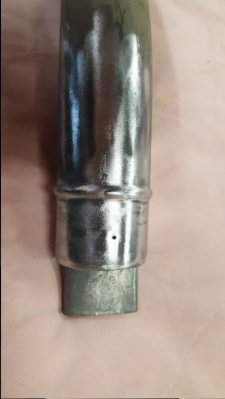
I left the filler tube out for the install. It went in without much effort when I had it on the floor so I thought I would leave it out until the tank was in place. Well, I installed the tube and it bottomed out in the tank before the bracket was where it needed to go.

Got the old one out to compare and this is what I found. (note the pin hole in the origanal one)
20170505_155154.jpg


Shiny don't cut it if it's the wrong part! I guess I'm sending Mega Parts an email with pics.

I could always cut a hole in my license plate!
20170505_160225.jpg
 
Last edited:
Kid; I can imagine the profanities were flying!! If you want,,,I could take a ride to Coon Valley and "Rough em Up" a bit!! Good install tips. I'm about a week away from that. Sure Looks Good!
 
It's very disappointing when you buy a good looking reproduction part and I doesn't come close to fitting. Not knowing filler necks were being reproduced, I bead blasted the necks inside and out on my Plymouths, filled in the pits with JB weld then painted with POR 15 light gray or metal mask. I think they look acceptable, can't really see them. Just keep the paint off the tank seal area and at the top where the cap seals. Good luck.
 
Another option is to solder the pin hole shut an tin the pits (solder). Then smooth it out.
PRND21's JB weld is a good idea for pits probably easier than tinning. I would solder the hole. I had a weep hole on my 65 Dodge where I had a sump soldered on, didn't leak for two years then it started. Had just put in more gas. Jacked car up wiped down with brake clean, roughed it up with 60 grit a dab epoxy. Bingo 2 years now all good.
 
Kid I was just cleaning up my fill pipe and noticed a pinhole in mine as well, which looks like it is supposed to be there. Unless you are referring to another . just an FYI

20170506_113644.jpg
 
Another option is to solder the pin hole shut an tin the pits (solder). Then smooth it out.
PRND21's JB weld is a good idea for pits probably easier than tinning. I would solder the hole. I had a weep hole on my 65 Dodge where I had a sump soldered on, didn't leak for two years then it started. Had just put in more gas. Jacked car up wiped down with brake clean, roughed it up with 60 grit a dab epoxy. Bingo 2 years now all good.
The problem that I see, is the rusted inside. I can clean it up to bare metal but there will be no galvinizing to keep it from rusting again thus contaminating the tank. Only coating places close to me, only do chrome. I'm waiting on a reply from Mega Parts to see what they say about what they sent me.

Kid I was just cleaning up my fill pipe and noticed a pinhole in mine as well, which looks like it is supposed to be there. Unless you are referring to another . just an FYI

View attachment 420999
Mine has a pin hole in the side, clean through it!
20170506_164151.jpg
 
A crazy idea, weld pin hole. Send out to a header coating company. Maybe phone call and little whining may get you a fast turn around.
 
A crazy idea, weld pin hole. Send out to a header coating company. Maybe phone call and little whining may get you a fast turn around.
It's not a crazy idea at all. It's what I thought of before I saw them for sale. There's a ceramic coating place near me but I'm curious on how it holds up to fuel. If I don't find the right one being reproduced with zink coating, I'll probably be looking at having my old one coated.
 
Don't you have a galvanising place around your area? Boat trailer manufactures would be the best place to take it.
 
Don't you have a galvanising place around your area? Boat trailer manufactures would be the best place to take it.
IIRC the nearest galvinizing outfit was near Philadelphia. I even considered anodizing it myself, which would be a rust deterrent.
 
Ceramic I think is like glass. Don't see why it wouldn't work , but ask you never know. 20 years ago I could have tried to plate it for you. At work we had a tin tank with 2000 lbs of melted tin. Soak in flux dip it in tin for 5 minutes done. Have to let sit in tin bath so you don't coat to thick, heats the part.
 
Last edited:
Auto Transport Service
Back
Top