• When you click on links to various merchants on this site and make a purchase, this can result in this site earning a commission. Affiliate programs and affiliations include, but are not limited to, the eBay Partner Network.

The Kelly Charger

Bad B-rad

Well-Known Member
Local time
3:08 AM
Joined
Jun 19, 2020
Messages
750
Reaction score
626
Location
NY
This will be the story of the repair/resurrection of my 1969 Charger.
I bought the car via online auction. I put in a bid, I was sure would not be enough, and a few days later, while returning from work, my wife calls me "Do you know, you just bought a Dodge Charger?".
I do now I said

I have been Mopar or no car for 25 years, and have owned and restored a handful of Mopars.
So when the time came to get a new car(new to me) I knew I wanted something without the usual MAJOR rust issues, that cars driven in NY tend to have. I have been down rust road before, and learned that expensive rule, long ago. (I should have listened to uncle Neil "Rust NEVER sleeps"

To me this Charger looked VERY solid, and looked very complete.
I figured I would be ahead of the game, by not having to spend time and $$$$ locating missing parts, or replacing rusted metal that cant be seen till its to late.(and I own it,lol)
So after paying for my new toy, I worked on having it shipped from California to me in NY.
It was $700 in open car hauler, or $1000, in enclosed transport.
I am NOT a wealthy man, but having to traveling across the US, I payed the extra cash to have the security of enclosed transport.
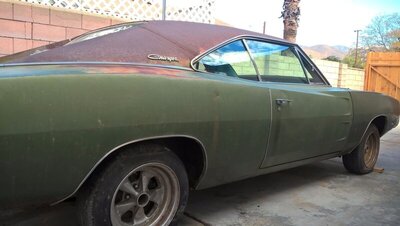
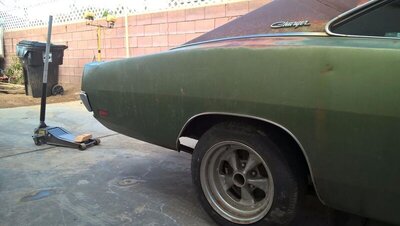
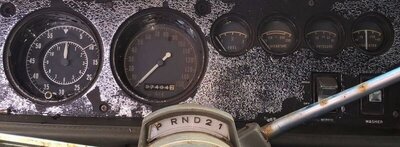
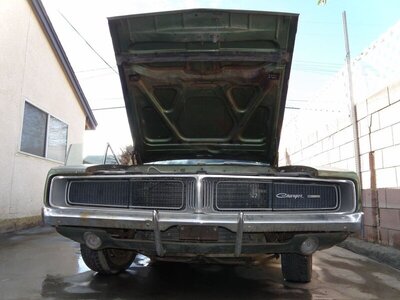
This is what arrived:
s-l16003_zps5yfdns8k.jpg 00000hhbh_zpsckv8ncuh.jpg s-l1600 (1)hh.jpg h_zpsmxn8amsz.jpg gauge.jpg cf 2636464hhh.jpg
 
I see lots of potential sir. It all depends on what is there...and if its been honestly represented. she looks very straight to me.
 
lol....now I get the bad side. Quarter skin for sure....frame?
 
The bad, doesn't look that bad.

AMD has everything you'll need.

Full quarter, trunk gutter, trunk floor extension, maybe outer wheel housing and trunk floor.

$790 - 1290 in parts
 
The guy I bought the car from, bought the car in 2006, and I got it in 2016.
He was not mechanically inclined and had done nothing with the car while he owned it.
Once car was at my garage, I dug in deep to see exactly what I now owned.
It is a 1969 Charger, with "H" code 4bbl 383 (330HP) engine. It has column shifted automatic transmission, power steering, power brakes, open 3.23 rear end. It has the "buddy seat" arm rest, and the car was a white hat special so it has that group of options(hood mounted turn signals, the light package, wood grain steering wheel, vinyl top, remote mirror, and deep dish wheel covers)
It is F5 med green metallic, with dk green inteior and green top.

white%20hat%20charger_zpsigvz9d7h.png
 
Next, I attack the back seat like I am a crack head, who dropped a huge rock down there, and BINGO build sheet!!!!!!!!!
 
Inside the glove box, I find reg and paperwork going back to 1973.
For shits and giggles I look up name on the California registration on "THE GOOGLE" (LOL)
and I am NOT KIDDING, the guy is not only still alive, he still lives at same address!!!!

I had to go threw a few family members to get correct phone number, so I called.

He was a GREAT GUY!!!!!
He told me he bought the car in 72ish from original owner, who was a teacher. He told me he only had the car a short time before he slide into a telephone pole. And he still drove the car for year with damaged.
Then he bought a 1970 model year Charger and parked the 69 in Family barn.
 
This guy was such a good man,(John) that I am going to just say car sat in the family barn until a family misunderstanding took place in 2006, when the Guy who I got the car from entered the picture, and bought it.
So the car left the barn/family property, in California, and made its way to San Bernardino.
There it sat in his garage, until he had to move it outside, to build or repair his garage.
This is where I am going to guess the California sun destroyed the carpet, and vinyl top.
Talking with John,(2nd owner) he said cars inside and top was mint when it left his ownership.
I noticed the car had blue 1970 Charger bucket seat in it, not the correct 1969 ones.
John said car had original seats in it when he had it, but when the 1969 left his ownership, it went with what was left of the 1970 Charger he replace the 69 with, and that car was blue, so for some reason un- known to me I am guessing the 69 got the 70's blue front seats.


John was very happy and surprised to hear from me, he was polite, and answered any question I had about the car,and he didn't have to.
I have a dream that when I get the car finished, I want to drive it to California, right to John's house, and take him out to dinner.
 
Its great to have the cars history... Good deal for you man and good luck. Hell of a start to a project.
 
With build sheet tucked away safe, and as much of my conversation with John written down in a note book(I have bad memory,lol)
I went about looking over the car a bit more.
The rear 1/4 was hit hard, but lucky for me, the frame is fine!!!
The LH side of trunk floor buckled OVER the frame rail.(just next to inner wheel house)
The 1/4 and the trunk extension are smashed beyond repair. (I now have the 1/4 removed to start repair, and the trunk floor, CAN be salvaged)
But that's not where I started, no I wanted to see the shape of the 383.

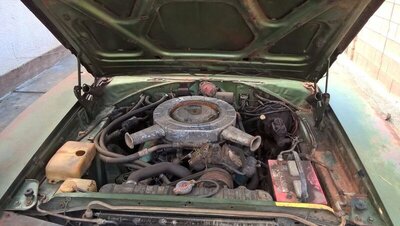
The engine bay looked VERY, VERY close to stock. It arrived to me with the set of headers that are still on the car.
I noticed a few header bolts and valve cover bolts were missing, and in the trunk, with the deep dish hub caps.
That seamed like a good place to start, as I already had a head start.(lol)
Under the passenger side valve cover I found a bent push rod, and a valve stuck open, so on to the driver side valve cover.
It also had a bent push rod and frozen valve.
So off with its heads!!!!!
 
So far not really bad. Nothing that cannot be remedied.
 
With heads off, I drained the engine oil, and went about cleaning inside of the engine up.
The oil was NASTY, but inside of engine was not bad at all.
I had a new set of Comp Cam push rods, and a set of rebuilt 1971 383/440 "346" heads laying around.
After the cleaning job, I installed the heads with a Mopar performance parts steel shim head gasket (10 thousands thickness)
With heads torqued down, and new oil and filter installed I pulled the intermediate shaft and installed an old one with the gear cut off, that I use to prime the oil system on my big blocks.
This is where things get interesting.
As I am turning the oil pump, oil starts flowing beautifully up the driver side valve train, as it should, but NOTHING on passenger side.
The mechanical oil PSI gauge I installed in place of factory sender unit is reading good pressure, but still passenger side of engine, is seeing no oil up top!!!!
After I prod the passenger side oil feed passage, I give it another shot.
This time, just as oil starts flowing up driver side, a gob of something that can only be described as dark and NASTY, pops out of the passenger side oil galley, followed by nice clean oil!!!!!!

I am so glad I did this, I feel had I not done things this way, I may have damaged the engine.(as the PSI gauge read oil pressure)

IMG_1875.JPG IMG_1877.JPG IMG_1883.JPG
 
I purchased and painted the aluminum Mopar copy of the org cast iron 4bbl intake manifold, and I located a rebuild carb, for my car that is only 9 days older then the original one on the car!!!!!!
Some fellow on e bay, bought up all the stock of a carburetor reman company, and as Tom Petty says, "Even the losers, get lucky sometimes"
And that day I was that lucky loser.
So I tucked away the intake and carb, and removed all the A/C parts from the engine bay, then on went the intake and carb.
I also painted the original valve covers, and new cover gaskets.
New spark plugs installed, and a set of resto wires from Mopar, along with a set of points and fuel filter from NAPA.
I then ran new fuel line to a metal gas can, and once again this looser got lucky and the engine fired to life!!!!!!
It ran smooth, but it did produce a large amount of smoke, partly due to marvel mystery oil I put in cylinder bore and partly due to what ever USED to live in the duel exhaust system. EVICTION NOTICE SERVED!!!!!!!!

.

image1 (5).jpeg
 
I KNOW that its NOT a MAGNUM engine, but 383 magnum is way cooler then 383 4bbl, so for now I am rocking the magnum cover, lol
 
Looks like a sweet project, and I too have gone through restoring a rusty car and will always try my best to find a rust free, or a close as I can, car from anywhere in north america....the shipping is ALWAYS cheaper then the rust repair. ;)

I am only seeing pics up to the White Hat special advert...no other pics after that. :(
 
A bit ahead of myself, when I drained the engine oil, I also changed the transmission fluid and filter, using Type F fluid.
When I started the engine, I put the transmission in NETURAL, so it would pump instantly.
I also flushed out the radiator, 3 or 4 times, and I scored an original Direct Connect aluminum Hemi water pump housing, that I also painted tourquirse, and intend on installing.
I removed the aftermarket flex fan, and installed a Mopar Performance viscous drive fan from Mancini Racing.

With the engine running and the transmission shifting, I turned to the brake system.
The master cylinder was completely devoid of fluid when I got the car, and once I had it filled up with brake fluid, and gravity bleed the lines, I discovered the brake pedal was FROZEN SOLID!!!!
Now I run 6 foot 3inch 250lbs, so I do have a broad torque curve.(LOL) and the amount of pressure I had to apply to the petal and still no movement, I knew we had an issue.

Now my father always used to say, "What do you need brakes for? They are only gonna slow you down"
And that's exactly why I started gathering up brake parts.
This Charger was a power drum car, with the Bendix style booster, so I purchased a reman DISC/DRUM master cylinder for the booster.
Then a call to Classic industries for the correct disc brake proportion/distribution valve.
Next up a set of new Disc brake spindles, and a call to DR Diff, for the rear shoes, and wheel cylinders, spring kit and rear wheel seals.
I also got the front wheel bearing kit from him.
I got 11.75 PIN STYLE caliper brackets(used c body Mopar parts) and ordered a set of 11.75 performance rotors and hoses from rock auto(for real they have them)
I got the front brake calipers and pads and rear drums from NAPA.
This, in my opinion is the best FACTORY disc set up. It is important to me to keep the car as much MOPAR as I can.
I also feel that I was able to get all these parts for cheaper, or the same price that most front disc kits go for, and I have the pin type calipers, and the larger rotors, also the pads from the pin type calipers have more surface area then the slider type.

10.87 caliper measures 3.125 @ 11.75 rotors measure 3.5inch.jpg pads pin vs slider type.jpg cordoba pin type caliber for 11.75 brake.jpg 1978 11 75 rotor raybestos frc4098 2 of 3.jpg
 
First photo of brackets shows the difference from the B body to larger C body rotors.
Then I posted picture, so you can see the extra surface area that the pin type caliper pads have vs the more common slider type.
So with the larger rotors and larger pads, this should out preform the standard 10 rotors, or even the 11.75 rotors with the slider type calipers,


I guess being a life long Mopar dork with a brain full of useless(to most people) info pays off sometimes!!!!!
 
Looks like a sweet project, and I too have gone through restoring a rusty car and will always try my best to find a rust free, or a close as I can, car from anywhere in north america....the shipping is ALWAYS cheaper then the rust repair. ;)

I am only seeing pics up to the White Hat special advert...no other pics after that. :(


The photos of build sheet are blurry as heck, I have to take some time to get my stuff in order, as I have been working on this car on and off (more OFF then ON due to cash flow,ha ha.) I am just a regular working guy,(like a lot of you) with wife, two kids, house, and so on. So it took about a year after I bought it before I had any extra cash to put into car.
In fact it took all of last summer and all I could afford was the 4 reproduction rims and new tires!!!LOL Sometimes you eat the bear, sometimes the bear eats you!!!!
 
My car arrived to me missing the front seats, but a BLUE set of 1970 Charger front seats were in its place.
So I had been trying to find a set of 1968-1969 seat cores so I would have the correct seats.
Well finding out that people want like $800-$1200 for trashed seat cores, I came up with this idea.
CUSTOM seat covers.
I started to speak with Legendary, and sent them some drawing of my idea.
I figured I could have a set of seat covers made to fit the 1970 seats, but that had the same pattern as the 1969(slightly adjusted due to seat shape)
They said they could make me such a cover!!!
But after the buzz of my cool idea wore off, I decided I wont be happy unless I have the correct seats.
Now during my seat search, I did notice that 1970 Charger seats are selling for much more then 1969 style seats, and my 1970 seats covers were still in fair shape, so I put them on a bunch of online sites to try and see what offers came up.
 
Last edited:
Auto Transport Service
Back
Top