• When you click on links to various merchants on this site and make a purchase, this can result in this site earning a commission. Affiliate programs and affiliations include, but are not limited to, the eBay Partner Network.

What did you do to your Mopar today?

Cleaned the yoke, bolts and straps. Removed the original pinion seal, its a C/R not like todays.
Tried acetone soaked paper towel and NAPA Paint Blitz paint stripper to remove 50 year old gasket on housing. Paint stripper worked better. Let it sit 20 minutes and most of gasket came off. A second application will do the trick.
Will put on Speedi-Sleeve tomorrow and try not to screw it up.
Be gentle(kinda) with the install Fran..
 
I think I finally have my thermoquad perfectly dialed in, got the air door adjustment set so I don't get heavy bog from a dead stop, and she will lay some pretty good rubber now! LOL
 
Yesterday put on Speedi-Sleeve, no pictures so posted today. Froze yoke for an hour, waste of time. Put a little anti-seize with a kiddy paint brush. It when on harder than I though it would. Started with a 4 oz. brass hammer on install cup, stopped moving after a couple hits. Got out the 2lb hammer and let fall on cup, cup didn't seem heavy enough to handle that. Put a 2 in sq piece of wood and a Little swing on the hammer and on it went. It took 8 to 10 hits, didn't want to pound it.
Finished cleaning gasket surface with paint stripper, work very well. Better to put it on and let it sit for a couple hours add more if it looks like its drying out. When I did the housing in the spring a wire brush in a drill was hard to do and less effective.

wid12.jpg
wid13.jpg
 
Last edited:
What do you use for sealer or do you use a gasket
 
That so tight don't think it will leak. They say add metalize epoxy if deeply scored. The ID of sleeve is smaller than the OD of yoke. Your stretching as you put it on.
 
In the ongoing effort to eliminate annoying rattles due to modified big-blocks with loud exhaust...I belive I tracked down the last of them. Been driving me crazy and I hadn't been able to pinpoint them. Rattles to this point have all been interior; loose window hardware, armrest mounting clips, stuff behind the dash etc.Today I opened the trunk while the noises were actually happening and noticed it sounded like they were coming from the rear lower quarters....there's a gap between the trunk floor sides and the fenders so I got the fishin' tools and went at it....

Here's what was wedged down there between the quarter outer and inner skins..
20181030_171053.jpg


holy-crap.jpg
 
In the ongoing effort to eliminate annoying rattles due to modified big-blocks with loud exhaust...I belive I tracked down the last of them. Been driving me crazy and I hadn't been able to pinpoint them. Rattles to this point have all been interior; loose window hardware, armrest mounting clips, stuff behind the dash etc.Today I opened the trunk while the noises were actually happening and they were coming from the rear lower quarters....there's a gap between the trunk floor sides and the fender so I got the fishin' tools and went at it....

Here's what was wedged down there between the quarter outer and inner skins..
View attachment 673656


View attachment 673657
To bad they didn't leave a half pint of something good to drink. I was fish around the trunk of a car my sister sold to my mother and found 2 nasty pounds of bacon. Good thing packages never got punctured.
 
To bad they didn't leave a half pint of something good to drink. I was fish around the trunk of a car my sister sold to my mother and found 2 nasty pounds of bacon. Good thing packages never got punctured.
Wow bacon?! That could have been ugly....I did find an old bic lighter that still works, (but I don't smoke). I guess it didn't make it into the picture...
 
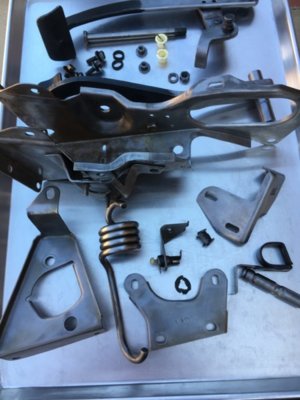
Disassembled & began inspecting/cleaning the clutch/pedal assembly. What appeared to be cosmoline was noted within the inner housing area. The clutch spring had a white paint inspection mark smeared atop the outer portion of the lower 3 coils. The needle bearings, end washers & bushings are in good shape & will be reused.

DAD7C742-6207-4D28-BD67-114CCAE7601B.jpeg
 
I was lucky enough Wednesday to take the '62 to the E-free gas station. 70 degrees and sunshine. Filled it up with 90 octane for the winter. Yesterday was cloudy and windy. Today we're back to the monsoon season and temps are to drop back down to the 50's. Toy run this Sunday and I might go there if its not too uncomfortable.
 
Got out to the shop and got working on the E- brake cable routing, and the new brake lines for the rear axle . . .

If you aren't following my build, will be moving the E-brake to the tunnel hump . . .
Here's the "holder" that I fabricated and the start of the cable routing . . .

sm_ebrake13.jpg


Then there's the new brake lines that were bent up to fit the new 3" narrower rear end . . .

sm_brakelines01.jpg


And the routing to the axle mounted T-fitting ( still have not found the star washer yet - figures )

sm_brakelines02.jpg


Then out the other side of the T-fitting and around the differeetial . . .

sm_brakelines03.jpg


Through the brake line clip and over to the passenger side connection . .

sm_brakelines04.jpg


And the connection to the wheel cylinder . . .

sm_brakelines05.jpg


Progress . . . I'll take it . . .
 
Got out to the shop and got working on the E- brake cable routing, and the new brake lines for the rear axle . . .

If you aren't following my build, will be moving the E-brake to the tunnel hump . . .
Here's the "holder" that I fabricated and the start of the cable routing . . .

View attachment 674973


Then there's the new brake lines that were bent up to fit the new 3" narrower rear end . . .

View attachment 674968

And the routing to the axle mounted T-fitting ( still have not found the star washer yet - figures )

View attachment 674969

Then out the other side of the T-fitting and around the differeetial . . .

View attachment 674970

Through the brake line clip and over to the passenger side connection . .

View attachment 674971

And the connection to the wheel cylinder . . .

View attachment 674972

Progress . . . I'll take it . . .

Freakin slick...!


Jeff
 
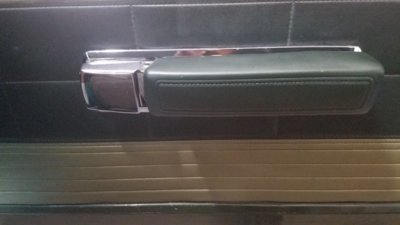
Replaced my old-and-busted front armrest bases with new repros from 521 Jeff. (Bought some rears ones too). Polished up the ashtrays on my junkyard score rear pads and got them installed...looks much better than the two holes in the panel:D..
(They look good but I think I will be hitting them with some Herb's '68 dark green for a slightly better match to the factory stuff).

Old and busted....
20181103_133007.jpg


New hotness....(installed)
20181103_170507.jpg

20181103_165711.jpg
20181103_170423.jpg
 
Last edited:
Put pinion in and pipe torqued it. 17" breaker and a piece of pipe, don't like it. Mentioned the dash 70 on the pinion think its the shim thickness under rear bearing. Cleaned ring gear and bolts also suregrip unit. It was in a bag for 30 years, just oily. put bearing cups in chuck to keep track what side they go on. There is a dash 05 on ring gear??
wid14.jpg
wid15.jpg
wid16.jpg
wid20.jpg
 
Replaced my old-and-busted front armrest bases with new repros from 521 Jeff. (Bought some rears ones too). Polished up the ashtrays on my junkyard score rear pads and got them installed...looks much better than the two holes in the panel:D..
(They look good but I think I will be hitting them with some Herb's '68 dark green for a slightly better match to the factory stuff).

Old and busted....
View attachment 675001

New hotness....(installed)
View attachment 675002
View attachment 675004 View attachment 675003
Did with sticky backed chrome vinyl 30 years ago. The wrinkled area looks worse in pictures and the dull part is the picture not the chrome.

wid22.jpg
wid23.jpg
 
Today put ring gear on suregrip and mounted in chuck. Had to clean caps and adjusters. tomorrow put in the rest of ring gear bolts and torque them. Hope to set backlash and preload bearings then torque cap bolts and put on adjuster locks. Somewhere in the process check pattern.:praying:
wid21.jpg
 
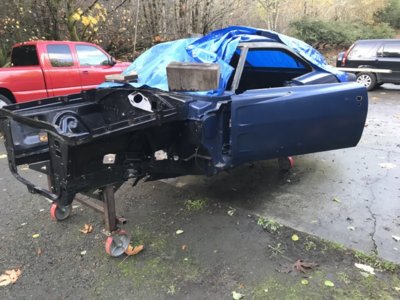
Well done with the complete tear down. I will not be doing the body work. I have several good sources and hopefully won’t take long.

92858CD6-BD94-4FA8-9A16-913B6D8A3A6E.jpeg
 
Auto Transport Service
Back
Top