• When you click on links to various merchants on this site and make a purchase, this can result in this site earning a commission. Affiliate programs and affiliations include, but are not limited to, the eBay Partner Network.

1968 Coronet 500 Project

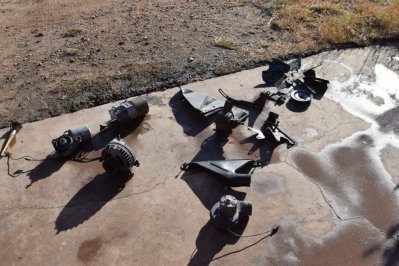
Mystery of the day. When I disassemble I package parts from each "subassembly" I removed in the same package. For the brake peddle frame I have only this nut left over. I also have this brace that I can't for the life of me figure out where it went... Anyone help me?
DSC_0031.jpg
DSC_0028.jpg
 
That brace looks similar to the ones that held my a/c compressor to the block.
 
Tonight I reassembled the rear brakes and finished installing the rest of the hardware around the axle (restored emergency brake cables, restored brake line bracket, new brake hose). The brakes are mostly period correct but the adjuster cable does not seem to match the manual or other photos. Not sure how much of the hardware is original or not, I do know it is older than 1985 when the car was parked :)

View attachment 350023 View attachment 350024
Jim, you have given me the inspiration to tackle my underside on the Yankee Express. I have done the front wheel wells and engine bay but not underneath. That looks so clean and neat when done that I think i'll bite the bullet and do it too. Nice car, great work. Ghost.
 
Jim, you have given me the inspiration to tackle my underside on the Yankee Express. I have done the front wheel wells and engine bay but not underneath. That looks so clean and neat when done that I think i'll bite the bullet and do it too. Nice car, great work. Ghost.

It is a PIA to the max but the underbody of these cars are so beautiful it is a shame to hide it with undercoating. I hated every moment of it but love the results.

Good luck!
Jim
 
Here you go Jim. If you look closely, you'll see three supports on the right side.
View attachment 370689
Bracket mystery solved. What about that nut? It appeared to be yellow chromate coated (why I painted it as I did). Do you see any other nuts besides the ones on the left side of your photo where the brake bracket bolts to the dash bracket (2 bolts and nuts)?

Jim
 
I know where it goes. Came to me this morning as I was waiting for the alarm clock to go off. It is yellow chromate so it seemed like it should go outside and yes I am sure it goes on the stud that hold the booster brace to the firewall under the hood. Need to find my package with the master cylinder nuts but I am sure when I saw it the other day all that was in there were the nuts for the cylinder.

Yup. Installed and no parts left over!
 
Last edited:
I know where it goes. Came to me this morning as I was waiting for the alarm clock to go off. It is yellow chromate so it seemed like it should go outside and yes I am sure it goes on the stud that hold the booster brace to the firewall under the hood. Need to find my package with the master cylinder nuts but I am sure when I saw it the other day all that was in there were the nuts for the cylinder.

Yup. Installed and no parts left over!

I got a five gallon bucket full of them if you need any. :rolleyes:
 
This feels good. I am seeing the home stretch... I dropped the tranny off at the tranny hospital to get rebuilt this morning...
DSC_0001.jpg
DSC_0007.jpg


The place is right next door to the FBBO member who rebuilt the 318. The tranny guy has a Charger so this will be an all Mopar effort!

The Steering Gear is packed and the invoice is in my email for a FirmFeel Stage III rebuild.

Went the M&M Auto Paint Supply in Sierra Vista and picked up my last bag of glass beads! I have the LAST batch of parts stripped with Aircraft Stripper and the blasting setup is ready to roll in the morning. I can't believe when I finish tomorrow there will only be a few odds and ends to touch up with the sand blaster and I should have these parts painted by the end of the weekend.... I may be able to get the drivetrain back in the car over the Turkey day weekend! Mopar Bill what are you doing that weekend :) DSC_0008.jpg DSC_0009.jpg
 
Last edited:
Started out a good day. Chilly (40 degrees) but warmed up nicely as the sun came up. Started with the Starblast to get the brackets roughed up for the epoxy primer, then switched over to glass beads for the parts that needed to stay "natural". Then the wind started blowing.... One thing that really sucks about the high desert is the wind in the spring and fall.... Then I got a headache which I still have.... Anyway enough whining.

Got a bunch of brackets and the last shield painted with SPI epoxy primer (I am now officially out of epoxy primer)..

DSC_0012.jpg

DSC_0015.jpg
DSC_0017.jpg


With the natural metal parts ready for restoring....

DSC_0018.jpg


And I have the last small pile of glass bead parts to blast in the morning..

DSC_0011.jpg


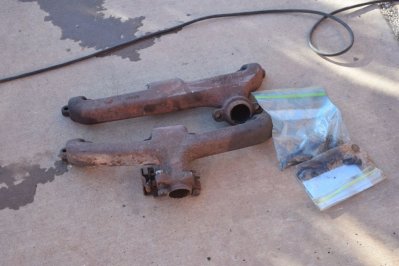
I finished restoring the exhaust manifolds and original hardware! Used Seymours 1200F Cast Blast paint. Well see how it hold up. Tacked them on the motor so they won't get scratched up by them kicking around the garage...
DSC_0019.jpg
DSC_0020.jpg


Lastly I have completed the restoration of the most important item there is for Southern Arizona driving... The Rear Window Defroster!

DSC_0010.jpg
 
Last edited:
Lol, can't say I ever needed one in Yuma but it sure looks pretty. I hear ya on the wind, never ending. How was the car show on Saturday? I had other stuff I needed to get done around the house.
 
Lol, can't say I ever needed one in Yuma but it sure looks pretty. I hear ya on the wind, never ending. How was the car show on Saturday? I had other stuff I needed to get done around the house.
For a Mopar guy not great. Bill here had a few friends there with and A body and a faux Modtop Roadrunner. No Coronets, no GTXs a few Chargers, Roadrunners, Challengers and a row of new Mopar iron.
 
Lol, can't say I ever needed one in Yuma but it sure looks pretty. I hear ya on the wind, never ending. How was the car show on Saturday? I had other stuff I needed to get done around the house.
Still get a fresh gallon of SPI grey epoxy :)
 
Auto Transport Service
Back
Top