• When you click on links to various merchants on this site and make a purchase, this can result in this site earning a commission. Affiliate programs and affiliations include, but are not limited to, the eBay Partner Network.

1968 Plymouth GTX

Thanks. I had the QQ1 and U codes from the Fender Tag but couldn't find the blue for the dash.
Do you know if anything else in the interior was painted with the low gloss blue used on the dash?

This code was on a 68 GTX Dash
IMG_3958.JPG
 
The dash and steering column are painted with a suede finish. It took a while trying to find the color codes for the suede finishes in the PPG paint sheets. I did not retain that info. Original paint was a lacquer paint that nobody seems to sell. Try Kolor Korrect to get correct suede finish and color.
https://kolorkorrect.com/

Spoke with them. Very helpful and sending me a sample.
They said, Bahama Blue Suede was the color used on the dash frame and steering column. It is a low gloss textured paint.
Here's a picture of the dash as purchased and you can see the color on the left side where the trim pieces are missing.
Dash view.jpg
 
Kudos to you for having the ability to work on such a project!
A close friend of mine bought a 68 X and had me pick it up for him.All the resto was done and the gent passed away before completion.Look forward to him coming out to our club meetings!

1.11.20 030.jpg 1.11.20 031.jpg 1.11.20 036.jpg 1.11.20 037.jpg 1.11.20 039.jpg 1.11.20 042.jpg 1.11.20 043.jpg 1.11.20 046.jpg 1.11.20 047.jpg 1.11.20 053.jpg
 
Watching intently to see how your going to install that trunk pan! Thats on deck for me.....
 
Watching intently to see how your going to install that trunk pan! Thats on deck for me.....
It will be a while before I get to it. Have a couple of customer vehicles to do first.
Here's some pictures of the Coronet R/T trunk floor replacement:
Car Before trunk floor left.JPG

Trunk floor left removed.JPG

A good spot weld drill bit is essential.
Trunk floor leftside old.JPG


This was a two piece floor pan kit, won't do that again if possible. I also replaced the quarter panels so access to the trunk floor extensions was a bit easier.
New Trunk Floor Left Side.JPG

Covered in epoxy primer:
Left side Primed.JPG
 
Another project arrived so mine gets put back even farther.
I have to learn to say no to these people or my car will never get done.

I did get the interior and exterior paint ordered: $926.63 and that is only the color, no primer, clear, reducer or activator included.
 
Wow, hard to believe how much time has gone by.
A friend of mine asked me to replace the rocker panels on his 1969 Chevy C10. He said he just wanted to clear over the existing patina. It turned into a lot more than that.
Front Left View.JPG


A-pillar left rust portion removed.JPG


Finished
Hood Alignment Issues.JPG


That's one down and one to go.
(He opted to put the mirrors on himself once he decided what style he wanted.)
 
This is the project that followed that Chevy. It's a 2000 Dodge Dakota. It arrived on a trailer, had rebuilt heads in the back seat, block in the bed and a bunch of parts thrown loose into a plastic tub.
2000 Dakota Sport 3.JPG


Sent the block out for machining and ordered all the necessary parts for rebuilding the engine.
It was like putting a jigsaw puzzle together.
IMGP0003.JPG


Clear coat was failing on all the horizontal surfaces so had to strip and repaint.
Owner want to do away with the decals and go with a black/red theme.
Here it is finished:
Leftside rear view.JPG

Front right view.JPG


Now, finally I can get back to working on my car. :thumbsup:
 
Still have this Dakota sitting in my garage so with limited space, I decided to start working on my passenger's door.
This door has been hit and has a pretty nasty dent in it.
Door Passenger Damage 1.JPG


After some bumping, prying and stud pulling, I got it to here:
After Some Bumping Stud Pulling.JPG


I used a flexible straight edge to check the profile of the door:
Checking the Profile.JPG


Since the bottom portion was so distorted, I decided to get the upper portion of the door straightened out first and then work the dented area to match the profile.
First I use an air file and 36 grit to start removing the old primer and paint.
Air File and 36 grit.JPG


As with the drivers door, I did earlier in this thread, there are a lot of highs and lows to deal with.
This door is much worse as you can see bare metal spots all over the door.
Revealing Highs and Lows 2.JPG


I use a short straight edge to help determine the high and low areas. You can see that the metal under the straight edge looks pretty good but just above it is a low spot and then more bare metal:
High or Low 2.JPG


I worked on it for a while and then decided to call it a day. Being new to the metal working stuff, I am extremely slow. Bumping checking, sanding, bumping again, etc.
The guys on the videos make it look easy. Good thing it's MY car and the guy doing the work isn't charging me anything. LOL
Some Progess.JPG
 
After some more tweaking:
Some Progress 1.JPG


Can only do a couple of hours at a time. Trying to get my one arm inside the door, while the other one is outside requires some serious contortion.
 
Hope it ends up good for you. I recall when I did my Runner about 30 years back. I put a load of work into the drivers door. It turned out real nice but down the road about a year or so didn’t a couple small bubbles start appearing along the bottom rear corner. Bummer. Now, when doors are in tough shape, rusting, the skin hits the floor and a new one goes on. Good luck with yours!

5ABAC042-5276-4496-A89C-89449E44DB9A.jpeg
 
The Dakota finally got picked up and the GTX is back in the garage.
Had to hose off a bunch of dust and dirt, blow it dry with an air hose but all in all, it's a good day.
Finally Back in the Garage.JPG


I may even celebrate and change the masking paper on the booth wall. :thumbsup:
 
I have the car supported on jack stands and the measurements from the concrete to points on the frame all are within 1/16".
Existing Floor Pan.JPG


Since the existing floor pan seems to be structurally sound, my plan is to replace the drip rails and roof skin first. Thinking this will provide even more structural strength before I replace the floor pan and trunk floor.

The roof skin seems to fit pretty nice. I have it just sitting on the car now without any adjustments.
Roof Skin Fit Rear Window.JPG

Roof Skin Fit Quarter Panel.JPG

Roof Skin Fit A pillar.JPG


Any thoughts on my plan?
 
Does anyone know where I can get a brand new tail panel and matching tail light trim?
Mine are pretty pitted and the tail panel has a small hole in it.
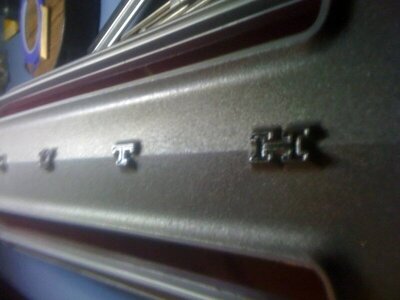
 
Does anyone know where I can get a brand new tail panel and matching tail light trim?
Mine are pretty pitted and the tail panel has a small hole in it.
The 1968 Sport Satellite/GTX finish tail panel is a tough deal - they're pretty much all pock-marked up and rough if original and take a lot of hours to restore as a result - and of course, it's a one-year deal to boot.
(That tail panel is also why you don't see much of any model kits or diecasts of '68 GTX's, too).

Like many of us were, you're left with either a)restoring what you have (or finding a nicer donor to do so on), or b) fessing up the huge money the reproduction fetches (that is, if it exists even - Classic Industries has shown it to be "coming soon" for years now - at $840!).

I was blessed to have a good friend in Texas who insisted on re-doing mine - and turns out, it was his last project before he passed of cancer.
Fred my GTX wears that panel proudly; Bob rides with me wherever we go cruising as a result:
finished 2.jpg
 
Auto Transport Service
Back
Top