• When you click on links to various merchants on this site and make a purchase, this can result in this site earning a commission. Affiliate programs and affiliations include, but are not limited to, the eBay Partner Network.

1969 Road Runner....another one!

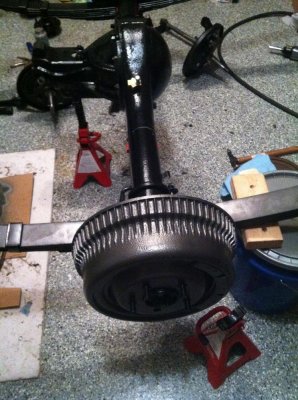
Axles came in....I was able to get them mounted. Differential fluid added back in and no leaks in the new seals and gaskets. Vent tube put back on. Drums added.

It's funny how you forget the little things....like lug nuts. haha
 

Attachments

  • IMG_2468.jpg
    IMG_2468.jpg
    130.2 KB · Views: 595
  • IMG_2471.jpg
    IMG_2471.jpg
    134.9 KB · Views: 588
That looks great capt! You'll be having some real fun time soon! :)
 
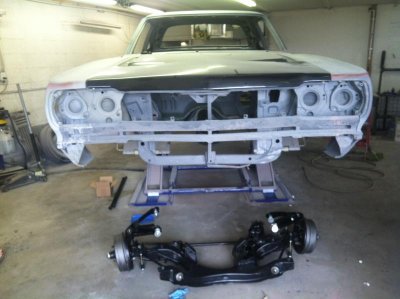
Front suspension is done.....I may or may not have the upper control arms on backwards....couldn't find any reference pics. 50/50 chance at this point. Body shop said they'll switch them around if they don't fit.

Yeah, went all black. I know it isn't correct. Not planning on selling it, but If I do....the new owner can change it to whatever he/she wants. Wouldn't be too hard.

After trashing the garage for the last 3 weeks, it's clean again. Wife is happy! And that's what counts at this point. She can pull her truck in the garage for the next couple months until the car comes back home from paint.

I guess the next thing on my to do list is door hinges, (hood, trunk and door) latches.
 

Attachments

  • IMG_2486.jpg
    IMG_2486.jpg
    75.1 KB · Views: 569
  • IMG_2492.jpg
    IMG_2492.jpg
    53.7 KB · Views: 572
  • IMG_2496.jpg
    IMG_2496.jpg
    61.8 KB · Views: 568
Nothing wrong with the black capt! Man would that shine sitting on that floor!! Looking good man......
 
The only problem I had with the K-member assembly is the front of the strut rods. Service manual says they nuts need torqued to 40lbs. But When I cranked it down that hard, they flattened the front bushing...and there was about 1/2 inch of thread showing between the nut and the hole for the cotter pin. I ended up backing it off a bit. Not sure what to do about that? Other than that....turning was real tight. I couldn't move the wheel assembly. Hoping when I get column on it'll be a bit easier. It should loosen up a bit after driving a few miles.
 
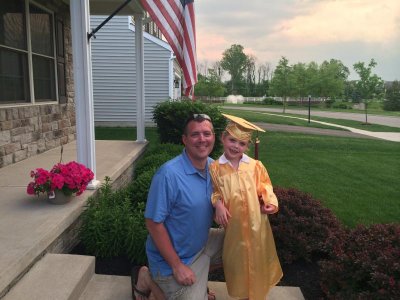
Just a bragging daddy moment....Baby girl is off to 1st grade. Sorry if this doesn't belong here. But they're growing up fast and I had to tell someone. :icon_winkle:
 

Attachments

  • IMG_0024.jpg
    IMG_0024.jpg
    61.3 KB · Views: 500
  • IMG_0038.jpg
    IMG_0038.jpg
    61.9 KB · Views: 493
  • IMG_0044.jpg
    IMG_0044.jpg
    73.8 KB · Views: 495
unbelievably fast. Our oldest finisehed 6 years at Ohio State,is getting married this summer. The youngest,born 4 months premature,is starting her second year of collage this fall.
 
My youngest just graduated from high school. was talking with a friend of mine and couldn't believe it had been 8 yrs when I had her riding in the truck with me.
 
Nice work on the RR, looking great and congrats on the little one (enjoy them while their young).
 
Last edited:
Sometimes it really does seem time just jumps start and were there, Starting her second year is something.. I have a grand-daughter that was born a little premature and was in ICU for sometime with breathing problems and now riding her bike to our house and life is good, seems like she was just born and now? lol time does fly or im not paying attention as good :)
 
Hinges

Are these hinges junk? Both of them are cracked in the same spot at the spring.

Also, I purchased the dorman hinge rebuilt kit. Except the bushings don't fit. Does this kit require the pin holes to be drilled out to a bigger size? There were no instructions for it.

Thanks

- - - Updated - - -

What brand lift is that.

I honestly have no idea...I can try to get an answer for you from my body guy. It's a scissor lift of some kind.

- - - Updated - - -

Nice progress!

Thanks Brother! Love watching your Bee come together.
 

Attachments

  • IMG_0995.jpg
    IMG_0995.jpg
    45.3 KB · Views: 350
hinges could be welded, pretty sure you need to drill out for the bushings, might be farther ahead to find another set of hinges. I always went after four door hinges, A Bodies are the same. Usually find them in good shape since the four door doors are a lot lighter than the two doors.
 
Are these hinges junk? Both of them are cracked in the same spot at the spring.

Also, I purchased the dorman hinge rebuilt kit. Except the bushings don't fit. Does this kit require the pin holes to be drilled out to a bigger size? There were no instructions for it.

Thanks

- - - Updated - - -


I honestly have no idea...I can try to get an answer for you from my body guy. It's a scissor lift of some kind.

- - - Updated - - -


Thanks Brother! Love watching your Bee come together.

Whether or not they're junk depends on you. My driver side hinge was allot like that and all I did was bevel the repair area and weld them back in solid then while holding the 2 halves straight re-drilled the holes. It's super easy just take your time to make a fixture that will hold the 2 halves true and make sure you grind the areas so that you get full penetration.
 
Things aren't like they used to be anymore, seems they would have instructions with them but now a days i guess there isint to much care in the way they do things, its a shame but i don't think it will get better, I have a set for my 73 but its just the repair set and i didn't get any help with these either..
If worse comes to worse moparmark might have a set of original from a parted car you could get, Good luck...
 
I had to drill mine out and then used a dremel to sand the hole smooth for a press fit.
 
Heck yeah...fix'em. Bevel in the crack, weld and grind flush..walla! Done the same a couple times. Like the other fella's mentioned, typically the kits have oversized pins, thus requiring the hinge to be drilled out.
 
With most of the tough body work done...it's finally on the rotisserie. Bottom of the car will be going body color with no undercoating going back on. Shouldn't be long now until she's back on her feet.
 

Attachments

  • photo 1.jpg
    photo 1.jpg
    13.4 KB · Views: 307
  • photo 2.jpg
    photo 2.jpg
    12 KB · Views: 310
  • photo 3.jpg
    photo 3.jpg
    10.1 KB · Views: 304
Auto Transport Service
Back
Top