• When you click on links to various merchants on this site and make a purchase, this can result in this site earning a commission. Affiliate programs and affiliations include, but are not limited to, the eBay Partner Network.

$500- 68 charger

Ok guys, I need some opinions and/or tips.
From what I have learned and seen others do here I have kinda tried to plan my next few tasks in the order that they need to be done in. Correct me if I'm wrong or if you know of a better way I should go.
I am doing my media blasting very soon, after that I figured I should>
#1- Etch everything.
#2- Epoxy primer everything and seam seal.
#3- Switch from rotisserie to wheel stands.
#4- Temporarily install doors, front fenders, trunk lid.
#5- Filler and sand.
#7- Switch back to rotisserie.
#8- Final paint on bottom, interior, trunk, engine bay, door jams, etc.
#9- Install rear end, front end and set it down on to tires.
#10- Final install front fenders, doors, trunk lid, ect.
#11- Final paint.
#12- Install motor, trans, interior, glass, etc.
 
Sounds simple lol. When I did my Charger, we used only epoxy primer. The brand I used stated that this and etch cannot contact each other. They said the etch has a acid in it that will react with epoxy. So we had to pick one or the other. Some brands must be different because Donny has stated several times that he blasts, sprays with etch, and then puts epoxy over that with no problems.
 
Sounds so simple and quick when you write it down. Lol. I used etching primer on a few things but for the body I just used a good epoxy primer. The stuff I used didn't even burn when I heated it up to remove the lead on the quarters.
 
Sounds so simple and quick when you write it down. Lol. I used etching primer on a few things but for the body I just used a good epoxy primer. The stuff I used didn't even burn when I heated it up to remove the lead on the quarters.


Same here.....I ditched using etch years ago. Especially with the good epoxy primers from PPG & SPI.
 
X4, the etch primer is more for when the surface is bare and smooth. Media blasting or just a good sanding is a great surface for epoxy primer and it protects the metal much better and really fills allot of the scratches. I painted mine the way you are describing but would paint it all apart if I had it to do over again, allot of extra work and masking resulting in tape edges to buff out. My booth wasn't big enough though so what are you gonna do. Good luck, can't wait to see paint.
 
I agree with 747! You wont go wrong and if you use a PPG, ill bet you wont be UN-satisfied!! Even if something delays the paint, the epoxy will keep it ready for you...
 
The stuff I used didn't even burn when I heated it up to remove the lead on the quarters.
Why did you remove the lead?

BIG THANKS GUYS! I feel smarter now. :thumbsup: Ok so no etching,..
Should I put the seam sealer and filler on before or after the epoxy primer?
Sorry I'm being so lazy and forgetful. I saw how Hunt and most of you guys have done yours, and forgot the details, and Just to lazy to go back and find all that info again.

We took all the lead out of my Charger too. The kid thought duraglass was better in those areas. Epoxy prime the whole car, do your bodywork, and then seam seal a few days before you paint.
 
Seems like my painter told me that once you epoxy prime, you have so much time to get the car into final paint. (like a day or two)
And if you go past that "time" then everything needs to get scuffed for the paint to bite into.
 
Seems like my painter told me that once you epoxy prime, you have so much time to get the car into final paint. (like a day or two)
And if you go past that "time" then everything needs to get scuffed for the paint to bite into.

You should rough up any primer that sits for an extended period of time before paint. Problem with epoxy is that after it has sat for a few days, and you have to rough it up, it doesn't sand/scuff well. It likes to clog up sandpaper...basically just glazes it over
 
I called it a shiny look and to me it was a pain to scuff, but it kind of helped me know any place that wasn't gone over right, i was using 400 grit at the time... Took awhileee to do mine where i was satisfied.
 
I'm going to do my blasting Easter weekend, since I'll have 4 days off to do it. I've been getting a lot of the parts ready for that also.
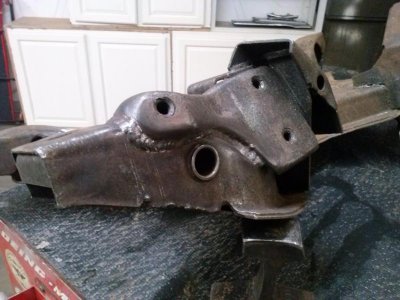
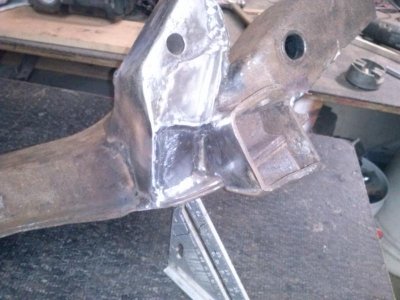
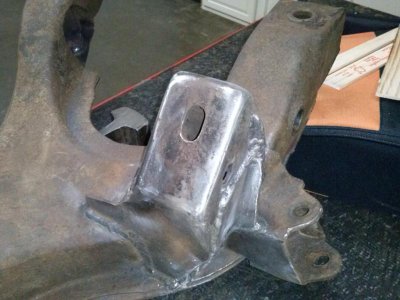
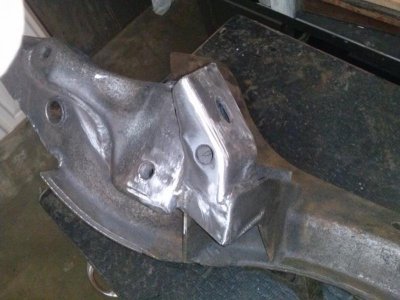
I'm beefing up the K frame similar to what I've seen a couple of you guys do. There was a 1/4" gap on the steering box mount, where that hefty weld is now. I think I'll also add some extra pieces of metal onto it in various other key spots and make a skid plate,. I'll try to copy the one Hunt finally decided was the best. hehe!
 

Attachments

  • CAM00020.jpg
    CAM00020.jpg
    62.2 KB · Views: 328
Last edited:
this is what i am using,it is awesome,my bro inlaw works for sikens & paint many high dollar cars,this is what he uses,from start to ready for top coat,just this one product.

read about it on their page
http://www.clausenautobody.com/proddetail.php?prod=rust-defender

- - - Updated - - -

the rust defender can be used same as the ALL U NEED PRIMER

RUST DEFENDER Hi-Build Polyester Primer is a one step “system” that primes, fills and seals bare metal, body filler, wood, aluminum, or fiberglass surfaces to accept any type of paint without concern about penetration of solvents or moisture. It has excellent resistance to heat, solvent attack, water, and salt. Non-shrinking and easy sanding, either wet or dry, it provides an excellent barrier between cured body filler and topcoats. Clear Coat/Color Coat paint systems are protected from the body filler when using this product. Highly prized among fine car restorationists.

ALL-U-NEED Ultimate Hi-Build, One Step, Polyester Primer-Surfacer-Sealer “Finishing System” is available in Light Gray, Dark Gray, Tan, White and Red. It replaces metal prep, etching primer, primer-surfacer and sealer. Containing 86% solids, it sands easily with no shrinkage. No recoat time, no sanding prior to recoating and no sanding after long periods of air dry, it sands the same after two years. Waterproof and solvent proof, self-etching to all ferrous and non-ferrous metals, fiberglass and wood, it is compatible with all paints and primers as well as repairs hail damage. As with our other innovative product ideas, a guide coat was developed within this product. The guide coat allows users to easily detect low or high areas in their panels.

- - - Updated - - -

NO NEED FOR EPOXY or sealer.
0
ALL-U-NEED

Handling Instructions
(Please read and follow
all directions carefully
)
For Professional Use Only
This product is a one step finishing material from bare me
tal, body filler, wood, aluminum, or fiberglass to a
surface ready to accept any type
of paint without concern about penet
ration of solvents or moisture.
Over twenty years in development and testing by THE
CLAUSEN COMPANY, this
product is, by design, a
different product from those currently market
ed. The primary functions of this product
are:
1) 86% Solids
5) Wet sandable and waterproof
2) Non-s
h
rink
ing 6) Self-etc
hing
3) Easy sanding
7) 2.01 V.O.C.
4) Excellent hold-put properties
8) Isocyanate – Free
Unlike lacquer or epoxy type primers, sealers, and surfac
ers, this product cured has
very good resistance to heat,
solvent attack, water, and salt. It has better adhes
ion and more strength because of it’s self-etching
characteristics. The zinc phosphate
additive and solvents in this product
react during curing and become part of
the total solid binder. This replaces the “corrosi
on protection system” and impr
oves strength and sealing
properties. This product provides an ex
cellent barrier between cured body fille
r and top coats. Clear Coat/color
Coat paint systems are protect
ed from the body filler when using
this product. Th
is product is
guaranteed
to
prevent this problem when applied properly.
PREPARATION
BEFORE YOU SPRAY
Surface must be clean and dry. Clean surface with deter
gents and clean water. Wipe surface with clean lint free
wipes and blow off with compressed air. When doing all over
applications or spot repai
ring old finishes, sand with
80-100 grit paper, then sand 2-4 inches into blend area wi
th 240-320 grit paper. This
product does not require
pre-preparation products such as
metal cleaner or conditioner.
Do not use it.
If you use metal preparation
products, you must completely remo
ve that product before applying this
product. The presence of metal
preparation products at any level could
inhibit this product bonding to the surf
ace. Apply over clean, dry, bare
metal, body filler, plastic, wood, aluminum or fiberglass.
Do not w
i
pe metal or surface w
i
th solv
ents.
TO PREPARE THIS PRODUCT FOR SPRAYING
Mix or shake contents of can thoroughly ju
st before use. (Some settling of the
filler material occurs as a natural
part of this type of materials. By placing material
on a paint shaker for 2-5 mi
nutes per quart and 5-10 minutes
per gallon, the filler portion will adequately re-disperse.)
Pour the desired amount of any
of these products into
the spray cup of a primer-type spray gun. Best applied
with a HVLP 1.7 or 2.0 head spray gun with 3/8 couplers
and hoses. The gun should deliver a full we
t coat, using 35-40 PSI of air, at 6-
8 inches from the work surface.
During the hot summer months, when temperature exceeds
80° a polyester primer reducer should be applied to
this product, up to 5% reduction
to slow the drying process.
MIXING OF HARDENER
Only
CLAUSEN’S
primer hardener must be used with
this product. Mix this produc
t in a cup with a proportionate
amount of primer hardener supplied. Do not mix more than
you are going to spray. Stir until mixed completely. It
is important to use the proper amount of hardener. Do not
attempt to over-catalyze
or under-catalyze to offset
temperature variances. The Isosyanat
e-free liquid hardener supplied with this
product is a special formulation
different from other liquid hardeners.
TEMPERATURE OF APPLICATION
To compensate for temperatures low
e
r than 70 degrees heat lamps or heated paint booths are
recommended.
DO NOT BAKE AT TEMPERATURES OVER 90 DEGREES,
w
h
ich w
ill cause the product to
skin ov
er and curing, w
ill stop. If temperature exceeds 90 degrees a retardant of 3%
buty
l
acetate or a
105 degree urethane or poly
ester reducer can be added.
All of the components, the air, the primer, and the priming surfaces must be abov
e 70 degrees.
ALL-U-NEED Poly
ester Primer
w
ill not cure at temperatures less than 70 degrees.

- - - Updated - - -

orielly auto parts sells it for 150. a gall.but i would buy it by the quart.
 
Thanks for that info Charlie, I may have to get some of that stuff., sounds pretty impressive. How much of that would we need for a whole charger? Less than 1 gal?
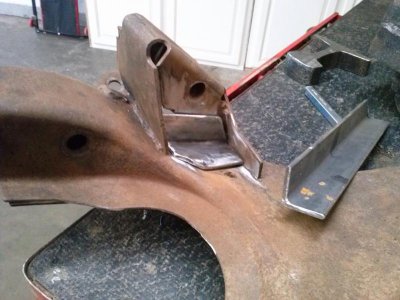
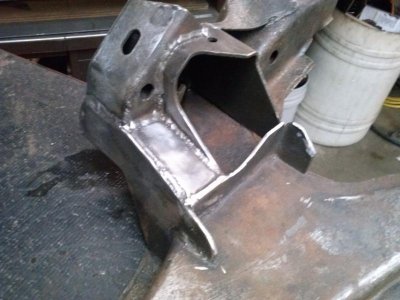
Here are a couple more pics of some of the K frame beef-up. I made this piece for the right side motor mount from some angle iron I had left over from previous use on the project.
 

Attachments

  • CAM00022.jpg
    CAM00022.jpg
    63.6 KB · Views: 325
  • CAM00023.jpg
    CAM00023.jpg
    53.5 KB · Views: 315
1 to 2 gallons,it depends on how many times you block out the car,with this product you would blast the car.spray on the rust defender,do body work one panel at a time & spray more rust defender over all your body work,put all the panels on the car & line them up,,,do a lite block sanding,then spray complete car with rust defend,,block car again, repeat till panels are straight,wet sand & paint.it
call & talk to them. just sayin
 
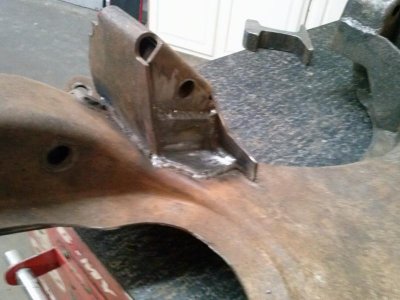
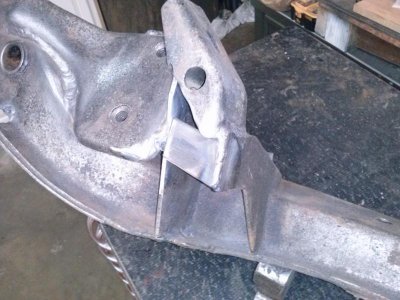
This piece finished beefing/boxing the right mount, I also filled in the open corners with weld,. now to the left.
 

Attachments

  • CAM00029.jpg
    CAM00029.jpg
    69.6 KB · Views: 301
  • CAM00030.jpg
    CAM00030.jpg
    60.2 KB · Views: 302
  • CAM00031.jpg
    CAM00031.jpg
    63.3 KB · Views: 290
Last edited:
i did same thing,also welded the outside seam.all the way around.
 
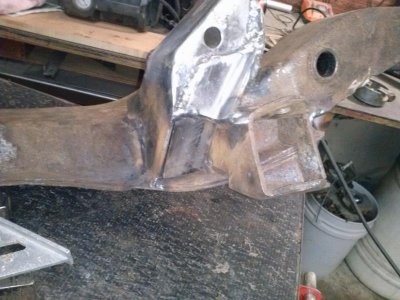
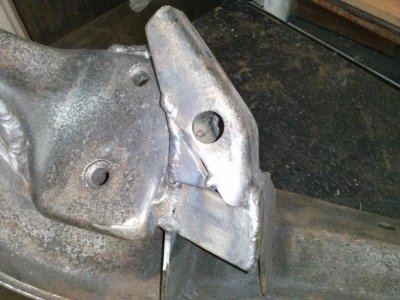
A couple more on the left side mount.
 

Attachments

  • CAM00033.jpg
    CAM00033.jpg
    71.3 KB · Views: 282
  • CAM00034.jpg
    CAM00034.jpg
    68.8 KB · Views: 276
  • CAM00036.jpg
    CAM00036.jpg
    59.1 KB · Views: 288
  • CAM00038.jpg
    CAM00038.jpg
    58 KB · Views: 278
Cool to hear you're blasting this weekend Daytona, exciting stuff! That k-frame looks great too

And for what it's worth I'm planning on using All-u-need on my car after I rough in the body work. The friend of mine that builds cars professionally told me it worked great for him, and being sealed I can have some fun driving the car before final paint. Looking forward to seeing your progress pics after the weekend!
 
Auto Transport Service
Back
Top