• When you click on links to various merchants on this site and make a purchase, this can result in this site earning a commission. Affiliate programs and affiliations include, but are not limited to, the eBay Partner Network.

'64 Fury Pro-Touring

666 , the 60 as i call it phank n dodge . should be a killer driver . i've got a thing for p/u's . would be kooler to do a pro touring p/u . but yours would be hard to beat for koolness ! ya on the wheel barrow firewall , thinking a hand made setback , i could pattern it after my set back , its not finish anyway , hoping for more on your ride . love the design , nascarish street ride .
 
Thank you, but I believe it's a total lack of common sense that keeps me going.
Your getting close, really coming together now. Besides, it's all about the journey not just the destination.
 
Thank you, but I believe it's a total lack of common sense that keeps me going.

I've got to remember that line Bob . . . that just about hits the nail square on the head ! ! ! Thanks . . . Great progress . . . keep us posted.
 
Got the modified fender mounted and was stunned at how good it came out, the fender lined up almost perfectly. The pic below shows the fender after knocking down the kitty hair without any other mods.

IMG_1456.JPG

One thing about kitty hair, it can have lots of pin-holes, which you can see in the pic above. Also, the body line at the top of the fender is where I sliced thenfender and the line is pretty much gone. Between the pin holes and the missing body line I used more kitty hair to build up the area.
I also wanted to build up the area at the top edge of the fender, where it wraps around the cowl, so I used kitty hair there too. I beveled the edge to give the kitty hair more surface to bond to, similar to bevelingnedges before you weld.

IMG_1457.JPG

IMG_1458.JPG

After roughly sanding down the kitty I began to re-establish the missing body line, which you can see developing in the picture below.

IMG_1459.JPG

In the shot below you can see the re-shaped upper edge at the cowl with nice even gaps.

IMG_1460.JPG

A couple of posts ago I showed the brackets I mounted inside the fenders, using them to help shape the fenders if I need to; getting the fenders to clear the leading edge of the door when the doormis opened has been a pain, but the brackets and adjusters work great. Here's a picture of the passenger side installed. Sorry the pic is dark.

IMG_1461.JPG

This last pic shows the fender installed and after blocking, which I spent a couple hours doing. I'll get some shots of the filler work.

IMG_1462.JPG

I am really going to be pushing to get the body work finished and get paint on this thing, that way I can build out the suspension and make a roller out of it.
 
Got some work done on the Fury when I could (busy at work). After getting the fenders mounted I found the front and rear fender seals, and what a mess. Had the entire underbody had this much undercoating the Fury would never had rusted!

IMG_1463.JPG

IMG_1464.JPG

IMG_1468.JPG


IMG_1467.JPG

I test fit the panels and with a bit of trimming they should fit real well, so I moved on to test fitting the hood for the first time since solidly mounting the fenders:

IMG_1465.JPG

IMG_1466.JPG
 
After trial fitting the hood it was time to fit the rad support and hood latch, which all went real well.

IMG_1469.JPG


IMG_1470.JPG

After fitting the rad support and latch bar I moved on to dissecting the steel hood; I wanted to use the latch and bracing, so after drilling out a few (and I mean only a few) spot welds I had it out for test-fitting onto the glass hood. My thought is using just hood pins and no bracing would allow high pressure air to gather under the center of the hood and bow upwards, something I've seen before and don't like.

IMG_1472.JPG


IMG_1473.JPG


IMG_1474.JPG


IMG_1475.JPG


IMG_1476.JPG

With only a little trimming and tweaking the brace fit great, so I prepped the hood and brace, drilled them for Cleco's, and mounted the brace using a combination of panel adhesive and Kitty Hair to both bond them as well as gap filling.
 
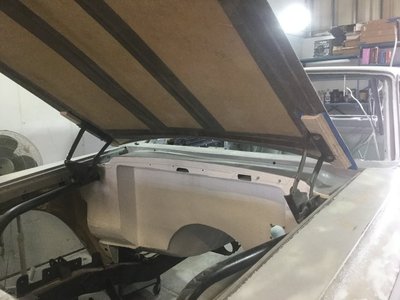
Here's a final shot of the under-hood bracing I cut from the original steel hood and bonded onto the underside of the fiberglass hood. I cut out 2 long oval holes (1 each side of the hood latch) just to remove a bit more weight. All in all the bracing adds a few pounds to the hood but the added weight is far offset by the additional strength/rigidity the bracing adds as well as the ability to use the hood latch:

IMG_1477.JPG

I ordered up an inexpensive pair of Summit Racing 4" Hood Pins, figuring I'd use them as mock-up pieces then go to a better quality piece when I finished, but when they arrived I was stunned at the high quality of the materials, the machining, and the clips, especially at the price; these things only cost about $10/set. I was shocked. They don't come with lanyards, so I'll have to add some later, but all in all, I'd buy these again without hesitation:

IMG_1478.JPG

IMG_1479.JPG

I already knew the hood fit pretty well and I wanted to use the hood pins to hold the hood exactly in place so I could work on the hinges, so I dropped the pins down really low, dabbed a bit of grease on the tips, set the hood in the correct position, then raised the pins so the grease would mark the underside of the hood. I pulled the hood, drilled the correct locations, cleaned the pins and raised them, then set the hood back in place. A perfect fit!

IMG_1480.JPG

The hood, like the rest of the Sled City fiberglass, is actually "race weight" fiberglass, so it weighs next to nothing, so my thought was to use a set of super lightweight Honda Civic hood hinges, figuring all I wanted/needed was a solidly mounted pivot point that had very little weight or stress to carry, and at only $12 each they were inexpensive enough to scrap if I couldn't get them to work. How prophetic!

IMG_1481.JPG
 
The factory Plymouth hinges move the hood forward and upwards simultaneously, pulling the rear edge of the hood away from the cowl, so my only concern about the Honda hinges was the fact they did not pull the hood forward at all, only upwards, but like I said, at $12 each they are inexpensive enough to try, so here's what I did:

Years ago I cut two braces off the original cowl, and kept them in my parts stash all this time "just in case", and I'll be damned if they didn't come in handy for mounting the Honda hinges; here you can see the hinges tacked onto the braces. The reason I wanted to use these old braces as part of the hinge mount was they lined up perfectly with the braces on the replacement cowl and they would allow the hinge pivot point to be mounted almost all the way back against the cowl, allowing the hood to pivot from much farther back than the factory Plymouth hinges:

IMG_1482.JPG

IMG_1483.JPG

IMG_1484.JPG

IMG_1485.JPG

IMG_1486.JPG

Very pleased with the results; the pivot points are almost against the cowl (just like I wanted), the hood mounting flanges are well below the fender line, and bolting the hinges on is a breeze since the mounting brackets are identical to the flanges on the cowl.
 
Next came the pillow blocks for the underside of the hood. I decided to use high quality/high density plywood for it's strength as well as its ability to take resin and be bonded to fiberglass.
I laid the hood in place, crawled underneath, marked where the hinges lined up on the hood, pulled the hood, then cut up the pillow blocks to match the shape of the trimmed area. I also countersunk some T-Nuts into the pillow blocks before bonding the blocks onto the underside of the hood.

IMG_1487.JPG

IMG_1488.JPG

IMG_1489.JPG

I am stoked with the results; the pillow blocks fit great, they are below the tops of the fenders, the hood will need a shim or two between the blocks and the hinges (which is what I wanted for alignment purposes), so I put the hood on, drill through the hood and into the blocks so I can Cleco the hood in place and test the hinges, and don't you know it, my one concern about the hinges comes back to bit me in the ***; the trailing edge of the hood will not clear the cowl! Aarrgghhhh, hours worth of fabbing for nothing.
The interference isn't even close so there's no point in messing around with these hinges anymore; I'm on to what I considered to be a last resort; modify and use the factory Plymouth hinges. Why a last resort? The front tubes of the roll cage run directly in the path of where the original Plymouth hinges mount, so getting the hinges to mount was never going to be an easy or quick fix, besides the point the originals are WAY over-built for use with the glass hood.
None of that matters, I don't want a lift-off hood, I want a hinged hood, so I got to modifying the stock hinges, removing the springs, their mounts, and LOTS of excess material that was either interfering with the fit or just overkill in terms of weight and rigidity.

IMG_1491.JPG


IMG_1492.JPG


IMG_1490.JPG

The rear mounting points were easy, there was an indentation in the fiberglass fender where the hole should be drilled, but it was getting the hinge to fit over the roll-bar that was a bitch. I started on the passenger side first (no particular reason) and had to remove LOTS of material from the bottom of the hinge in order for it to clear, but you can see it's in! Once I got the hinge to clear I fabbed up a bracket to mount the front, with about 1/8" clearance between the hinge and the bar, then tacked it in place. Once I got the passenger side done I used it as a template for the driver's side, which went much quicker.
Both hinges/hood mounting flanges fit below the fender/cowl height so I'm good to go with hinges that will pull the hood forward and up simultaneously. Just wish I'd have listened to my gut in the beginning and just moved forward with the factory hinges!

Once both hinges were mounted I test fit the hood, which will now need a bit more trimming, then fab up some new pillow blocks.
IMG_1493.JPG
 
I got to work on the Fury for one day and spent that day prepping and installing the new mounting pads for the hood. Nothing exciting but the hood mounts to the "stock" hinges and opens/closes with no issues or problems.

Here are the 3/4" ply blocks mocked into place. One thing left to do is embed some reinforcement rods (fiberglass arrow shafrs) running forward from the mounting blocks. These rods will add back the rigidity I lost when I cut the raised reinforcement "tunnels" (the 2" wide brown areas running the length of the hood) molded in by the Sled City guys.
IMG_1496.JPG

IMG_1495.JPG


I used a combination of JB Weld Epoxy (intended for fiberglass and wood use) and Kitty Hair to bond the blocks to the underside of the hood:
IMG_1498.JPG


IMG_1499.JPG

Here's the hood mounted on the new pads and modified hinges.
IMG_1494.JPG

IMG_1497.JPG
 
The work going into this car is inspiring. I thank you for sharing and think this car will be a beast when completed.
 
The work going into this car is inspiring. I thank you for sharing and think this car will be a beast when completed.
Thanks Wookie, I really appreciate the kind words.
Had life in general been a bit less bumpy the last couple years I'm sure I'd be done by now, but WTF, every day I wake up gives me another opportunity to play with my Fury :)
 
So after all the work with hinges I've thrown in the towel and decided to go with 4 pins and no hinges; I just don't like how they were working. Oh well, it's all a process and this was just part of it.

I put the engine/trans back in so I could mark the cut-outs in the hood. You can see, by how high the carbs sit compared to the cowl height, how low the body sits over the chassis. I always knew this was going to be the case but figured the '65 Hemi scoop would be tall enough to cover, but it's not looking like it. I believe VFN makes a tall version of the Max Wedge scoop, and maybe the '65 scoop, so I'll be looking into that.

IMG_1507.JPG


IMG_1508.JPG


IMG_1510.JPG

IMG_1511.JPG
 
I've had a life-long love affair with '64 Fury's and Belvedere's, especially those from NASCAR back in the day, so now I'm building myself a Pro-Touring style Fury with a 500" RB and lots of other goodies.

I am a newbie to For B-Bodies Only so in the future I'll make sure to post updates here, but to see what I've been up to and where my project is at this point I hope you'll follow this link to Pro-Touring.com:
http://www.pro-touring.com/forum/showthread.php?52504-64-Plymouth-Fury&

If my putting the link to another site is problematic or an issue please let me know; I just don't have the time to reconstruct the many posts I've already made.

I hope you enjoy my take on the perfect MOPAR,

Bob
:thumbsup::popcorn::popcorn:
 
Auto Transport Service
Back
Top