• When you click on links to various merchants on this site and make a purchase, this can result in this site earning a commission. Affiliate programs and affiliations include, but are not limited to, the eBay Partner Network.

'69 charger r/t-se: Building my dream car

Left Hand Drill Bit

Years ago I worked in an automotive machine shop and frequently ran into problems like you're having with the broken off exhaust stud. The way I handled most of these was to use a left hand / reverse drill bit. Go with a 5/16 inch left hand bit since the stud is 3/8".

Start by determining the center of the stud if you can still see it. Use a good center punch and make a good purchase point for the drill bit.

Then it's just a matter of using a reversible drill and go slow, making sure you try to maintain proper alignment.

If the broken off easy outs hamper the progress, you may be able to strike the broken off part with a good punch, causing it to shatter because its a hardened steel.

Most of the time when you get close to the end of drilling, the rust will break free and the offending stud will screw out as you operate the drill.


I love your thread. Chargers have always been one of my favorites.

I hope this helps.....
 
Hey thanks airgrabber, I might try and shatter the easy out rather than drill it. But when I go to drill out the stud I'll try a left-handed bit. I think the hole I have in it now is pretty well centered so hopefully it won't be a major pain :icon_thumleft:
 
Just be careful when you strike the easy out with a punch. Hardened steel on tool steel has a tendency to sometimes "spall" and can send little pieces of shrapnel flying. I'd recommend a good set of goggles and leather gloves too.

Good luck with it. In a "worst case" scenario you can install a heli-coil to fix the threads.

Also keep lubricating the drill bit as you using it.

Let me know how it goes.
 
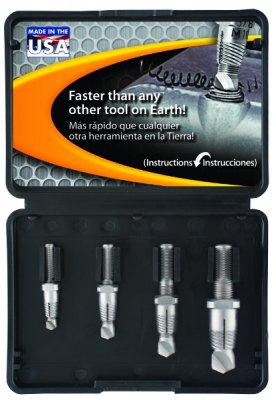
Or you could try these.

I used them a couple of times and they worked slick.
If you go to there web site I believe they have videos on how to use them. Or maybe youtube?

Just be sure the broken easyout is removed from the hole. These wont drill a hardened easyout !

4017P2.JPG

http://http://www.aldn.com/Pages/drillOut.php
 
Thanks Airgrabber, I will!

And thanks Don those actually do look pretty trick, and there's a Fastenal in another shop literally about 100 feet away from mine lol. Might walk over there and see if they got one
 
They do look pretty slick!! Same principle, left hand drill. Cool stuff, thanks!!!

- - - Updated - - -

I may have to get a set of those too. Please let me know if Fasten All carries them.....

- - - Updated - - -

And they are made in the good old USA
 
They do look pretty slick!! Same principle, left hand drill. Cool stuff, thanks!!!

- - - Updated - - -

I may have to get a set of those too. Please let me know if Fasten All carries them.....

- - - Updated - - -

And they are made in the good old USA

Yeah I will, and if you follow don's link (just take out the extra "htttp") they list Fastenal as a distributor but I'll check and see if they do for sure :icon_thumleft:

"made in the USA" is definitely a good sign, I have a feeling the easy-out I used was made out of 100% Chinesium lol
 
Man that sucks about those broken studs and the easy-out. I had 3 x broken studs earlier this year when I installed my headers. It took about 3 hours with lubricant and carefully applied heat from the oxy/acet torch, but we eased the broken studs out. Maybe try the heat treatment as you go on the easy-outs....might help. Also when you do get them out, make sure you use a quality lube for the new studs you install - I used a silver lube compound by Wurth (can get name tomorrow if you need it) - and it works a treat.
 
Thanks Kiwigtx, that would be great. I believe this stud actually would need some kind of high temp rtv or something since it goes through the water jacket. Anyone have any advice on this?

And Airgrabber, Fastenal does carry them if you don't use Don's link through Amazon (sure either way would be fine) but the local Fastenal here would have to order it in. Might be a similar story across the board with them

Either way, for right now I'm just going to focus on removing the easy-out tonight, then decide what to do about the stud. But most likely I'll try a left hand carbide drill and if it doesn't remove the stud completely, I can always re-chase the threads with a 3/8 coarse tap. I'll be glad to have this one out of the way though, that's for sure
 
I didn't know about the water jacked deal until I fired the motor for the first time "surprise, surprise". Red RTV took care of. As far as the stud goes, they are usually pretty stubborn in a hot location like that. I'd put some heat to the surrounding iron before trying to remove it, the expanding will usually break the corrosion loose. I like the simple square tapered easy outs for bolts, they don't wedge the bolt as tight and are usually softer (bends instead of breaking) then most making them easier to remove if broken "heat is the key". I love the reverse bits but they usually won't cut it where heat and corrosion are a factor. Good luck
 
Bet that was a fun surprise! And thanks for the tips 747, the 4 straight flute type of NeverEasy-Out is actually what I broke off in the stud though.. :icon_scratch:

Well guys I got some decent news and some bad news. Decent news is I got the broken off easy out "out" of the stud, but the bad news is it's now somewhere in the water jacket. In attempting to shatter it with a punch, it actually went through the stud completely and fell inside, not sure if that's going to cause any issues or if it's even going to be possible to fish out of there ??

But at this point now that I'm back to working with just the stud, I'm thinking I'll take a torch to it to hopefully break it somewhat free then try one of those extractors Don linked to. Fastenal said they can have it for me in just a couple days.

So it's either that or just continue drilling and re-tap the original 3/8 hole once the stud is completely drilled out, which now that I say it sounds a little simpler. What do you guys think between those two options?

- - - Updated - - -

And thanks again to all you guys, the encouragement and advice from everyone on here always helps keep me moving forward
:eek:ccasion14:
 
Alright, finally some good news. I went ahead and drilled the rest of the stud out to 5/16, retapped the hole, good as new. :icon_pray:

So with that out of the way I'm going to try to get the interior sheet metal of the car sealed and painted this week, and keep going on the bodywork while I wait for the mancini rear main kit to get here. Can't wait to see the engine in the car

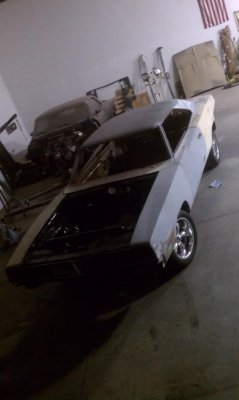
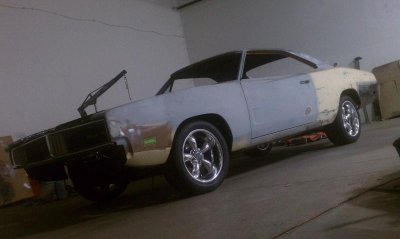
Also figured I haven't posted many good progress pictures of the whole car since I got all the suspension buttoned up and back rolling. Still a lot to do but she's come a long way from the basketcase I found down in Norwalk, California
:eek:ccasion14:
IMAG1858.jpg

LOWANGLE1.jpg
 
Congrats, betcha can't wait to get it all one color.
 
Great Progress

She's coming right along and looking GOOD!!!
I love the Torque Thrusters. I put a set on the last Challenger resto.
I'm glad to hear the head stud ordeal is done.
Soon she will be all one color and the problems that you encountered along the way will seem trivial.

Thanks for the update!!!
 
Thanks guys! It does feel great to have that behind me and close to dropping the engine in :beavisnbutthead:

And to say I can't wait to see it all one color would be putting it lightly lol it's gonna be awesome to see the body nice and straight after all this time and work
Bring on the black! :eek:ccasion14:
 
Looks great and thanks for the updates. I'm glad the bolt worked out .. was a little worried for you.
 
Those rims and tires gives your car a nice stance and will look good when it is black.
 
Looks great and thanks for the updates. I'm glad the bolt worked out .. was a little worried for you.

Thanks Brian, I was too lol being that it goes through the water jacket, I'm guessing those studs see some pretty bad corrosion over 45 years. Definitely nice to have that one taken care of!

Those rims and tires gives your car a nice stance and will look good when it is black.

Thanks rrman! I think it will sit really nice once I get the motor in and drop the front just a hair. And I actually have 1/2" hubcentric spacers for the rear wheels so once I install those and longer lugs they should fill the wheel well out a little better :icon_thumleft:
 
Auto Transport Service
Back
Top