• When you click on links to various merchants on this site and make a purchase, this can result in this site earning a commission. Affiliate programs and affiliations include, but are not limited to, the eBay Partner Network.

'69 charger r/t-se: Building my dream car

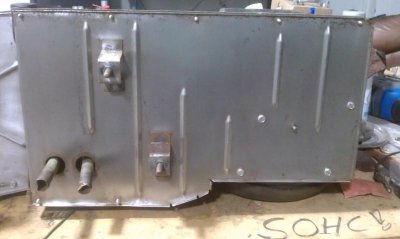
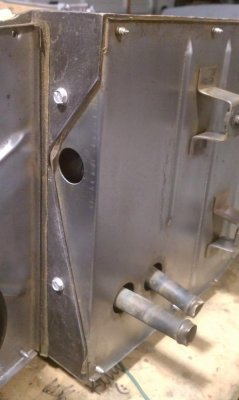
Other than that I've been keeping pretty busy. Took my heater box completely apart and cleaned it all out. Also noticed the outlets for the heater core were bent pretty bad so I straightened them and pulled it for pressure testing. Just had one leak at the outlet, got it re-soldered for only $10, good as new. Otherwise just sanded and painted the rusty pieces the vent cables attach to and back plate with martin semour underhood black. I might do a better step by step post on all that if it'd be useful to anyone

Hell's to the yeah on bolded!

Congrats on your good fortune with the engine too. Nice update
 
Other than that I've been keeping pretty busy. Took my heater box completely apart and cleaned it all out. Also noticed the outlets for the heater core were bent pretty bad so I straightened them and pulled it for pressure testing. Just had one leak at the outlet, got it re-soldered for only $10, good as new. Otherwise just sanded and painted the rusty pieces the vent cables attach to and back plate with martin semour underhood black. I might do a better step by step post on all that if it'd be useful to anyone

View attachment 132641

View attachment 132642

View attachment 132643

View attachment 132644

I vote for a step by step! please :hello2:
 
Out standing work your doing man! Surprises with the engine i would say a good thing when a lot of the time surprises go's the other way ive found out, I have a 383 here thats supposed to be a strong runner and yet wonder if that wasn't yet another line of BS that im getting used to over the years lol. Time says it all though, you sure have that Charger in great order, keep it up the neighbors will envy you soon if not already! She is looking sweet!! :)
 
Wow thanks for the kind words guys, always appreciate the extra encouragement. I did really feel like a 5 year old kid on Christmas morning when I pulled that oil pan off lol a big weight off my shoulders knowing what I'm dropping into the car.

And Ron I actually had a guy last weekend drive by my shop when it was all wrapped up getting painted, got all excited to see one here in our area and wanted to buy it. Turns out the guy owns a Ferrari, super rare new shelby mustang, and some pretty expensive cars. Really nice guy and we stood around bs'n for a while, but he didn't seem too surprised I wasn't interested in selling it lol

And I'll get that step-by-step on the heater up for you guys tonight
:eek:ccasion14:
 
I can see why he wasn't surprised when you weren't interested in selling it! Talking with you thru a keyboard i can here the enthusiasm, excitement and the Mopar madness we all seem to have, after all your title says it all "Building my dream car" No surprise to me.. :)

81x75rotM.gif
 
Heater Box Resto (Pt. 1)

Alright fellas, here's a better look at how I cleaned up my heater box. I got lucky with how nice it was to start with, but still some surface rust, some bashed-in heater core outlets, and 45 years worth of dirt

IMAG1992.jpg

IMAG2029.jpg

So first I just used a pair of long needle-nose pliers to get a good hold of the fittings and pull them back straight. I did this first (before pulling the core) to be sure they were centered nicely in the holes. Straightened out pretty easily

IMAG2178.jpg

IMAG2180.jpg

Next was removing the top plate and removing the heater core. Really simple stuff, just remove all the pictured hex-head scews on the plate as well as the ones all the way around the outside edge that come through from the other side. (these pics were before I straightened the fittings)
IMAG2169.jpg

And don't forget the 2 on the left side
IMAG2175.jpg

Also remove the 2 hex head scews (loosened in the picture) that are along the diagonal ridge on the top side...
IMAG2224.jpg

...and the two along the diagonal ridge on the bottom side (keep these 2 separate as they're a little longer than the rest which are all identical). These 4 screws secure the heater core to the housing.
IMAG2182.jpg
IMAG2184.jpg

And finally here's what ya got when it's cracked open
View attachment 132979
 
Heater Box Resto (Pt. 2)

At this point the core should just pull right out. Pretty easy to tell if they've been leaking as you'll see the green-ish copper corrosion on the fins like mine.
IMAG2195.jpg

IMO the core should be pressure tested any time the entire box is out of the car (not fun to do if you ever find it leaking when everything is already installed in the car), I took mine to a local radiator shop that tested it for me for free.

Turns out the corrosion on mine was caused by a leak at the base of one of the fittings, which then ran down onto the fins. Luckily an easy fix, the radiator shop just re-soldered the fitting, re-tested it under pressure for 1 hour, and with no leaks called it good as new for only $10. :icon_thumleft: If there had been leaks in the tubes, you can find replacement cores on eBay through a few different companies for $50-60.

But while the core was in the shop I took the time to clean out all the dirt and dust from the housing with some wet shop towels.

View attachment 132985

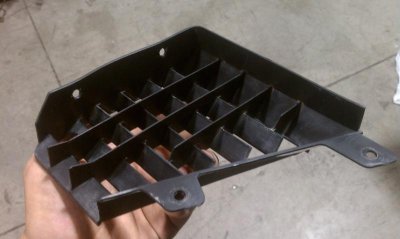
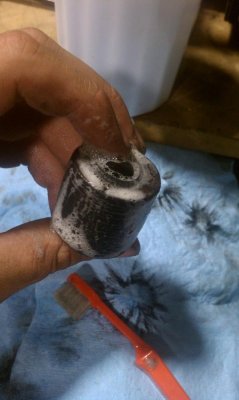
Then removed the plastic finned piece that had some decent buildup (just a couple screws holding it onto the housing) and scrubbed it with a combination of warm water and dish soap, and an old toothbrush.
IMAG2242.jpg
IMAG2244.jpg

And cleaned up the foam insulation pieces for the core fittings
IMAG2227.jpg

Then I removed the plate that the blower motor attaches to (only held to the housing by hex head screws around the edges) and gave the inside of the housing a good wipedown
View attachment 132989

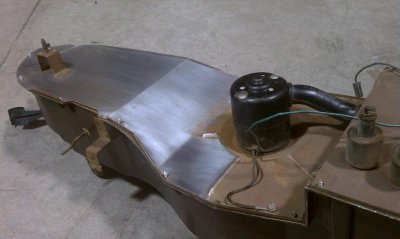
Going back to before I started tearing everything apart, I hit the plates with red (coarse) scotchbrite pads to remove that minor surface rust I mentioned
IMAG2025.jpg

Then with the plates removed hit them with etching primer, then topcoated with Martin Semour "underhood black." I also took the time to tape off the metal pieces that are riveted to the housing (the brackets where the vent cables attach to the posts) and gave them the same paint.

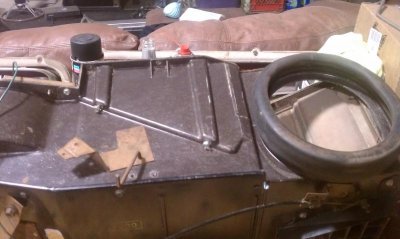
So now with everything painted, the heater core repaired, and the box cleaned out, everything just goes back together in the reverse order as taking it apart. (secure the heater core, re-attach the back plates) Here it is all painted and buttoned up :icon_cool:
View attachment 132991

So there ya go guys, there's really not much to it taking one of these things apart and cleaning them up, pretty simple stuff and it should go a long way for the air quality inside the car whenever you need to throw some air through it. Like a buddy of mine told me about deciding to tear his all apart, "I don't need to be breathing no f***** air from 1969" haha
:eek:ccasion14:
 
Last edited:
Totally inspirational stuff there Mr S.F. :headbang:

Your attention to detail and commitment is impressing a lot of people here on the boards....keep up the great work. :icon_pray::icon_pray:
 
Totally inspirational stuff there Mr S.F. :headbang:

Your attention to detail and commitment is impressing a lot of people here on the boards....keep up the great work. :icon_pray::icon_pray:

:iamwithstupid: X2
 
Totally inspirational stuff there Mr S.F. :headbang:

Your attention to detail and commitment is impressing a lot of people here on the boards....keep up the great work. :icon_pray::icon_pray:

:iamwithstupid: X2

I'm gonna have to go ahead and say that is the best heater core restoration documentary I've seen on FBBO .. and I've seen a few.

Thanks for the detail Mr SF
 
Congrats, great to see progress. For all of you less fortunate (critters ate your seals) that are going to be doing this and will be needing new seals, I used this kit "really nice". Only other thing needed is contact adhesive. $(KGrHqV,!lcFCf0utqMkBQqwCrlIEQ~~60_57.jpg
 
Congrats, great to see progress. For all of you less fortunate (critters ate your seals) that are going to be doing this and will be needing new seals, I used this kit "really nice". Only other thing needed is contact adhesive. View attachment 133186

Nice looking kit, I think I will need one of these for my project.

- - - Updated - - -

Then with the plates removed hit them with etching primer, then topcoated with Martin Semour "underhood black." I also took the time to tape off the metal pieces that are riveted to the housing (the brackets where the vent cables attach to the posts) and gave them the same paint.


:eek:ccasion14:

Is this Martin Senour underhood black more of a satin or semi gloss black?
 
I can vouch for the DMT foam kits...they're top notch. I did my '71 A/C box with new cores, and all new seals...

sjd
 
Nice presentation indeed. I've done about the same thing you've done with yours but still have to take my core to the rad shop yet.
 
Man, thanks for all the kind words and encouragement from all you guys! It's always appreciated and nice to know I'm on the right track
:eek:ccasion14:

And now that the heater is all sorted I have room on the bench to get going on the grille. Still planning on doing a step by step on that one too. Gonna be a busy weekend!

Nice looking kit, I think I will need one of these for my project.

- - - Updated - - -

Is this Martin Senour underhood black more of a satin or semi gloss black?

Yeah thanks for linking that kit 747 you read my mind! Was looking for a kit to include in my post for heaters a little worse off than mine but didn't even think to check DMT, looks like a good one :icon_thumleft:

And elk, the underhood black is full satin, really good stuff and I've used it on quite a few odds and ends so far. If I had known how much easier it goes on I would've used it instead of krylon on my dash that I had to repaint twice :eusa_doh:
 
And elk, the underhood black is full satin, really good stuff and I've used it on quite a few odds and ends so far. If I had known how much easier it goes on I would've used it instead of krylon on my dash that I had to repaint twice :eusa_doh:


So this comes in a rattle can?
 
I stopped by (last) Friday ..

"As I lay rubber down the street, I pray for traction I can keep, but if I spin and begin to slide, please dear God protect my ride." -Amen (or my Hide ) :icon_silent:

no body was home ..
was checking out the dairyqueen hotrod thing :eusa_shifty:

Mike..
 
Really great work on the heater box Speed. Just in time so I can do mine, thanks.
 
Auto Transport Service
Back
Top