Something I did for my first fire was after priming the oil system I got the timing as close as I could then had someone give it a crank with the plug wires off while I checked it with a timing light. People will probably say not to but mine fired instantly and ran smooth with no timing issues, no backfiring, no fussing around just instant fire. The second thing I did was take a small funnel and filled the float bowl (Holley) threw the overflow tube that way when it fires it stays running "no waiting on gas". Just a thought
You are using an out of date browser. It may not display this or other websites correctly.
You should upgrade or use an alternative browser.
You should upgrade or use an alternative browser.
'69 charger r/t-se: Building my dream car
- Thread starter Mr.SpeedFreak
- Start date
PFG MOPAR
Well-Known Member
Nice ..
When are you gonna fire it up ? :campfire:
I WANNA SEE !!
let me know when .. :blob1:
(Mopar/Chevy/Oldsmobile) Mike..
 enguins paint pixi
PS:
I just listed the plymouth for auction ..
http://silverauctions.com/auction_view.php?eventid=163&lotid=44477
Was too late for Barrett-Jackson in Vegas !!
When are you gonna fire it up ? :campfire:
I WANNA SEE !!
let me know when .. :blob1:
(Mopar/Chevy/Oldsmobile) Mike..
PS:
I just listed the plymouth for auction ..
http://silverauctions.com/auction_view.php?eventid=163&lotid=44477
Was too late for Barrett-Jackson in Vegas !!
Alright guys, I'm happy to say the Charger now has a complete drivetrain for the first time in who knows how many years.
ccasion14:
.......
Now for all the other odds and ends in the engine bay, finishing up the grille, and a ton of bodywork.
- Local time
- 5:44 AM
- Joined
- Jan 1, 2013
- Messages
- 8,038
- Reaction score
- 3,467
- Location
- Mascoutah, Illinois
Something I did for my first fire was after priming the oil system I got the timing as close as I could then had someone give it a crank with the plug wires off while I checked it with a timing light. People will probably say not to but mine fired instantly and ran smooth with no timing issues, no backfiring, no fussing around just instant fire. The second thing I did was take a small funnel and filled the float bowl (Holley) threw the overflow tube that way when it fires it stays running "no waiting on gas". Just a thought
Congratulations and thanks for the update. Looking very nice
Mr.SpeedFreak
Well-Known Member
Thanks guys! Have some touching up to do still but I'm just glad everything is in and clears ok with the headers, huge relief to say the least. Hopefully I can do my first fireup next month, have some odds and ends to wrap up and I still need to buy a new radiator. Thanks for the tips on the startup 747 :icon_thumleft:
And good luck at auction Mike! ccasion14:
And good luck at auction Mike!
BigBlock61
Well-Known Member
Lookin good Speed! Can't wait to see it fire up. Many videos must be posted. 
- Local time
- 3:44 AM
- Joined
- Jan 16, 2011
- Messages
- 78,620
- Reaction score
- 126,515
- Location
- NorCal Sierras
sounds like she coming along nicely, I'll bet you can't wait... good luck & great work
Mr.SpeedFreak
Well-Known Member
Thanks guys, and yeah I'll definitely going to be taking a lot of pictures and video now that the frankencharger's starting to come together
 ccasion14:
Spent some time last weekend changing out my rear wheel lugs and getting the wheel spacers installed, and a few other odds and ends. Still on my backup phone so I'll get some pics up tomorrow
Yesterday all my instrument cluster LED's and vinyl wrap showed up so I'll be messing with that stuff tonight. Also thinking about fabbing up my own sheetmetal glovebox. Does anyone know how to bench test all the instrument cluster lights? (where to supply the 12v to light them all up?)
Also finally got my factory service manual, "holy $h!t" I've got information overload lol. Wasn't too excited to spend $50 on one, but now that I'm flipping through it I'm glad I did
Also finally got my factory service manual, "holy $h!t" I've got information overload lol. Wasn't too excited to spend $50 on one, but now that I'm flipping through it I'm glad I did
I thought the same as you before buying mine, but it has paid for itself may times over for me.
Mr.SpeedFreak
Well-Known Member
Yep that's the one, really nice and I have enough reading material to last me a while now. I can tell already it will save my *** more than a few times haha. The camera on this phone takes pretty crappy pictures so I'll upload some from my digital camera tomorrow.
Do either of you guys have any ideas on the light-testing question? :icon_scratch:
Do either of you guys have any ideas on the light-testing question? :icon_scratch:
That book should help, I sold mine since I went custom and can't remember what it looked like. If it has the laminated circuit on the back like most you should be able to trace the two contact points from the bulbs to the proper terminals and put 12 V + - to it. I have to run to the garage, I'll see if I have anything to look at.
cdr
Well-Known Member
check this
http://www.dodgecharger.com/forum/index.php/topic,78399.0.html
- - - Updated - - -
this shows the 12 volt feed to the cluster
you are also gonna have to ground the cluster

http://www.dodgecharger.com/forum/index.php/topic,78399.0.html
- - - Updated - - -
this shows the 12 volt feed to the cluster
you are also gonna have to ground the cluster
Mr.SpeedFreak
Well-Known Member
Bitchin, thanks fellas! That diagram confirmed what I thought the light connection was on the board, and I'll probably just jumper in some wires to the backs of the tack and speedo lights. The cluster is in the dash, dash on the bench, should be enough to ground em ? I'm monkeying with it and and the vinyl wrap as we speak, Nights With Alice Cooper on the radio and working on stuff for the car is my post-workday relaxation lol
And yeah that fsm is already going a long way answering some of my dumb "how does this go back together?" questions as I'm reading it haha. And once the car is roadtrip worthy it's probably gonna live in my glovebox, there's a lot of troubleshooting that I'm sure will come in handy on the road
And yeah that fsm is already going a long way answering some of my dumb "how does this go back together?" questions as I'm reading it haha. And once the car is roadtrip worthy it's probably gonna live in my glovebox, there's a lot of troubleshooting that I'm sure will come in handy on the road
Mr.SpeedFreak
Well-Known Member
Success! I ended up running jumpers to the far right pin (post, whatever) on the back of the board for the 4 auxillary gauges, the 3 amp "Inst." fuse on the block for the tach and speedo, and a gator clip jumper clipped to the negative battery terminal and the cluster housing to ground everything. Lights up like the 4th of July! :icon_biggrin: The far left light didn't come on at first but those 194 wedge base bulbs have polarity, just flipped it around and problem solved.
Glad they all work and extremely happy with how the light looks with the LED's. Not to say that it looks bad, but I wanted to try to avoid the really dark/deep blue that a lot of the LED converted dashes had. Mine with the stock blue lenses in place and white LED's ended up being a way lighter crystal blue, exactly 100% how I wanted it
 ccasion14:
Not sure how the pics came out on my digital camera but if they're decent I'll add them to my picture dump tomorrow. Thanks again for the help guys! Also a big thanks to Wookie316 for helping me figure out how to get the lighter shade that I basically copied from the dash cluster in his car
Glad they all work and extremely happy with how the light looks with the LED's. Not to say that it looks bad, but I wanted to try to avoid the really dark/deep blue that a lot of the LED converted dashes had. Mine with the stock blue lenses in place and white LED's ended up being a way lighter crystal blue, exactly 100% how I wanted it
Not sure how the pics came out on my digital camera but if they're decent I'll add them to my picture dump tomorrow. Thanks again for the help guys! Also a big thanks to Wookie316 for helping me figure out how to get the lighter shade that I basically copied from the dash cluster in his car
Looks like you have made some great progress Mr S.F. :headbang: the car is looking awesome already....looking forward to the big fire-up day 
Mr.SpeedFreak
Well-Known Member
You and me both Kiwi! It's been a long year and a half coming haha thanks for the encouragement and hopefully the fireup will be soon
 ccasion14:
Oh and about the car **** 747 asked for, I actually I think I forgot to post this pic my dad took of the drivetrain back in, pretty cool one and better than any of the endless pictures I took lol
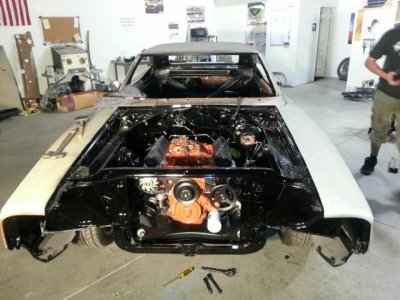
Oh and about the car **** 747 asked for, I actually I think I forgot to post this pic my dad took of the drivetrain back in, pretty cool one and better than any of the endless pictures I took lol

Mr.SpeedFreak
Well-Known Member
Alright well here's the gauges all lit up! It's hard to get a decent picture that does them justice, but I'm really happy with how they look in person. Hopefully I can get some better pictures here soon.
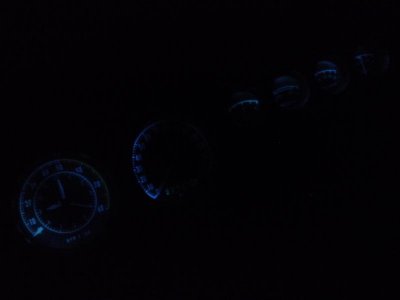
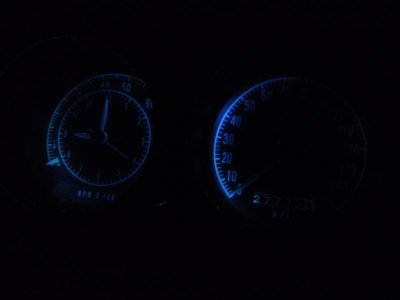
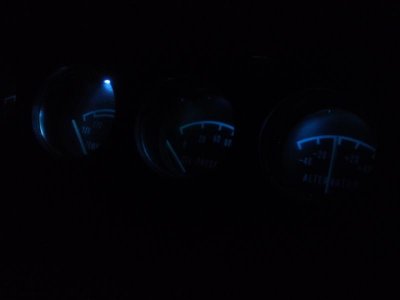
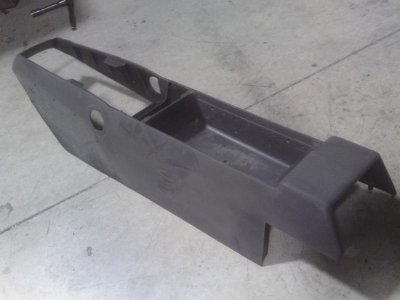
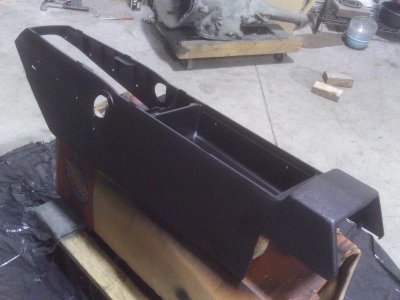
Aside from some re-assembling of the dash, I also did some work on my console last night, first got it all scuffed up and painted with SEM colorcoat. My original base was fubar when I bought the car, just made sure I grabbed all the plates, trim, wiring, etc for it. Luckily I was able to pick this original black one up from a buddy of mine. No cracks, just needed a little freshening up
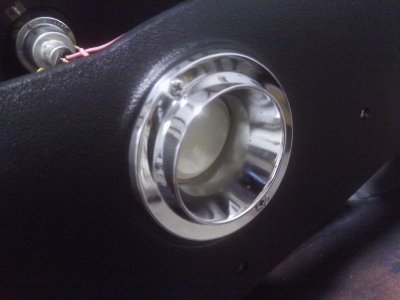
Believe it or not, this is one of the original console lights to my car. Really crazy how it still looks practically brand new after 44 years
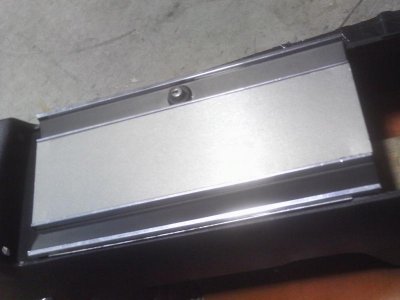
And here's my first attempt at the vinyl wrap, didn't come out too bad. Getting it to form around the console lock was a b!tch :banghead: but I like the final look of it. I used 3M brushed titanium in the center and matte black on the sides. Other than the difficult contour of the lock, the vinyl wrap is pretty easy to use. Just cut your piece oversize, remove the backing to expose the adhesive, lay it down, then press it on with a bondo spreader with some light heat applied by a heat gun/hair dryer/etc. sorta like ironing out a shirt, and just trim away the excess with an x-acto knife. Be careful with the heat though as this stuff will melt if you get it too hot
And here's my general mock-up with the lights installed. Just getting a general idea how it will look with the brushed titanium center, really liking it!
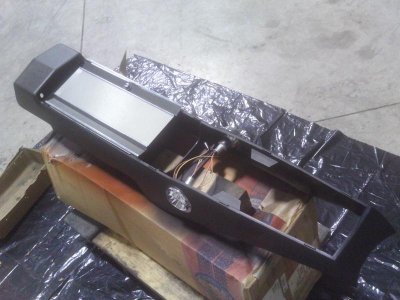


Aside from some re-assembling of the dash, I also did some work on my console last night, first got it all scuffed up and painted with SEM colorcoat. My original base was fubar when I bought the car, just made sure I grabbed all the plates, trim, wiring, etc for it. Luckily I was able to pick this original black one up from a buddy of mine. No cracks, just needed a little freshening up


Believe it or not, this is one of the original console lights to my car. Really crazy how it still looks practically brand new after 44 years

And here's my first attempt at the vinyl wrap, didn't come out too bad. Getting it to form around the console lock was a b!tch :banghead: but I like the final look of it. I used 3M brushed titanium in the center and matte black on the sides. Other than the difficult contour of the lock, the vinyl wrap is pretty easy to use. Just cut your piece oversize, remove the backing to expose the adhesive, lay it down, then press it on with a bondo spreader with some light heat applied by a heat gun/hair dryer/etc. sorta like ironing out a shirt, and just trim away the excess with an x-acto knife. Be careful with the heat though as this stuff will melt if you get it too hot

And here's my general mock-up with the lights installed. Just getting a general idea how it will look with the brushed titanium center, really liking it!

Propwash
Well-Known Member
- Local time
- 5:44 AM
- Joined
- Oct 29, 2009
- Messages
- 9,695
- Reaction score
- 4,338
- Location
- Island of Misfit Toys
Outstanding! Looking great speed! She's getting close!
Similar threads
- Replies
- 86
- Views
- 3K
- Replies
- 20
- Views
- 1K
- Replies
- 7
- Views
- 438
- Replies
- 5
- Views
- 352


