You are using an out of date browser. It may not display this or other websites correctly.
You should upgrade or use an alternative browser.
You should upgrade or use an alternative browser.
'69 charger r/t-se: Building my dream car
- Thread starter Mr.SpeedFreak
- Start date
Mr.SpeedFreak
Well-Known Member
You and me both man! haha what a PITA that ended up being.Sweet! Glad to hear that headache is done with!
Oh yeah, plenty of them laying around the shop lol :icon_thumleft:Hey Speedy - I see you have one of those "stubby" BFHs too . . . ( LMAO )
Thanks Brian, 3rd time's the charm I guess!Success !! Congrats and well done there speedy
Thanks elk! Yeah hopefully I can finally button up this engine now and get it making some noise haha. Oh and you asked me about what I was going to do with the engine wiring, I checked my wire separators and doesn't look like there's enought room there, but my dad suggested these cool little rubber insulated clamps he used on his jetboat. You can get em cheap in an assorted box at harbor freightGreat ingenuity. On to bigger and better things............
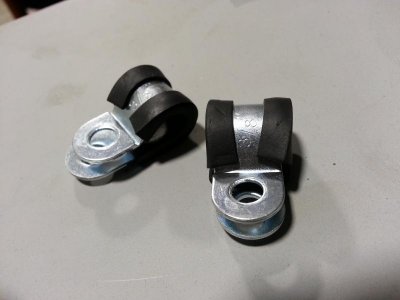
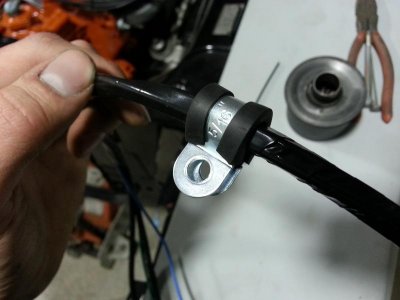
So I'll probably paint the metal part black and bolt em down under the upper valve cover bolts to run the wiring that way. Think they should look pretty clean!
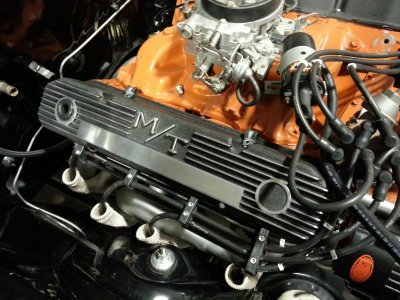
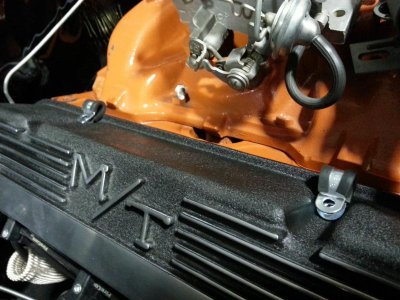
And they fit perfect in the recesses of the valve cover too
- - - Updated - - -
Oh and I forgot to mention, I got this little rough sketch done of an idea for a 3d-printed emblem or maybe just a little window decal since I'm not sure where I would put an emblem :shruggy:
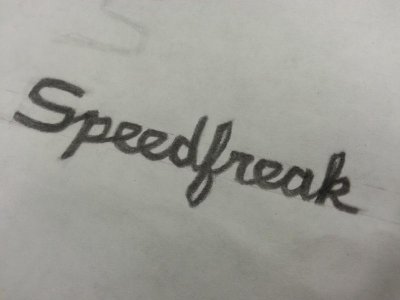
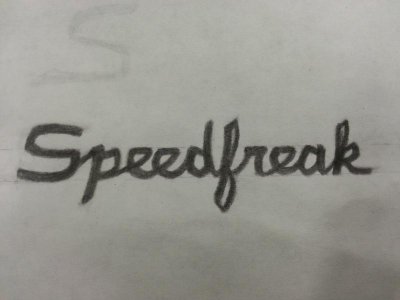
Tried to get it close to the original Chager emblem font
Propwash
Well-Known Member
- Local time
- 6:12 AM
- Joined
- Oct 29, 2009
- Messages
- 9,695
- Reaction score
- 4,338
- Location
- Island of Misfit Toys
Those clamps work very well on 70 million dollar USAF Fighter Jets, with the miles of wiring and lines they have. Think your Dodge will be alright..lol
Cool Design on the logo!
Cool Design on the logo!
Definitely liking the Logo, should look pretty cool. I used the same clamps for my fuel lines and brake lines seeing how I routed them down my subframe connectors "I like them" look for the stainless ones. Here's an idea I'm doing but you may not like, I routed my wiring under the intake (out of sight) and will be making a bracket that will bolt to each side of the intake (the valley pan bolts) providing something to fasten the wires to so they're not just flopping around under there. Just throwing it out there, Keep up the great work Speedy and congrats on beating that stub unto submission.
- Local time
- 6:12 AM
- Joined
- Jan 1, 2013
- Messages
- 8,038
- Reaction score
- 3,467
- Location
- Mascoutah, Illinois
X3 I think that logo would look great as a 3D chrome looking decal or an actual traditional looking emblem .. maybe as a thought you could incorporate the Mr as a larger font M/R in chrome surround look Red letters kind of like R/T emblems
Last edited:
Mr.SpeedFreak
Well-Known Member
Lol I was actually thinking the exact same thing when my dad showed me those, asked him what F-22 he stole them off of hahaha and thanks Will!Those clamps work very well on 70 million dollar USAF Fighter Jets, with the miles of wiring and lines they have. Think your Dodge will be alright..lol
Cool Design on the logo!
Wow I feel stupid now, I've been wondering what to use on the fuel lines and you're right those clamps would work perfect haha thanks man! Did you have to drill and tap a hole in the frame rail for the clamps to bolt to?Definitely liking the Logo, should look pretty cool. I used the same clamps for my fuel lines and brake lines seeing how I routed them down my subframe connectors "I like them" look for the stainless ones. Here's an idea I'm doing but you may not like, I routed my wiring under the intake (out of sight) and will be making a bracket that will bolt to each side of the intake (the valley pan bolts) providing something to fasten the wires to so they're not just flopping around under there. Just throwing it out there, Keep up the great work Speedy and congrats on beating that stub unto submission.
And that's a cool idea I'll be interested to see how it looks when you're done!
That's a good idea thanks Mr. 'Hair! I'll have to mess with adding the "Mr." to it, or maybe a S/F emblem I could mess with replacing the tailpanel R/T when I feel like it, hmm. :thinker:X3 I think that logo would look great as a 3D chrome looking decal or an actual traditional looking emblem .. maybe as a thought you could incorporate the Mr as a larger font M/R in chrome surround look Red letters kind of like R/T emblems
I think I will have some decals made just for fun, but I was thinking a solid emblem on the dash above the glovebox would be cool too, not really decided yet. If I didn't go with 3d printing I could probably have a friend make a CAD program of it and run it myself on the mill at work. A nice little billet emblem might be awesome
Last edited:
- Local time
- 6:12 AM
- Joined
- Jan 1, 2013
- Messages
- 8,038
- Reaction score
- 3,467
- Location
- Mascoutah, Illinois
Lol I was actually thinking the exact same thing when my dad showed me those, asked him what F-22 he stole them off of hahaha and thanks Will!
Wow I feel stupid now, I've been wondering what to use on the fuel lines and you're right those clamps would work perfect haha thanks man! Did you have to drill and tap a hole in the frame rail for the clamps to bolt to?
And that's a cool idea I'll be interested to see how it looks when you're done!
That's a good idea thanks Brian! I'll have to mess with adding the "Mr." to it, or maybe a S/F emblem I could mess with replacing the tailpanel R/T when I feel like it, hmm. :thinker:
I think I will have some decals made just for fun, but I was thinking a solid emblem on the dash above the glovebox would be cool too, not really decided yet. If I didn't go with 3d printing I could probably have a friend make a CAD program of it and run it myself on the mill at work. A nice little billet emblem might be awesome
Yeah even better S/F ~ R/T .. really cool idea. You should definitely look into it. The script above the glovebox like you drew will be a super cool touch too
P.S. you should keep this quiet LOL .. might be a sales opportunity for you
usaroadrunner
Well-Known Member
Mr.SpeedFreak
Well-Known Member
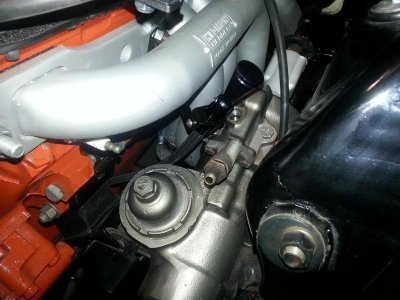
Got a couple little things done last night, mainly routing my engine oil dipstick and getting it installed finally. Wasted more time messing with this damn thing than I'd like to admit to you guys, but now that it's in place I'm pretty satisfied with it.
First I tried mounting it off the furthest forward exhaust stud, but the hose was to short to run it there without having issues with the dipstick not wanting to slide though easily. Also realized the battery tray would be in the way of the dipstick. Doh!
:head_smack:
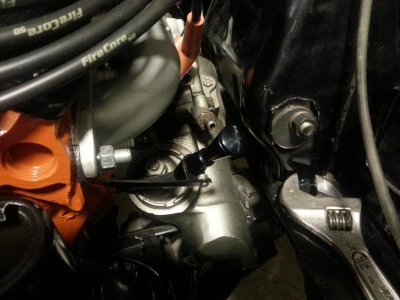
So take two, I tried what I originally thought wouldn't work and routed it between the steering box and number 1 primary. Was a PITA to get the bracket onto the 3rd exhaust stud, but it fits like a glove and the dipstick slides perfect! And you'll see when I bolt my high pressure steering hose on, the hard line runs right down along the side of the dipstick like they were both meant to be there. Dialed! :icon_thumleft:
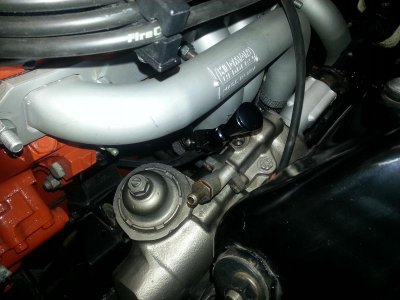
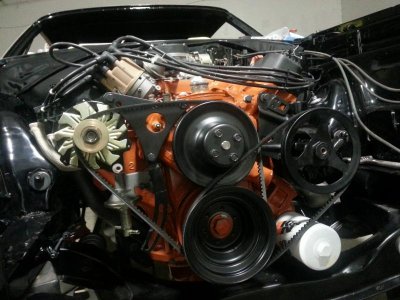
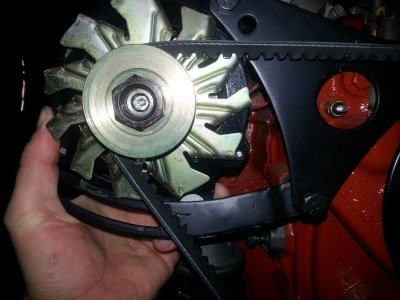
After I got that all locked down, I mocked up all my accessory pulleys and belts to figure out how I need to modify the alternator bracket for the Powermaster. Had all the pulleys powdercoated forever ago so it's cool to finally see em on the engine :grin:
Time to grab a cutoff wheel, fire up the mig and wave the magic wand haha
My vapor separator showed up too so I think I'll run my fuel and PS lines tonight. Moving right along guys
 ccasion14:
- - - Updated - - -
First I tried mounting it off the furthest forward exhaust stud, but the hose was to short to run it there without having issues with the dipstick not wanting to slide though easily. Also realized the battery tray would be in the way of the dipstick. Doh!
:head_smack:

So take two, I tried what I originally thought wouldn't work and routed it between the steering box and number 1 primary. Was a PITA to get the bracket onto the 3rd exhaust stud, but it fits like a glove and the dipstick slides perfect! And you'll see when I bolt my high pressure steering hose on, the hard line runs right down along the side of the dipstick like they were both meant to be there. Dialed! :icon_thumleft:


After I got that all locked down, I mocked up all my accessory pulleys and belts to figure out how I need to modify the alternator bracket for the Powermaster. Had all the pulleys powdercoated forever ago so it's cool to finally see em on the engine :grin:

Time to grab a cutoff wheel, fire up the mig and wave the magic wand haha

My vapor separator showed up too so I think I'll run my fuel and PS lines tonight. Moving right along guys
- - - Updated - - -
Haha true! I'll have to give em a shot and see how they come out!Yeah even better S/F ~ R/T .. really cool idea. You should definitely look into it. The script above the glovebox like you drew will be a super cool touch too
P.S. you should keep this quiet LOL .. might be a sales opportunity for you
Oh ok cool, I was thinking about using those too. I'll get on with that tonight, thanks for the tips! :icon_thumleft:I like the R/T look alike idea "cool touch". As far as the fuel line clamps go, I used stainless self drilling, tapping screws "love those things".
There we go! Haha that's a good start and cool idea, thanks for making that! Got me really thinking on the S/F emblem now :thinker:kinda like this.........buh ha ha ha........
Last edited:
roadrunnerman
Well-Known Member
Glad you got the dipstick hole fixed. Thanks for the plug insulation tip. I just may raise my engine up and drop the pan since I've got to do that to put the headers on anyways.
Pulleys, brackets, and spacers - looks familiar Speedy as that is just what I have been doing also. Except I have had to scrounge most of my stuff because it was mia. Post up how your vapor separator install goes. I ordered a 69 pump and the small hard line kit for an AVS carb. This pump is threaded for 1/8 - 27, and the line nut is 1/2 - 20. So with a little research, I found that a 1970 pump has the larger thread and have ordered one of those. It is also looking like the small line bend is not tight enough, but wont know for sure till the new pump arrives. Another thing I don't care for is that these hard lines, pump, and separator are all 5/16 instead of the 3/8 coming from the tank and the inlet to the carb. It would be nice if everything was the larger size.
- Local time
- 6:12 AM
- Joined
- Jan 1, 2013
- Messages
- 8,038
- Reaction score
- 3,467
- Location
- Mascoutah, Illinois
You probably outlined earlier but what paint did you use on your steering sector or is it powder coated. Regardless everything looks great
HYRDGOON
Well-Known Member
- Local time
- 7:12 AM
- Joined
- Apr 20, 2013
- Messages
- 3,372
- Reaction score
- 2,745
- Location
- Breslau, Ontario, Canada
Your pics made me happy with my choice I just sent my pulley's and brackets out for Powdercoat on Wednesday 
Mr.SpeedFreak
Well-Known Member
Yeah that'll work, or like 440+6 said you can drop the pan fairly easily with everything still bolted in the car. And if you have any questions or anything feel free to pm me rrman, hope you can get it taken care of!Glad you got the dipstick hole fixed. Thanks for the plug insulation tip. I just may raise my engine up and drop the pan since I've got to do that to put the headers on anyways.
Thanks tallhair, the steering box is painted with Martin Senour "ironcast" from Napa, then satin-cleared. All the Martin Senour stuff is really niceYou probably outlined earlier but what paint did you use on your steering sector or is it powder coated. Regardless everything looks great
Oh cool deal Goon! Powdercoating's the way to go with that stuff, bet you'll be really happy with em!Your pics made me happy with my choice I just sent my pulley's and brackets out for Powdercoat on Wednesday
Hey elk sorry I haven't gotten to running everything yet, but I had the same concern you're having and asked CDR about it on facebook. He and a friend of his on there said that's how everything is from the factory with the 5/16" lines up from the pump. They said the same thing I was thinking "if it's good enough from the factory for hemi and 6 pack cars, it should be fine for me" haha, I'm just running my stock AVS anyway.Pulleys, brackets, and spacers - looks familiar Speedy as that is just what I have been doing also. Except I have had to scrounge most of my stuff because it was mia. Post up how your vapor separator install goes. I ordered a 69 pump and the small hard line kit for an AVS carb. This pump is threaded for 1/8 - 27, and the line nut is 1/2 - 20. So with a little research, I found that a 1970 pump has the larger thread and have ordered one of those. It is also looking like the small line bend is not tight enough, but wont know for sure till the new pump arrives. Another thing I don't care for is that these hard lines, pump, and separator are all 5/16 instead of the 3/8 coming from the tank and the inlet to the carb. It would be nice if everything was the larger size.
As for the short line, my pump is a little different with two 5/16" slip on fittings, and the sending fitting is at a different angle to where I'll just be running a short rubber hose straight to my vapor separator instead of using the short hard line. Summit's picture for the replacement carter pump showed one that was the same as mine, two slip on fittings, so I figure it'll be fine. :shruggy:
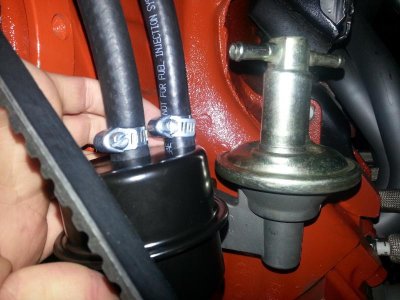
If you need to adjust the bend in it, I'd just use a steel pipe or anything round under it and do small gentle adjustments at a time to help prevent any kinking. Hope all that helps and if you have any questions I can help with just let me know!
- - - Updated - - -
Not sure why the pic uploaded upside down, it's right side up on my phone? Sorry about that guys
Mr.SpeedFreak
Well-Known Member
It's sold by Powermaster and Summit as a "chrysler upgrade alternator" that "may require modifying mounting brackets" but basically yes it is lol.Is that a Chevy alternator?
Mr.SpeedFreak
Well-Known Member
Alright guys, fuel lines are done! I couldnt fit a powerdrill in there to use the self-drilling screws and insulated clamps for the main lines, so I used these adhesive-backed ziptie anchors. We use em for wiring in the cnc machines at work, just painted em black with SEM colorcoat and they worked great. The Right Stuff upper preformed line needed a little tweaking but that wasn't unexpected. Here's how I routed everything
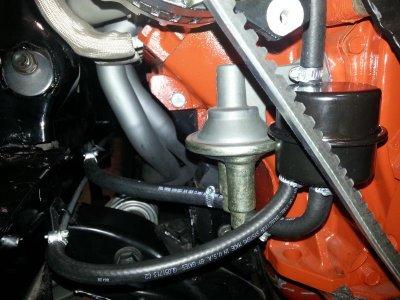
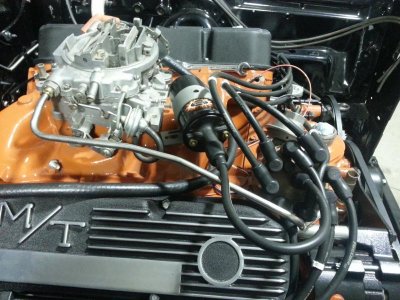
Also went out to my buddy Mike's to check out a gorgeous '69 Roadrunner he's building for a guy, and picked up a 7 blade fan and the start of my rollcage :icon_thumleft:
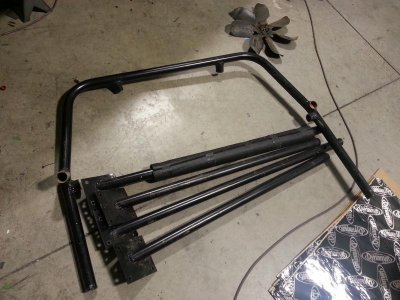


Also went out to my buddy Mike's to check out a gorgeous '69 Roadrunner he's building for a guy, and picked up a 7 blade fan and the start of my rollcage :icon_thumleft:

usaroadrunner
Well-Known Member
looking good speedy, by the way i will be putting in a cage in mine also. what kind is the one you putting in. thanks
- Local time
- 6:12 AM
- Joined
- Jan 1, 2013
- Messages
- 8,038
- Reaction score
- 3,467
- Location
- Mascoutah, Illinois
Nicely done Speedy.
PS saw this earlier and thought of you .. not the *** part though

PS saw this earlier and thought of you .. not the *** part though
Similar threads
- Replies
- 101
- Views
- 3K
- Replies
- 20
- Views
- 1K
- Replies
- 7
- Views
- 453
- Replies
- 5
- Views
- 357


