• When you click on links to various merchants on this site and make a purchase, this can result in this site earning a commission. Affiliate programs and affiliations include, but are not limited to, the eBay Partner Network.

'69 charger r/t-se: Building my dream car

440+6;910018055[SIZE=5 said:
]Sounds dangerous in your hands Goon[/SIZE] lol

hey Speed, did you do those lenses in dash like that? Or did you have the bezel off cluster out? By hand or foam pad on drill? They look great, Mine need a freshening too.

No kidding "god forbid he gets his hands on a couple cans" haha. Thanks for showing the plastic polish, that's something I'm sure will come in handy in the future.
 
" Martin Senour "Underhood Black" from Napa "

Sounds like a great product to me!! LMAO!!


That was a typo Goon . . . Martin Senour "Underhood Orange" from Napa . . . I sure that what he meant to type . . . ( GRIN )
 
Thanks guys! I'm really liking the steering wheel too, now I just have to figure out how to mount the damn thing lol. I'll probably get my driver's seat in to see how much room I've got. If there's enough I might go with a 3-to-6-hole 1 inch thick adapter.

Another issue that's been kicking around up in my gray matter has been the radiator shroud. Since the upper inlet of mine is off by 3" a repop shroud won't work (and the stock mounting method would probably be useless too), so I had the idea to whip up my own out of fiberglass. A couple minutes on google turned up a thread on none other than FABO where someone posted this really awesome DIY step-by-step. A couple guys there tried it with good results and I've got some mdf laying around the shop leftover from my Chevelle's sub boxes, so I'm thinking "what the hell" I'll give it a shot!

http://www.cadvision.com/blanchas/54pontiac/FanShroud.html

And lmao @ goon, better watch out man there'll be a price on your head here pretty soon for that kinda talk hahaha

Sounds dangerous in your hands Goon lol

hey Speed, did you do those lenses in dash like that? Or did you have the bezel off cluster out? By hand or foam pad on drill? They look great, Mine need a freshening too.

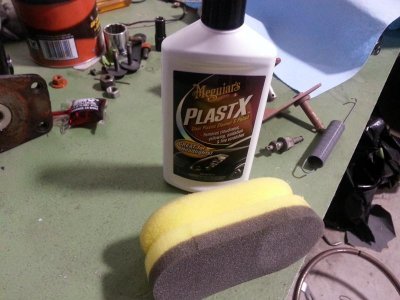
Thanks 440+6, and yeah I did them in place right where they are in the pic. I just used this foam applicator thing from Autozone (Napa was closed, don't judge lol), used the gray side to polish and the yellow to dry. Didn't take much effort and they cleared right up

20140207_065111.jpg
 
If you want I can post a pic of the adapter for mounting my Grant Signature Series wheel for you. It's basically the same deal, uses the standard mounting adapter but then has an adapter to go to the six bolt Signature Series wheel "pretty simple to make". I had the same issue with the shroud but had an aluminum shroud that I was able to modify to get the job done. Good luck.
 
If you want I can post a pic of the adapter for mounting my Grant Signature Series wheel for you. It's basically the same deal, uses the standard mounting adapter but then has an adapter to go to the six bolt Signature Series wheel "pretty simple to make". I had the same issue with the shroud but had an aluminum shroud that I was able to modify to get the job done. Good luck.

That'd be awesome man! Is it basically just the 1" spacer with the 6 hole pattern on top? And thanks, doesn't look like too difficult of a job but I'll still take all the luck I can get haha
 
Do I feel a start up vid on the horizon??? Your dash polished up nice and as usual, lookin good Speedy. It really is easy to forget you're only 21 and I'm sure you'll figure out your steering wheel with no problems or minimal problems. :)
 
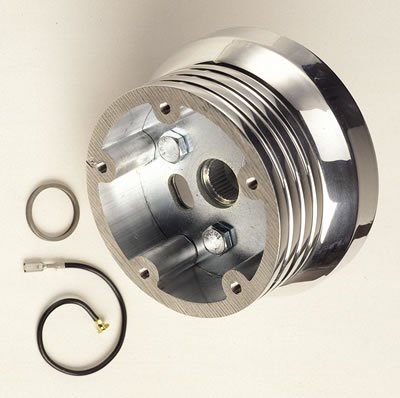
Thanks for the pic 747, that's what I was thinking but just didn't want to big of a spacer to where the steering wheel is too close and trying to kill my ability to reproduce lol. I ended up finding this one that's 1" thick black anodized aluminum. Something like 25 bucks after shipping and it should be here within the week :icon_thumleft: doubt I'll really notice the extra inch of spacing
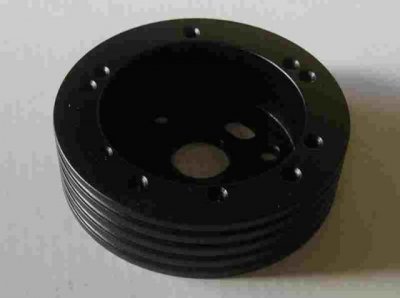
$T2eC16hHJHYE9nzpgI2vBRSg3MOTv!~~60_3.jpg
Do I feel a start up vid on the horizon??? Your dash polished up nice and as usual, lookin good Speedy. It really is easy to forget you're only 21 and I'm sure you'll figure out your steering wheel with no problems or minimal problems. :)

Thanks bigblock and yeah I'm shooting for this weekend! Got some friends back in town visiting so I think we'll be having a maiden fireoff fiesta if I manage to get the wiring figured out and everything buttoned up in time. Getting real close!
:eek:ccasion14:

Sorry I've been kinda slacking on the updates this past few days guys, had a pretty busy weekend and got to check out the first local car show of the year, but I did a couple little things in the engine bay I was meaning to do. Got started on the wiring and blacked out my PS cap, coil bracket, alternator spacer, and distributor cap. Used SEM colorcoat on the dist. cap and it worked like a charm. Little touches but I think it made a good change
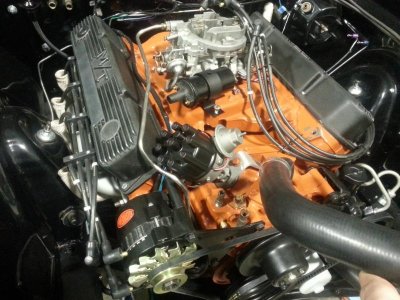
20140210_005813.jpg

The wiring brought up a question I've been wondering about, since I have a stock wiring harness and stock wiring diagram, does anyone know what wire I should use or how I should modify for my one-wire alternator? I would think I should look at my diagram and just use whatever wire goes to the ammeter but wasn't sure :shruggy:

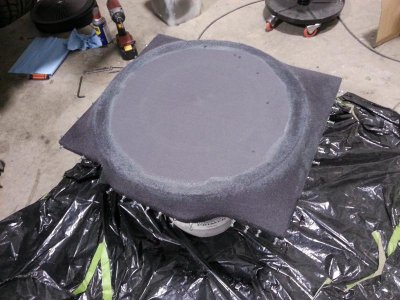
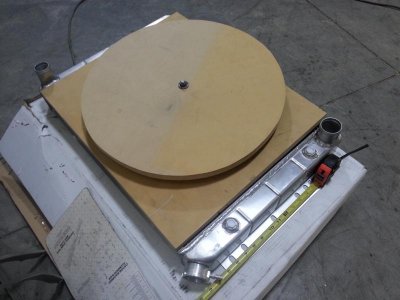
Also been getting a lot of work in on the fan shroud but didn't bother to post til I had something to show for it haha. Got all my measurements taken and the mdf "template" made
20140210_185930.jpg

And used fleece for the base fabric since I read online that it'll be thicker and stronger than other fabrics after the resin is applied. Stretched it over my template and now it's ready for resin and glassing I'll be doing tonight. Had to add the extra template piece at the bottom cause I was worried about fan clearance
20140211_010045.jpg

20140211_003050.jpg

If all goes well I think it'll come out pretty clean! Keeping my fingers crossed haha
 
Really looking forward to seeing the shroud come out! I'm confident it will turn out awesome just like the quality of the rest of the work on Ol' Frankenstein!
 
Pretty cool set up/idea on the shroud! Hope it turns out for you.

I have a smaller amp single wire in my bird (100 AMP). You need to run a ground wire for that alt. Anywhere to chassis is fine, or to engine if you have a good ground from battery to engine. Your other wire would be the power feed wire to the battery. I'm guess that alt is the 140Amp? I'd say use at least 4 gauge wire if so.
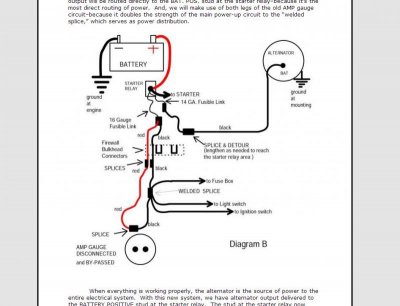
For the most part, I used MAD Electrical's Ammeter bypass and wiring directions. I did not run the power wire off the alternator to the starter relay though. Had a lot of other accessories running of the relay already, so I ran to the battery. I did not run a fusible link off the power feed from the alt either, I used a circuit breaker before the battery.

mad elec.jpg


http://www.madelectrical.com/electricaltech/amp-gauges2.shtml
 
Pretty cool set up/idea on the shroud! Hope it turns out for you.

I have a smaller amp single wire in my bird (100 AMP). You need to run a ground wire for that alt. Anywhere to chassis is fine, or to engine if you have a good ground from battery to engine. Your other wire would be the power feed wire to the battery. I'm guess that alt is the 140Amp? I'd say use at least 4 gauge wire if so.
For the most part, I used MAD Electrical's Ammeter bypass and wiring directions. I did not run the power wire off the alternator to the starter relay though. Had a lot of other accessories running of the relay already, so I ran to the battery. I did not run a fusible link off the power feed from the alt either, I used a circuit breaker before the battery.

View attachment 168385

http://www.madelectrical.com/electricaltech/amp-gauges2.shtml

That's a huge help thanks Will! I'll probably do like you did and run my alternator straight to the battery. What amperage breaker would you recommend? (Yeah my alternator is a 140 amp) And at the ammeter bypass, should I solder and heat shrink or is a butt connector fine? I'll dig through your thread later on but would you happen to have any pictures of how you routed evrrything (breaker location, starter relay location, wire routing)? Thanks for the help! :icon_thumleft:

Really looking forward to seeing the shroud come out! I'm confident it will turn out awesome just like the quality of the rest of the work on Ol' Frankenstein!
Thanks goon! I'm excited to see it done too, this is my maiden voyage into fiberglass fabrication but there's some other things I wanted to make too so it's been fun diving into it
 
Hey if you need any help with the fiberglass don't hesitate to ask "my dad built an airplane and had us kids in that stuff haha" so I have quite a bit of experience in form making etc. If you want a nice bubble free tight fit to your form put it in a trash bag, tape it shut with a small hose going to a vacuum pump (I use an old refrigerator pump) then just pull the wrinkles out of the bag and your set.

- - - Updated - - -

The extra thickness of the wheel spacer is unnoticeable on my car, I think because most wheels are concave where yours and mine are pretty flat or it could be that I'm 5'-8" but I really like the feel of it "fits nicely".

- - - Updated - - -

Your question on the bypass is a good one, I read up on wiring and soldering is discouraged in auto wiring because it becomes a solid wire at that time meaning "not flexible" and eventually leading to breakage. On the other hand I like soldered joints "positive contact" :edgy:. I used a combination of crimp fittings, a good set of crimpers and good shrink wrap (not the pretty yellow, blue, red ones but the ones that actually have glue in them and seal tight).

- - - Updated - - -

Your shroud looks pretty cool "outta do the job".

- - - Updated - - -

gaugeguide.jpg

- - - Updated - - -

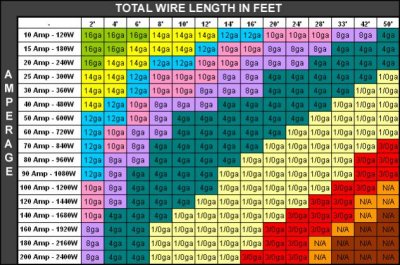
You'll notice that the gauge needed changes depending on length due to resistance of the added wire but bigger never hurts. I'd size both the wire and breaker larger than needed for 140 amps.
 
Man that custom shroud set up you are making is too cool Speedy .. I'm really looking forward to the results.

- - - Updated - - -

View attachment 168414

- - - Updated - - -

You'll notice that the gauge needed changes depending on length due to resistance of the added wire but bigger never hurts. I'd size both the wire and breaker larger than needed for 140 amps.

Cool chart 747 .. I'm saving that in the files for future ref brother !

- - - Updated - - -


Thanks once again for the help to everyone, lincl me Propwash !
 
Last edited:
Hey no problem Speedfreak/Tallhair....Glad to help. I used 150AMP CB and mounted it under the battery tray (out of sight). I would recommend at least 175 or 200 in your case (depending on what gauge you select- 4ga 175, 1/0 200ga). My Circuit breaker is not an auto reset, so if it pops you'll have to reset it (which you would probably want to investigate why it popped anyways). There's a little switch on it to reset it or turn it off. I believe I bought mine from an Boat/Marine website (it's water-moisture proof), I can't find where, but i'll keep digging. I know audio stores sell them as well for AMP installations. I routed mine from the alt to the right inner fender. My MSD box is under the wash bottle so the wire from the alt blended in with that harness. From there it follows the typical harness route across the firewall, over the booster, down the left inner fender and to the breaker. Obviously from there up to the battery. Starter relay is still located where the factory had it, next to the master cylinder. BTW, I used black insulated wire, so it blended in better with the harness and body color.

As far as the connection under the dash, I used a non-insulated butt connector, crimped the wires together in it and then soldered. Finished off by covering with shrink tube and a couple layers of electrical tape. The solder connection will give you the best connection. It also does not allow for any moisture to get in. I hardly use the insulated butt connectors, but if I do, I use the ones that have the heat shrink type insulation. Seen way too many funky green copper wires hanging on crappy radio shack cheap insulated butt connectors to ever go that route.

I also drilled out the bulkhead connector for the red wire (W/fusible link) that runs through and connects up with the black (at the ammeter bypass). I had a '72 Dodge Dart and a '73 Roadrunner melt the bulkhead connector because of that wire/connection. Not a fun fix! Pretty easy to do the mod....Pop out the female terminal connector on one side and the male on the other. Pick a drill bit to support the wire diameter and not too big to drill outside the designated slot for that wire. Hook the harness plug to the bulkhead connector and drill straight through. Run the wire w/fusible link that comes off the starter relay, through the bulkhead connector & harness connector, and then make your connection to the black wire at the ammeter bypass. Only catch to this is that if you ever wanted to take the harness completely out, that connection/ring terminal hooking to the starter relay would hold you up. It would have to be cut off. With that being said, that terminal connection is obviously known for melting out there. That link for the mad electrical website I posted even had the MOD in their article. I would really recommend the change to anybody. If not, at least get in there with a small file, really clean that brass and use some good die-electric grease.
 
Wow Speedy - I get tangled up in stuff and get behind on your thread . . . and you've got a ton of stuff done ! ! !

I agree with Propwash - I'm NOT a fan of but connectors, I'd much rather solder the wires together and then heat shrink them for protection. I will tell you that I had seen some connectors at the parts stores ( they're a little pricey ) but they're but connectors that have solder in them, and are covered with heat shrink. You put the wires in, heat the connector with a heat gun, and it melts the solder and solders the wires in place and shrinks to heat shrink to hold and protect the connection - pretty cool idea !

I saw the online article about the fan shroud - love to see you giving it a try and making it happen ! ! ! Can't wait to see the result and hear you reviews ! ! !

Keep up the great work - you've gotta be getting close ! ! !
 
Thanks for all the help and compliments guys! That wire chart is real handy 747 and your reply was a lot of help Prop. I have a breaker on order at the boat shop my dad uses that should be here friday, starter relay on order at napa to pick up tomorrow, and they said they also have 2 gauge wire there I'll be getting for my alternator to battery line.

Will, I was thinking about using an extra ground strap from the back of my alternator housing over the spacer to the block, is that a good way to go for grounding the alternator or is there a cleaner looking way? Also I got an assortment of the heat-shrink type butt connector but I'll look at napa tomorrow for the non insulated type so I can go the same route as you if possible. I'll also be doing the bulkhead mod, but just to clarify did you splice in a fusible link at that connection where the spade terminals are removed? Or what did you do for connecting those wires? Sorry about all the most likely noob-level questions but I just want to be sure I do everything about this wiring right the first time haha

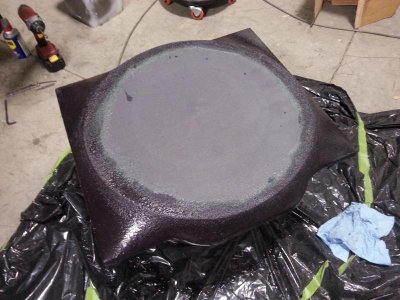
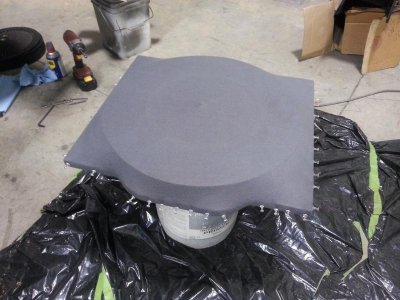
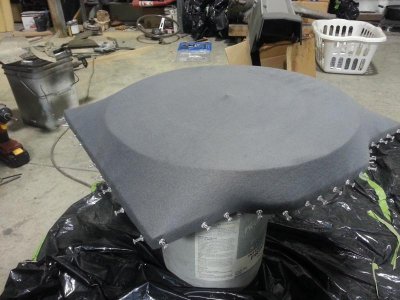
Well as I'm getting all my ducks in a row on the wiring, I got 2 coats of resin done on the shroud. Because of the texture of the fleece, it's a little bumpy but solid as a rock at this point. Think I'll do one more coat later before I call it a night just to see if it smooths out a little, but I'm not too worried about it. Either way should look cool once it's painted and I can always sand it smoother first if I want.

First coat:
20140212_064634.jpg

Pulled the pushpins once it set and threw on a second coat:
20140212_214523.jpg
 
Will, I was thinking about using an extra ground strap from the back of my alternator housing over the spacer to the block, is that a good way to go for grounding the alternator or is there a cleaner looking way? Also I got an assortment of the heat-shrink type butt connector but I'll look at napa tomorrow for the non insulated type so I can go the same route as you if possible. I'll also be doing the bulkhead mod, but just to clarify did you splice in a fusible link at that connection where the spade terminals are removed? Or what did you do for connecting those wires? Sorry about all the most likely noob-level questions but I just want to be sure I do everything about this wiring right the first time haha

No sweat, and those are not NooB questions at all Speedfreak. Take a look at your questions...a lot of folks would have no clue what you're talking about. You been doing car & resto work long enough that you don't even realize the complexity of your questions. That sounds like a real good place to run a ground from the alt! As far as the un-insulated butt connectors, I should have mentioned they can be a little tough to find. I buy mine in bulk at a local electrical supply store. All the chain stores and hardware stores don't carry them around here. Radio Shack has a very limited supply/size of them. My splice for the fusible link is probably 2" out from the bulkhead, under the hood. I would say the easiest way to make that wire w/ fusible link is to get the ring terminal and fusible link connected to the wire, attach to the starter relay, run through the bulkhead and then cut the wire to length under the dash for not too loose or too tight of a connection to the black wire. The fusible link is also connected with a heat shrink covered, non insulated, soldered butt connector. When you run the wire through and make your splice to the black wire under the dash, leave yourself a little slack. If you have too much slack under the hood you can pull the wire to the inside a little, which is easily hidden. Also, having a little slack available allows you a little play if you need to unplug the connection at the bulkhead for any reason

Pretty excited to see how that Shroud turns out for you. Gotta say, pretty cool! Keep up the good work man.
 
Auto Transport Service
Back
Top