• When you click on links to various merchants on this site and make a purchase, this can result in this site earning a commission. Affiliate programs and affiliations include, but are not limited to, the eBay Partner Network.

71 Road Runner Restoration Started

Great stuff ! I hope to see more , love the details , I have a 71 bird that I put to gather last year , I had on clue that you could buy some of that stuff I was making most of it . I like what you do . Like to see more , You make it look easy !
 
1)I do this as a hobby / relaxation.
2) I do everything on my cars, except for machine work, and alignments.
Now I get my cars front ends "close" then trailer them in to get the alignment done. 3) I can't wait to get started back up on the Bird.

4) Im sure you all can't wait either!!!!!!!

5) One of my goals on this thread was to document everything that goes into building a car and provide part numbers, etc. that go with it. Hopefully it will help someone who is working on their car somewhere along the way.

1) Me too, but sometimes it's more of a headache than relaxation thou...LOL...

- - - Updated - - -

2) me too, I know I can trust the work I do...LOL...

- - - Updated - - -

3) & 4) good luck & yeah you got that right...LOL...

- - - Updated - - -

5) your doing an excellent job of it so far, keep up the great work, I wish we were neighbors, I would get allot more done & be much more motivated....
 
5) your doing an excellent job of it so far, keep up the great work, I wish we were neighbors, I would get allot more done & be much more motivated....

Thanks & Me too !!!!

- - - Updated - - -

Made some good progress and had a minor set back again on the Duster. The printed circuit board was causing all kinds of problems with the dash lights and gauges. So I had to drop the steering column and pull the instrument cluster. Replaced the circuit board, no problems. But when I was in the dash I some how pulled the battery connection to the MSD box. When everything was connected back up I hooked up the ground wire back on the battery. Then I smelled smoke and burning plastic. I fried the power wire to the MSD box.

So I fixed the connection and replaced the burned wire. Started the car up and it ran for about a minute then died. Started it again and it ran for about 30 seconds and died again. I finally lost all spark.

I then removed the MSD box from the engine test run stand and I'm in the process of wiring it up in place of my older -6AL box.

On a good note......... Everything works on the dash now.

Two steps forward............. One back.

Chit Happens............
 
Concur OTR and thanks for the updates 71AGRR. I'm looking forward to seeing the final post on your Duster and hear you tell what the new owner thinks of it. He's surely going to be ecstatic !
 
Headed out to the shop.................. Hopefully today will be "The Day" for the final post about the Duster. This car has been fighting me every step of the way here lately.

Wish me luck !!!!!!

Will post the results later tonight.
 
The Duster is FINISHED !!!!!

Around noon today the new owner of the Duster drove it home............. He was a very happy man. His daughter was with him to drive their other car home and they were both very pleased with the final result. He was a very patient and understanding man, considering the recent set backs with the car. As usual with any restoration there are unforeseen problems. This car had it's share.

I am very pleased too. This car was not complete and didn't run when we bought it back in 1995. I never knew what worked on the car and what didn't, or what was missing. Years of searching for parts, etc. finally paid off. Another Mopar is back on the road...................

Just the other day was the first time I drove it. Now it's gone to a great home, and everything works like new.


I had to install a new MSD box and re wire it for the new style harness. Then I charged the AC system and gave everything a final "once over." The horns needed to be grounded better. Once that was done everything worked just fine.

now,

IT's ROAD RUNNER TIME !!!!!!!!! and I'm sure a lot of you are thinking .......... It's about time. (Me too !!!)
 
Great I am glad to hear the Duster went to a good home. Road Runner? What Road Runner? :tongueflap:
 
Congratulations !!! Did you catch any video of him smiling as he's driving away and laying some sweet sweet parallel road art?
 
Thanks for the kind words. Unfortunately the video I did get of him leaving was very short. By the time I grabbed my camera and started filming he was almost out of our yard. I have about 10 seconds of very distant footage of the car as it was headed out of our driveway and down the road. He drove it away in a gentle fashion and did not leave a farewell message on the road. The car did sound sweet though. I never realized how sweet she was until I saw someone else at the wheel................
 
You have such attention to detail your restoration rivals professional shops.
 
Photo and Horn Info Needed Please
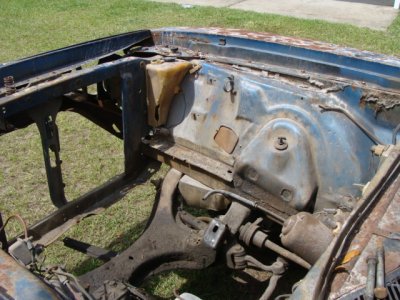
DSC03605.JPGI'm hoping that someone here will have an answer to several questions.......

My RR was missing the purple horns when I bought it. I found some NOS ones made by Sparton, but they have the short mounting bracket and claim to fit 1970 - 72 cars. I'm pretty sure I know where they mount by looking at the old holes in the passenger side inner fender well.

On normal cars there are two horns, a high tone and a low tone.

I am pretty sure (but not 100%) that my car takes 2 horns and they are both the same. (Purple with the "Voice of the Road Runner" decal). I know that certain year RR's had long horn mounting brackets and others had short. I do not know if they mixed them, using both a long and short bracket on the car. (especially since this is an air grabber car and the vacuum can is nearby.)

Here are the questions..........

What type / style of mounting brackets on the horns does my car take??? It's a 1971 model year built on Dec 4th, 1970.

How many horns ? 1 or 2 ????

Can anyone either post or PM me a photo of how it should be??

Do these special horn take a special horn relay or does the same relay work for all 71 - 72 model year cars??

I'm getting ready to pull the trigger on buying the correct horns for the car. I've seen other threads on here that claim the current reproduction horns are VW replacements and suck, where the originals were made by Sparton. Any help will be greatly appreciated.

I just don't want to waste money on the wrong stuff. These horns are expensive.......

Thanks again.
 
Original Part Numbers

With a little research I found this out.

The original part numbers for the RR horns are as follows:

1968-71 used PN 2926233
1972-74 used PN 3488646

But this still doesn't tell me which horn has the longer bracket and which was short. Any help here would greatly be appreciated, especially any pictures of how they were mounted.

Thanks in advance !!!!
 
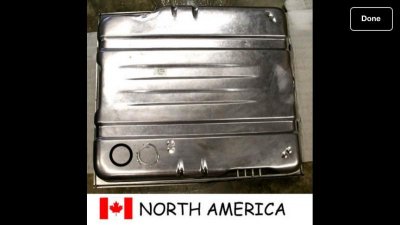
New Gas Tank Ordered

image.jpg

- - - Updated - - -

Should be delivered in a few days. This is supposed to be a better quality tank and have the correct finish on it. Will post some pictures when it arrives.

Anyone have the info on the horns mentioned in my last two postings???
 
I know '69s take the long bracket. I think but not 100% the '71 would have the short bracket, and only one horn.
 
Thanks everyone.

Yes OTR it is a spectra tank. I have used them several times in the past and they are great. There are some out there that have a finish that looks like it was painted silver and that's not the look I want for my car.

Thanks Tall Hair for the restoration link on the horns. That is a very COOL link to a very informative thread here on FBBO. I'll send him a PM to see what he knows. Hopefully he can answer some of my questions.

Thanks for the reply Basket Case. From what I have been finding out I tend to agree with you. My car probably had the short bracket.

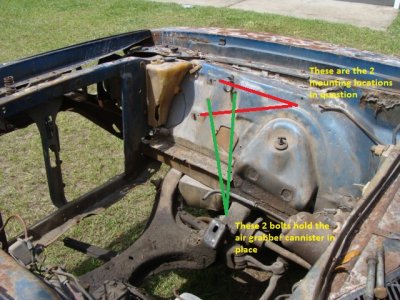
The only thing that concerns me know is whether or not my car had 2 horns or not. If you look close at this photo, you can see where there is a spot that has identical marks and even has the mounting bolts screwed back in position just behind the washer bottle. One place is just ahead of the plastic loom clip for the air grabber hoses and behind the washer bottle. The other spot is directly beneath this position and is about 6-8 inches below it on a little spot that protrudes on the inner fender well. Both of these places have the smaller secondary hole that holds the horn in proper position as it is tightened down.

I'm making a SWAG here and thinking my car had 2 horns with the short brackets, just based on the original marks and mounting bolts that were left on the inside of the fender well.

I would really like a photo of this area from their car if someone can do it for me.possible horn locations.jpg

- - - Updated - - -

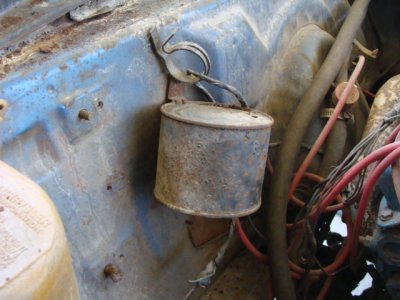
DSC03586.JPG

- - - Updated - - -

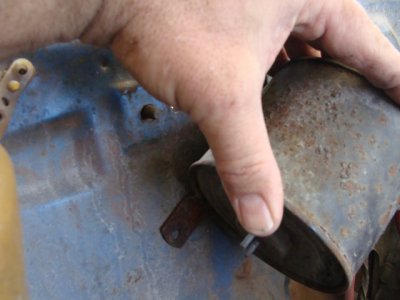
DSC03587.JPG
 
Looks like a vacuum canister for N96 Hood ?

You are correct Sir !!!!

I added this photo to show how these holes line up for the canister . This is how the car was when we bought it. A lot of detective work is going on here......

I know that some cars also had a coolant recovery bottle somewhere on this side. Not sure if my car had it or not.

- - - Updated - - -

But this is also what concerns me. If this N96 canister is in this location, it doesn't leave much room for the upper horn mount.

That being the case sounds like the short mount horns would be required? Go to the 71-74 Forums and post there. Also there are a couple of threads with lots of B bodies pictures there.

http://www.forbbodiesonly.com/mopar...atellite-Pic-Thread&highlight=bodies+pictures
 
Auto Transport Service
Back
Top