You are using an out of date browser. It may not display this or other websites correctly.
You should upgrade or use an alternative browser.
You should upgrade or use an alternative browser.
71 Road Runner Restoration Started
- Thread starter 71airgrabberRR
- Start date
71airgrabberRR
Well-Known Member
Memory Lane........
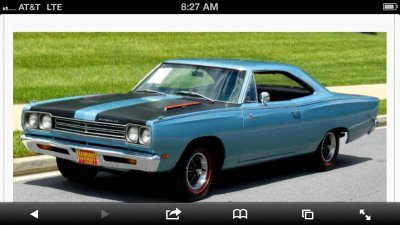
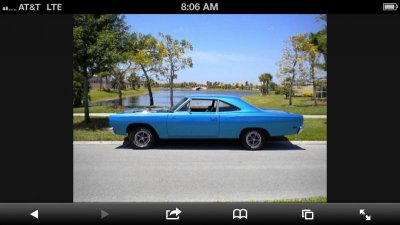
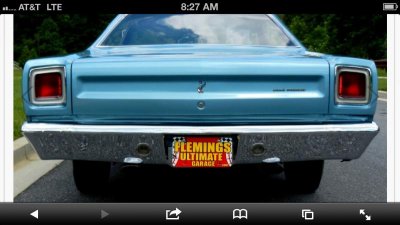
Here are a few pictures I found on the Internet that look very close to how my 69 RR did when I owned it back in the day. I had some pictures of it years ago, but unfortunately they were lost probably during a move.
So here is the next best thing.
If these cars belong to anyone here on FBBO, you have a sweet ride and they sure brought back some good memories ......
- - - Updated - - -


Propwash
Well-Known Member
- Local time
- 11:08 AM
- Joined
- Oct 29, 2009
- Messages
- 9,695
- Reaction score
- 4,338
- Location
- Island of Misfit Toys
Trying to play catch up here on the resto threads....Gotta say, you take documenting your resto to a new level. Very detailed to say the least. Progress is rolling along great!
- Local time
- 11:08 AM
- Joined
- Jan 1, 2013
- Messages
- 8,038
- Reaction score
- 3,467
- Location
- Mascoutah, Illinois
Trying to play catch up here on the resto threads....Gotta say, you take documenting your resto to a new level. Very detailed to say the least. Progress is rolling along great!
71 AG and his thread is pretty awesome. You should also check out conv67bdere too. He's quite the documentarian also and doing a great job with his convert
71airgrabberRR
Well-Known Member
Durango is Fixed !!!!!!
The Durango is finished. Yesterday I was pulling the AC system down with my vacuum pump but I couldn't get it to drop below 10. I had a leak where the expansion block bolts onto the evaporator core and also where the hoses bolt on to the expansion block.
The rubber O-rings provided with the new parts weren't thick enough. Once I installed a new gasket and O-rings, I was able to get the system to drop down to -30.
I let it set like that for a few hours and it held. So I charged the system and everything is good to go now.
While this was happening I was cleaning / painting some parts for the 72.
The next step is to remove the rear suspension, bumper, trunk lid and fuel tank.
I don't need any excitement from an accidental fire while I am cutting / welding on the car.
My work schedule is busy for the next week so I might not get as much done as I would really like to.
Please Stay Tuned ...............
71airgrabberRR
Well-Known Member
440 Tear Down Completed
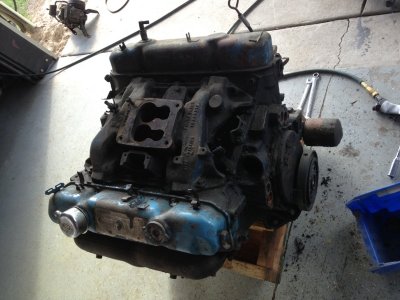
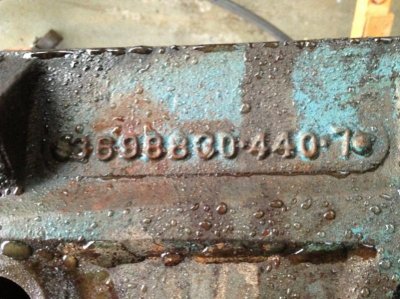
This afternoon I pulled out one of my 440's from storage and started disassembly. I picked out a 1974 model year engine that came out of a Power Wagon and has a forged steel crank. I've been thinking about building a 440 Source Stroker so this engine will be perfect if I decide to go that route. First things first. I needed to tear the engine down and find out what bore the block is.
After removing all of the accessories this is what the engine looked like..........
- - - Updated - - -
- - - Updated - - -
Right away I noticed a problem. The #1 and #2 spark plugs had a little rust on them which is not a good sign. I pulled the heads and found out that sometime while the engine was sitting, water collected in the front 2 cylinders and caused the pistons to seize in the block. Also the #7 cylinder had a burnt exhaust valve. I'm not really worried about the heads. I have several good sets of the old 906's and I've been itching to put the new set of aluminum 440 source heads on something.
- - - Updated - - -
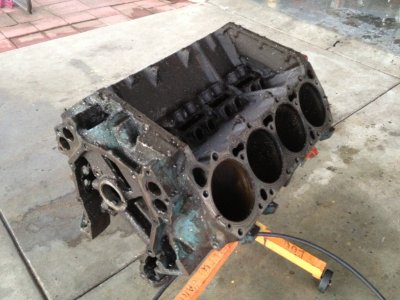
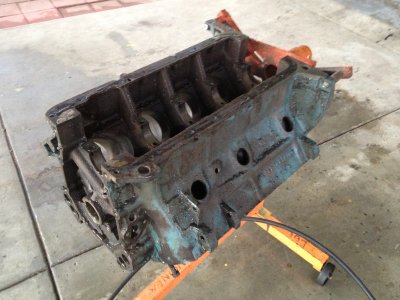
- - - Updated - - -
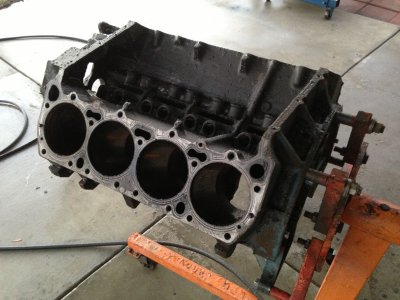
- - - Updated - - -
Once the pistons were broke free they came right out. The block is standard and has never been apart. It still had the factory steel shim head gaskets.
- - - Updated - - -
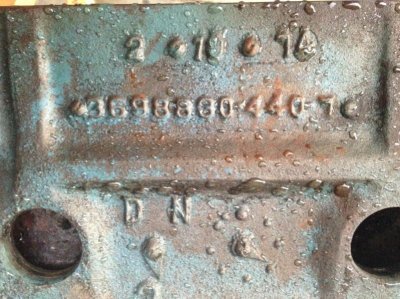
- - - Updated - - -
- - - Updated - - -
After I removed the freeze plugs and oil galley pipe plugs, I gave the engine a good bath with my pressure washer. Now its ready to get dropped off at the machine shop on Monday.
- - - Updated - - -
The #1 and #2 cylinders had some rust on the walls. I will have to see if they clean up at .030 or even .060 over. If not they may need sleeves installed. The steel crankshaft looks to be in very good shape. The bearings were surprisingly good and the line bore seemed OK too. I will have to break out the micrometers and see how good it is. The bearings were standard on the rods and mains.
- - - Updated - - -
The other day when I stopped by the machine shop he had 2 other 440 engines that he was working on. One was a 68 HP engine, while the other was a 69 1/2 A12 six pack. The shop has a nice dyno and the owner showed me some videos he had stored on his computer of several 426 Hemi's and various six pack motors he has done recently.
It's a very good shop and he will be using torque plates when the boring / honing is done. The owner told me that recently he has had a quite a few big block Mopars in his shop.
- - - Updated - - -
I guess he wont mind one more on Monday ..................................
This afternoon I pulled out one of my 440's from storage and started disassembly. I picked out a 1974 model year engine that came out of a Power Wagon and has a forged steel crank. I've been thinking about building a 440 Source Stroker so this engine will be perfect if I decide to go that route. First things first. I needed to tear the engine down and find out what bore the block is.
After removing all of the accessories this is what the engine looked like..........
- - - Updated - - -

- - - Updated - - -
Right away I noticed a problem. The #1 and #2 spark plugs had a little rust on them which is not a good sign. I pulled the heads and found out that sometime while the engine was sitting, water collected in the front 2 cylinders and caused the pistons to seize in the block. Also the #7 cylinder had a burnt exhaust valve. I'm not really worried about the heads. I have several good sets of the old 906's and I've been itching to put the new set of aluminum 440 source heads on something.
- - - Updated - - -


- - - Updated - - -

- - - Updated - - -
Once the pistons were broke free they came right out. The block is standard and has never been apart. It still had the factory steel shim head gaskets.
- - - Updated - - -

- - - Updated - - -

- - - Updated - - -
After I removed the freeze plugs and oil galley pipe plugs, I gave the engine a good bath with my pressure washer. Now its ready to get dropped off at the machine shop on Monday.
- - - Updated - - -
The #1 and #2 cylinders had some rust on the walls. I will have to see if they clean up at .030 or even .060 over. If not they may need sleeves installed. The steel crankshaft looks to be in very good shape. The bearings were surprisingly good and the line bore seemed OK too. I will have to break out the micrometers and see how good it is. The bearings were standard on the rods and mains.
- - - Updated - - -
The other day when I stopped by the machine shop he had 2 other 440 engines that he was working on. One was a 68 HP engine, while the other was a 69 1/2 A12 six pack. The shop has a nice dyno and the owner showed me some videos he had stored on his computer of several 426 Hemi's and various six pack motors he has done recently.
It's a very good shop and he will be using torque plates when the boring / honing is done. The owner told me that recently he has had a quite a few big block Mopars in his shop.
- - - Updated - - -
I guess he wont mind one more on Monday ..................................
I thank you for putting those pic's up, if yours looked like that, it must have been a beauty!
Good luck on the 440! I have one hear i want to have done myself, im no engine builder so i cant/wont.. I only have one set of 906 heads and i have to have them so it will be awhile (need to many other parts at the moment), sorry i haven't been around bud and im missing some good stuff here, your doing a great job and i do look forward to updates here, and with this 440 build, ill be interested in seeing what you do with it, any idea on what kind of HP and torque you may be looking for?
Good luck on the 440! I have one hear i want to have done myself, im no engine builder so i cant/wont.. I only have one set of 906 heads and i have to have them so it will be awhile (need to many other parts at the moment), sorry i haven't been around bud and im missing some good stuff here, your doing a great job and i do look forward to updates here, and with this 440 build, ill be interested in seeing what you do with it, any idea on what kind of HP and torque you may be looking for?
71airgrabberRR
Well-Known Member
Engine build "Guesstimate"
It's good to hear from you Ron.
Back in the day my 69 RR could have passed as a twin to the cars in the top and bottom pictures. The shade of blue seems a little off on the other one, but you get the idea. Mine had the B-5 Blue interior also. If memory serves me correctly, the door panels had a two tone blue with a darker shade of blue as the second color and some "fancy" scrolling in the material.
It was a real head turner even back then. I miss it. Maybe someday I can get my hands on another one and build it the way my old car was.
Im still sitting on a good '69 HP 383 with a Road Runner VIN pad (just in case).
After I sold it, the guy drove it out to LA where it was totaled in an accident in Hollywood. Luckily he wasn't hurt, but not so true for my old Blue Bird.
Going back to the question on the 440 build, I'm looking to get between 500 - 550 horsepower and about the same on the torque. I don't want to go crazy wild with it, and I want it to be street friendly and a sleeper too that will run on pump gas.
Thats why I'm leaning towards the stroker set up. Plus on the 74 model year and later, the 440's had a larger surface on the face of the thrust bearing, which will help with the longevity factor and main bearing choices. You can install the earlier mains and thrust bearing in the later blocks, but the later thrust bearing will not fit in the 73 and earlier years because it is larger in outside diameter on the thrust face.
It is a reasonable combination.
- - - Updated - - -
Those HP numbers would be at the flywheel not the rear tires. I have another friend in Port Orange who has a chassis dyno. I'm sure I could talk him into letting me try it out with this combination once it's done. Then I would know what is getting to the rear wheels and could "tune it" a little if you know what I mean......
Thats a shame the RR was wrecked, it sounds like it was a very nice car! The one i had back in the day was green, nothing fancy about it with black interior but it sure was a fast bird, funny back then i paid 800 bucks for it and look at the prices now lol.
I don't know much about building the engines, i have the 440 that according to the numbers i think it said that could be a 75 or up, The guy i got it and my 400 (73) said it came out of a New Yorker but you know how that works, i hope to have it done and about 400 should do it up for me but thats kind of down the line a long way so im not sure of anything about what will go on at that point, Yours at around 500 both in HP and TQ sounds like a pretty good beast to be! Im sure you'll have it on the dyno that will be fun.. almost as much as tuning it and doing some street action tests!
I don't know much about building the engines, i have the 440 that according to the numbers i think it said that could be a 75 or up, The guy i got it and my 400 (73) said it came out of a New Yorker but you know how that works, i hope to have it done and about 400 should do it up for me but thats kind of down the line a long way so im not sure of anything about what will go on at that point, Yours at around 500 both in HP and TQ sounds like a pretty good beast to be! Im sure you'll have it on the dyno that will be fun.. almost as much as tuning it and doing some street action tests!
- Local time
- 11:08 AM
- Joined
- Jan 1, 2013
- Messages
- 8,038
- Reaction score
- 3,467
- Location
- Mascoutah, Illinois
I'm really looking forward to your engine build and details 71AG and I"m glad you are back Ron!
71airgrabberRR
Well-Known Member
Dropped off the 440 at the Machine Shop
I just got back from the Machine shop a few minutes ago. They will be cleaning the block and then do a "rough" bore on the front 2 cylinders to see where it is. John looked at the rust and scratches from the stuck pistons and he said he thought it might clean up at .030 over. If not he said they would take it to .060 and see how things were then. Rust can be deceiving on cylinder walls from my own past experiences as an automotive machinist years ago. You really don't know until the cutting bar has made it's last pass to find out for sure.
In the worst case he said like I originally thought, that we may have to sleeve the 2 front cylinders, (#1 and #2).
John also agreed that the rest of the cylinders looked very nice and would have been fine with a standard finish hone. The engine appears to have been a very low mileage or well taken care of original.
- - - Updated - - -
- - - Updated - - -
Here is a list of things that will be done for starters.
Clean / detail / prep work on the block
Bore block at either .030 or .060 oversize depending on the results of the front 2 cylinders. The boring / honing will be done with torque plates and the main caps installed.
Square / deck the block so that the head gasket surface is properly aligned with the crankshaft and all cylinders have the same volume.
Align bore / hone the main bearing journals.
Install new one piece cam bearings and distributor gear drive bushing.
- - - Updated - - -
Then I spoke to John about installing a set of 440 source billet main caps and stud girdle when the crankshaft align boring is done. He said that since this is a HD truck block, the bottom end is sturdy enough as long as it's not driven at the track every day, and that this money spent on the girdle and main caps could be used elsewhere.
I'm still thinking about that.............. Haven't decided yet.
- - - Updated - - -
- - - Updated - - -
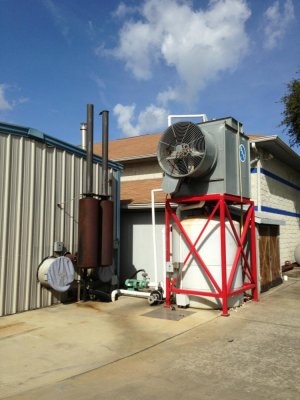
This is a parting shot I took of the back side of his engine assembly / dyno room. You can see the big exhaust and coolant tower. It's a very nice set up. Out of respect for other racers, I didn't want to take any pictures inside. Hope you understand. But I will say, I saw some Hemi's inside there..................
- - - Updated - - -
While the block is at the shop, I will be getting into some panel replacement. John has a good amount of work ahead of me, so I probably will not see the end results for a few weeks.
I just got back from the Machine shop a few minutes ago. They will be cleaning the block and then do a "rough" bore on the front 2 cylinders to see where it is. John looked at the rust and scratches from the stuck pistons and he said he thought it might clean up at .030 over. If not he said they would take it to .060 and see how things were then. Rust can be deceiving on cylinder walls from my own past experiences as an automotive machinist years ago. You really don't know until the cutting bar has made it's last pass to find out for sure.
In the worst case he said like I originally thought, that we may have to sleeve the 2 front cylinders, (#1 and #2).
John also agreed that the rest of the cylinders looked very nice and would have been fine with a standard finish hone. The engine appears to have been a very low mileage or well taken care of original.
- - - Updated - - -

- - - Updated - - -
Here is a list of things that will be done for starters.
Clean / detail / prep work on the block
Bore block at either .030 or .060 oversize depending on the results of the front 2 cylinders. The boring / honing will be done with torque plates and the main caps installed.
Square / deck the block so that the head gasket surface is properly aligned with the crankshaft and all cylinders have the same volume.
Align bore / hone the main bearing journals.
Install new one piece cam bearings and distributor gear drive bushing.
- - - Updated - - -
Then I spoke to John about installing a set of 440 source billet main caps and stud girdle when the crankshaft align boring is done. He said that since this is a HD truck block, the bottom end is sturdy enough as long as it's not driven at the track every day, and that this money spent on the girdle and main caps could be used elsewhere.
I'm still thinking about that.............. Haven't decided yet.
- - - Updated - - -

- - - Updated - - -
This is a parting shot I took of the back side of his engine assembly / dyno room. You can see the big exhaust and coolant tower. It's a very nice set up. Out of respect for other racers, I didn't want to take any pictures inside. Hope you understand. But I will say, I saw some Hemi's inside there..................
- - - Updated - - -
While the block is at the shop, I will be getting into some panel replacement. John has a good amount of work ahead of me, so I probably will not see the end results for a few weeks.
Photon440
Well-Known Member
- Local time
- 9:08 AM
- Joined
- Mar 14, 2012
- Messages
- 18,599
- Reaction score
- 34,484
- Location
- Surrey, B.C. Canada
Seems like a pretty decent facility! Just curious - you did mention that they're using torque plates and have the caps applied, but will they also be running hot water in the block while machining it?
-=Photon440=-
-=Photon440=-
myfirstcar
Member
I cant remember the person I asked about putting on my quarter panel. I think it was this thread.
Thank You!!!! It is better then I Hoped. The one thing I could not fix, was the rear curve is not the same as the trunk. Must have been the stamping.? I don't dare to try to fix it.
I'm following your thread, If I can get a link.
Oh the Durango , cool . I do all kinds of stuff like that every day.
Thank You!!!! It is better then I Hoped. The one thing I could not fix, was the rear curve is not the same as the trunk. Must have been the stamping.? I don't dare to try to fix it.
I'm following your thread, If I can get a link.
Oh the Durango , cool . I do all kinds of stuff like that every day.
71airgrabberRR
Well-Known Member
Seems like a pretty decent facility! Just curious - you did mention that they're using torque plates and have the caps applied, but will they also be running hot water in the block while machining it?
-=Photon440=-
Yes, running hot water, while standing on one foot with one eye closed and chewing bubble gum too !!!! These guys are AWESOME !!!!! LOL
I'm just kidding with you Photon. No hot water. But serious about these guys. They are good.
The coolant tower is for the dyno room. Its a part of the coolant circulation system that is used to keep the engines cool while they make their test pulls.
The main caps will be in place during the boring and honing. That's one nice thing about the Big Block Mopar engines. The caps sit deep inside the block so it can sit flat on the oil pan rails.
One some boring fixtures they actually use the main saddles to set up the block on. These guys can do it either way. I like to bore my blocks with the torque plates and main caps installed if possible. It probably doesn't really matter too much, but some (me included) say it helps to keep the metal around the cylinder walls as it would be when the engine is assembled.
Years ago we did a test with a mock up block (SB Chevy) at the shop I worked at. We didn't have the crank installed, but only bolted the heads on after it was bored.
We checked the bore before the heads were bolted on and it was straight with no run out. Then we simply bolted the heads on and checked the bore again from the bottom side using the same micrometers. With the heads bolted on it actually distorted the block by .001 of an inch.
It is OK, but torque plates really help if your looking to get the most out of your rebuild for both longevity and making power.
- - - Updated - - -
I cant remember the person I asked about putting on my quarter panel. I think it was this thread.
Thank You!!!! It is better then I Hoped. The one thing I could not fix, was the rear curve is not the same as the trunk. Must have been the stamping.? I don't dare to try to fix it.
I'm following your thread, If I can get a link.
Oh the Durango , cool . I do all kinds of stuff like that every day.
I have talked to several people about panel replacement. I don't remember if I talked to you or not, but I'm glad your car came out nice. You are right about some panels not having the same curve on the rear. I have a friend who has a 70 Chevelle SS454 car (sorry about that, no I like Chevelle's too) and he had both rear quarters replaced. After the car was painted he noticed the shop doing the work didn't take the time to make sure the bolt on end corners matched up with the replacement quarters. There is about a 1/4 inch gap there and he is not too happy !!!!
It helps to stick with a better brand name panel and test fit it with everything that bolts on / around it before hand, including window chrome if that applies. Sometimes the stampings are just not that good.
Good luck with your car. Post up some photos. I'd like to see how its coming along.
Photon440
Well-Known Member
- Local time
- 9:08 AM
- Joined
- Mar 14, 2012
- Messages
- 18,599
- Reaction score
- 34,484
- Location
- Surrey, B.C. Canada
the body of information gathered from hot honing indicates greater bore distortion is created by circulation of hot water through a block's cooling jacket than by cylinder head clamping forces
Read more: http://www.circletrack.com/enginete...on_part_prevention/viewall.html#ixzz2n2EaydHP
For your perusal...
Read more: http://www.circletrack.com/enginete...on_part_prevention/viewall.html#ixzz2n2EaydHP
For your perusal...
71airgrabberRR
Well-Known Member
Old Dog ........... a new trick !!!!!!!!!!!!!
That makes sense. I just learned something new. I never heard of that before....... (So I guess you can teach an old dog a new trick or two). Thank you.
I'll ask them about it and see if they do that as an option.
I seriously thought you were just kidding. (so was I) That's why I started out the reply the way I did.
Thanks again brother !!!!!!!!!
This is a great place here on FBBO.............
Propwash
Well-Known Member
- Local time
- 11:08 AM
- Joined
- Oct 29, 2009
- Messages
- 9,695
- Reaction score
- 4,338
- Location
- Island of Misfit Toys
Cool beans...another stroker hitting the streets. If your not going the girdle route, have you thought about installing some ARP Studs for the main caps? $60-70 in studs is pretty cheap insurance for the bottom end of your 500-550 HP motor. After doing all the research when building my stroker, I found it's not that hard to get into that 500-550HP range with a RB block. A real big factor is the heads. Get a set on there that breathes well. After that, buy stock in a tire company.
Photon440
Well-Known Member
- Local time
- 9:08 AM
- Joined
- Mar 14, 2012
- Messages
- 18,599
- Reaction score
- 34,484
- Location
- Surrey, B.C. Canada
That makes sense. I just learned something new. I never heard of that before....... (So I guess you can teach an old dog a new trick or two). Thank you.
I'll ask them about it and see if they do that as an option.
I seriously thought you were just kidding. (so was I) That's why I started out the reply the way I did.
Thanks again brother !!!!!!!!!
This is a great place here on FBBO.............
Hey...no problem. I didn't come up with the idea, just passing it on. I used to be more into the circle track magazine stuff - used to help out with a friend who was into stock car racing. Over 30 years ago I was part of the pit crew. Still remember a few things.
-=Photon440=-
71airgrabberRR
Well-Known Member
Main Bearing supports
Hey Propwash. I will definitely be using the stud package at a minimum. The jury is still out on the main bearing saddle and billet steel caps. I just haven't decided 100% for sure.
I'm going to get the 500 inch Stroker kit from 440 source. I don't want to go any bigger than that for several reasons. First off is the rod / pickup tube clearance with the larger stroke. I wanted to keep a stock internal oil pickup, but may end up opening it up from 3/8" to 1/2". If this car was going to be seriously raced then by all means it would get an external pickup for sure. My goal is to keep it looking "kind of" stock, sort of like a "Day 2" car with different things like headers, intake and valve covers.
In the beginning of this thread I posted up some pictures of a 1970 plum crazy Challenger R/T that I built for a friend about 6 years ago. His car has a stroked 440 (500 cubic inches) in it that was built by Herb McCandless. The Challenger is a real Beast. The torque from that car in unreal.
Herb told my friend that it wasn't good to go "Too Big" with the stroke and try to keep it around 500 inches or so. His reasoning behind that was he had a row of RB engines siting in his shop that had cracked blocks near the mains. He even sent us a few pictures that showed some cracks that went external above the oil pan rails.
Now I don't know how hard these engines were ran, or even how long they held up, but I try to learn from others mistakes. But this engine for the Challenger was built back in the early '90s when Indy heads were just coming available. I don't know if the main girdles were readily available then.
This thread has changed quite a bit from when I first started it. The "Stroker" engine I'm building now will go in the 72 Satellite Sebring. Its going to be my "Have Fun" car.
I am still holding on to the date code correct 440 for my 71 Road Runner that this thread was started about.
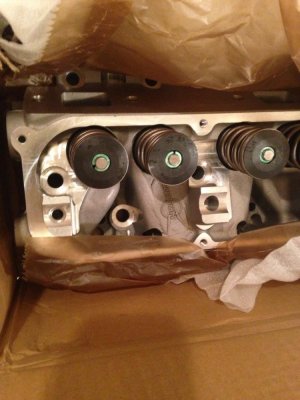
I have a new set of 440 Source "Stealth" aluminum heads that I originally bought for the 71 RR. Now it looks like they will get installed on the Stroker engine. I've been thinking about doing some mild pocket work on the ports, gasket matching the port openings, upgrading the valve springs and retainers, then CC'ing them before they are bolted on.
- - - Updated - - -
- - - Updated - - -
Thanks again Photon. Do you have any experience with RB Strokers ????
- - - Updated - - -
- - - Updated - - -
- - - Updated - - -
- - - Updated - - -
- - - Updated - - -
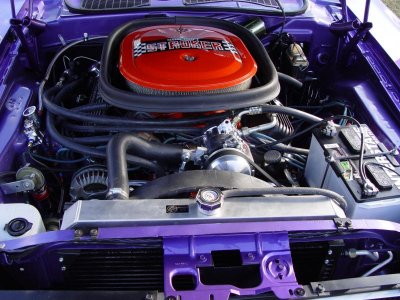
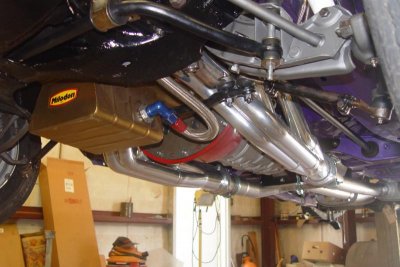
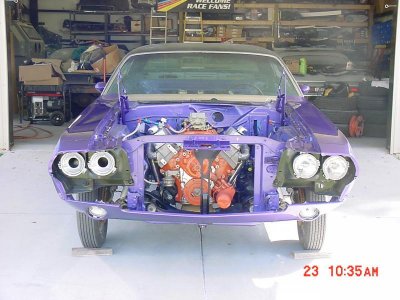
Here are a few more pictures of the Challenger during it's assembly. I ended up re routing the fuel line braided plumbing and swapped out the cast Indy valve covers for a set of MP ones.
The skinnies are not on the front any more. They were just to roll the car in / out of the shop. It has a Milodon pan with external lines and swinging pickup. TTI 3 inch exhaust, Dual Disc clutch with a Lakewood housing,
and a 6 speed manual trans!!!!
Back when we started this project in the early '90s, we were the 1st people in the US to get a 6 speed gear box for a Mopar. We had to fabricate EVERYTHING !!!!
Now its available in a kit from several sources...............
- - - Updated - - -
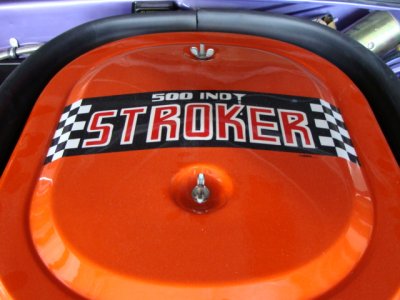
My next door neighbor is a pin stripe / air brush artist. I asked him to take the original font and style from a 440 "Six Pack" air cleaner decal and make up something cool that would be a little sneaky too......
Notice it says "500 Indy STROKER" and incorporates the INDY logo with the "valve" as a letter "Y".
I cant tell you how many times people have walked past the car looking it over and as they walk away the air cleaner hits them. Then they come back and look at it again............
I think my neighbor nailed it pretty good. Its all free hand and air brushed. I cleared over it when the art work was done.
- - - Updated - - -
The last time I did any machine work on any engine was also back in the early '90s. A lot has happened / changed since then and the aftermarket parts industry has really come a long way.
So seriously, if any of you have any experience with the 500 inch Stroker's I'd love to hear from you.
Please fell free to chime in like Photon did. I would really appreciate that. There is a wealth of knowledge here on FBBO.
Thanks.
Hey Propwash. I will definitely be using the stud package at a minimum. The jury is still out on the main bearing saddle and billet steel caps. I just haven't decided 100% for sure.
I'm going to get the 500 inch Stroker kit from 440 source. I don't want to go any bigger than that for several reasons. First off is the rod / pickup tube clearance with the larger stroke. I wanted to keep a stock internal oil pickup, but may end up opening it up from 3/8" to 1/2". If this car was going to be seriously raced then by all means it would get an external pickup for sure. My goal is to keep it looking "kind of" stock, sort of like a "Day 2" car with different things like headers, intake and valve covers.
In the beginning of this thread I posted up some pictures of a 1970 plum crazy Challenger R/T that I built for a friend about 6 years ago. His car has a stroked 440 (500 cubic inches) in it that was built by Herb McCandless. The Challenger is a real Beast. The torque from that car in unreal.
Herb told my friend that it wasn't good to go "Too Big" with the stroke and try to keep it around 500 inches or so. His reasoning behind that was he had a row of RB engines siting in his shop that had cracked blocks near the mains. He even sent us a few pictures that showed some cracks that went external above the oil pan rails.
Now I don't know how hard these engines were ran, or even how long they held up, but I try to learn from others mistakes. But this engine for the Challenger was built back in the early '90s when Indy heads were just coming available. I don't know if the main girdles were readily available then.
This thread has changed quite a bit from when I first started it. The "Stroker" engine I'm building now will go in the 72 Satellite Sebring. Its going to be my "Have Fun" car.
I am still holding on to the date code correct 440 for my 71 Road Runner that this thread was started about.
I have a new set of 440 Source "Stealth" aluminum heads that I originally bought for the 71 RR. Now it looks like they will get installed on the Stroker engine. I've been thinking about doing some mild pocket work on the ports, gasket matching the port openings, upgrading the valve springs and retainers, then CC'ing them before they are bolted on.
- - - Updated - - -


- - - Updated - - -
Thanks again Photon. Do you have any experience with RB Strokers ????
- - - Updated - - -

- - - Updated - - -

- - - Updated - - -

- - - Updated - - -

- - - Updated - - -
Here are a few more pictures of the Challenger during it's assembly. I ended up re routing the fuel line braided plumbing and swapped out the cast Indy valve covers for a set of MP ones.
The skinnies are not on the front any more. They were just to roll the car in / out of the shop. It has a Milodon pan with external lines and swinging pickup. TTI 3 inch exhaust, Dual Disc clutch with a Lakewood housing,
and a 6 speed manual trans!!!!
Back when we started this project in the early '90s, we were the 1st people in the US to get a 6 speed gear box for a Mopar. We had to fabricate EVERYTHING !!!!
Now its available in a kit from several sources...............
- - - Updated - - -
My next door neighbor is a pin stripe / air brush artist. I asked him to take the original font and style from a 440 "Six Pack" air cleaner decal and make up something cool that would be a little sneaky too......
Notice it says "500 Indy STROKER" and incorporates the INDY logo with the "valve" as a letter "Y".
I cant tell you how many times people have walked past the car looking it over and as they walk away the air cleaner hits them. Then they come back and look at it again............
I think my neighbor nailed it pretty good. Its all free hand and air brushed. I cleared over it when the art work was done.
- - - Updated - - -
The last time I did any machine work on any engine was also back in the early '90s. A lot has happened / changed since then and the aftermarket parts industry has really come a long way.
So seriously, if any of you have any experience with the 500 inch Stroker's I'd love to hear from you.
Please fell free to chime in like Photon did. I would really appreciate that. There is a wealth of knowledge here on FBBO.
Thanks.
steved033
Well-Known Member
How do those heads look? I'm considering a set.
I'm hopefully going to order pistons and rods soon too, probably from them. I'm .040 over on my 440 GTX. it's not a matching block, so i'm not too worried about building it up.
sjd
I'm hopefully going to order pistons and rods soon too, probably from them. I'm .040 over on my 440 GTX. it's not a matching block, so i'm not too worried about building it up.
sjd
Similar threads
What's it Worth
1969 Plymouth Road Runner N96 air grabber set up
- Replies
- 7
- Views
- 348
- Replies
- 4
- Views
- 481
- Replies
- 1
- Views
- 2K
- Replies
- 26
- Views
- 3K


