• When you click on links to various merchants on this site and make a purchase, this can result in this site earning a commission. Affiliate programs and affiliations include, but are not limited to, the eBay Partner Network.

DePouli's 1969 Charger 318

Looks like an 8.25 to me....always fill to the bottom level of the plug hole......

The gear submerged in fluid is whats important, not the axles.......


So it would seem I am overfull any issue with that? fluid is clean and looks like new?

So silly question why doesn't the shop manual list an 8.25 as an option or have any information on it?
 
Last edited:
Ok I have the wiring all but sorted out. The ground wire is too short so I have another one coming.

I did a much cleaner install of the pertronix than I did when I was in college. Nothing particular special just used some heat shrink and actually used terminal ends this time.

IMG_20190105_163401.jpg
 
Also filled the radiator but those OEM hose clamps leak like sieves, any trick to get them to seal up better. In the less noticeable spots I added modern hose clamps under/next to the OEM clamp
 
So it would see I am overfull any issue with that? fluid is clean and looks like new?

So silly question why doesn't the shop manual list an 8.25 as an option or have any information on it?
Just remove the drain plug and let it seep out......

It started in 69...

 
Last edited:
Also filled the radiator but those OEM hose clamps leak like sieves, any trick to get them to seal up better. In the less noticeable spots I added modern hose clamps under/next to the OEM clamp
Where did you buy your clamps from? I hate to ask because I can probably guess......

It could be a combination of the clamp and hose......or the hose......

I place some perma tex Indian head gasket maker around where the hoses attach........
 
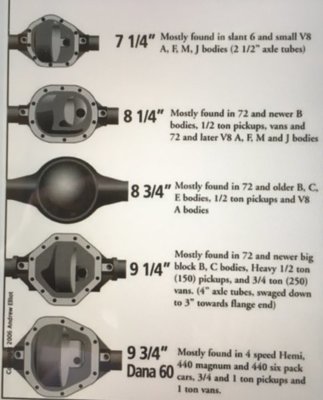
I was reminded as I went to fill the rear axle that I have no idea what axle I have.

See the photo in terms shop manual of the three types.
View attachment 700823
Then see I have no fill hole on the cover.
View attachment 700825
I do have one on the side (which grease came out of when I opened and seems awfully low relative to the tubes.

View attachment 700827

Build sheet has a 640 code for the axle, when Wayne Wooten of the Charger Registry decoded it he said that it is a 2.76 gear in an 8.25 axle. But an 8.25 axle isn't even in the shop manual.

So what exactly do I have and what's the proper fill amount/location?

Admire your progress. Re the rear axle, if it helps with future reference, attached a copy of a guide I came across on the forum awhile back....

5D78A39E-6F2D-4B85-AD96-2AB556E0CBBB.jpeg
 
Cap, plugs and wires, mostly on. I need to find #1 TDC so I can attach them to the cap.

IMG_20190105_095052.jpg
IMG_20190105_165427.jpg
IMG_20190105_165431.jpg
 
Last edited:
Where did you buy your clamps from? I hate to ask because I can probably guess......

It could be a combination of the clamp and hose......or the hose......

I place some perma tex Indian head gasket maker around where the hoses attach........

YearOne...

Ok I will try that trick Thanks.
 
Brian, are you using the correct tool to install the OEM clamps? Once in place you need to rock them around and then I always put the tool between the clamps "ears" and pull it open with both hands to force the clamp down into the rubber hose.
 
Brian, are you using the correct tool to install the OEM clamps? Once in place you need to rock them around and then I always put the tool between the clamps "ears" and pull it open with both hands to force the clamp down into the rubber hose.

I am using the one i bought from YearOne I don't think it is like what you described or the OEM special tool
 
I've seen guys use channel locks.. me included... and it's not the way to do them. Sounds like you have a proper tool to hold the ears correctly when spreading onto the hose. Never spread more than you need to get it over the "hump" and into place and then you need to make sure the ends are as close to each other as you can get when you release. Then just put the tool arms between the ears and use the back side of the arms to tighten the clamp into the rubber by pulling out on the handles.
 
Justin's trick seems to have worked on the worst leaker (the upper rad hose at the rad), but I did get another tool to help tighten the clamp some more as @dadsbee suggested just to be sure.
 
Ok got back on the steering column tonight.

With the help of my little camera scope thing I got for Xmas if it it all back together

IMG_20190105_201110.jpg
IMG_20190105_201115.jpg
 
I've seen guys use channel locks.. me included... and it's not the way to do them. Sounds like you have a proper tool to hold the ears correctly when spreading onto the hose. Never spread more than you need to get it over the "hump" and into place and then you need to make sure the ends are as close to each other as you can get when you release. Then just put the tool arms between the ears and use the back side of the arms to tighten the clamp into the rubber by pulling out on the handles.
Glad you pointed this out Wayne.....I wipe a little silicone on the hose end and apply the slightest pressure to back the clamp over the hump.......

The year ones are made of the typical cheap metal and they don't spring back well at all......
 
So, I need some help this AM on Gas pedal mounting hole locations and apparently I am not the only one. When I had the drivers side floor board replace the shop failed to replicate the mount holes in the floor board when they put in the patch panel. I was speaking with @dadsbee about it and he apparently had the same thing happen. he has his old carpet to use for template but I do not. So does anyone have photos of these holes with good points of reference or even measurements so I can finish one of these last things that require my attention under body. Thanks.
 
There is not much that I do not have a reference of Brian......just an fyi....

I would not rely on the carpet as a true reference.......Below is measurements form my charger. This car retained all original sheetmetal. I gave the info below and pics to the body shop that replaced that section in the GTX.....Can you guess who had to put the holes in?

Gas Pedal
1. Outer hole(towards driver door) from inside edge of frame rail to center is roughly 8 1/8-1/4(between)
2. Inner hole towards trans tunnel 9 5/8-3/4(between)
3. Both holes from inside of trans crossmember brace are 10 3/4

DSC03751.JPG
DSC03753.JPG
DSC03754.JPG
DSC03755.JPG
DSC03756.JPG
 
Auto Transport Service
Back
Top