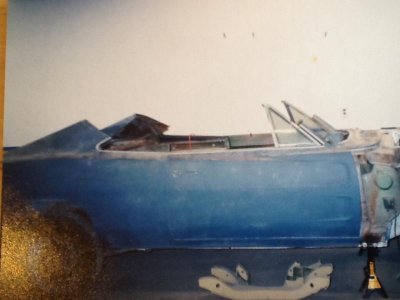
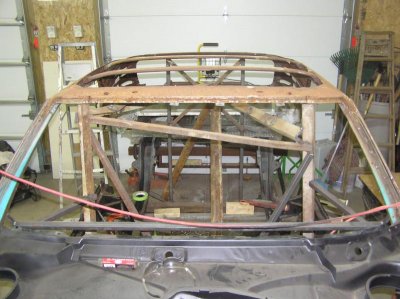
Not surprised but at least I one upped you on something (I removed the whole entire roof) haha. You better buy stock in welding wire cause your gonna need allot of it.
You are using an out of date browser. It may not display this or other websites correctly.
You should upgrade or use an alternative browser.
You should upgrade or use an alternative browser.
Don's 1969 Charger Restoration
- Thread starter mopar4don
- Start date
CharGer
Well-Known Member
I just bought a set of drip rails so thanks Don, now I know what I'm in for. I'm tired just thinking about it.
Coronet66JJ
Active Member
there is a thread for a restoration on a 69 six pack RR that I have been following . The guy doing the work is a professional and very helpful with questions. I learned a lot about proper welding skills and surface prep after the welding is done in order to prevent the new welds from rusting out. It seems that the heat caused by welding actually weakens the metal and can cause cracking adjacent to the welds if not done carefully. Good luck to you on this ambitious project, Don.
Darius
Well-Known Member
mopar4don
Well-Known Member
747, WOW, now this is an interesting picture! How in the world did you get the roof off without messing up the quarters? And the same thing up front with the a-pillars. Looks like you just sliced them just below the top of the vent wings! WOW, I love seeing how guys do this!Ok maybe I didn't, here's a pic of the roof surgery on mine. I don't even think this pic is on my thread but the vinyl top rotted out the front and rear window openings. Replacing it all was probably allot easier than just the skin.View attachment 173529
Coronet66JJ, I'm interested. Do you have the link?there is a thread for a restoration on a 69 six pack RR that I have been following . The guy doing the work is a professional and very helpful with questions. I learned a lot about proper welding skills and surface prep after the welding is done in order to prevent the new welds from rusting out. It seems that the heat caused by welding actually weakens the metal and can cause cracking adjacent to the welds if not done carefully. Good luck to you on this ambitious project, Don.
Thanks Darius!I feel your pain Bro!
View attachment 173540
I think I spent about $500 on spot weld cutters and use 2 1/2 rolls of wire. Just know it is sooooo worth it when done from a personal accomplishment perspective.
It's actually pretty easy to get it off this way, just drill out all of the factory spot welds inside and out where the quarters stop and it slides right out. When I did the pillars I wasn't sure whether or not I was going to pull the cowl so I just butt welded them leaving a 1/16" gap for a 100% fill weld. Go figure I later pulled the cowl and replaced it too but the roof I bought didn't go all the way down anyways. I feel for you, mine was pretty bad up top and in the trunk but otherwise was a really solid car only needing some minor pin holes welded shut in the floor boards. Like you I blasted it all and used Epoxy Primer to seal it up "good stuff". Love your thread, hard for me to gripe after seeing what your having to do.
69 Charger RT/SE
Well-Known Member
there is a thread for a restoration on a 69 six pack RR that I have been following . The guy doing the work is a professional and very helpful with questions. I learned a lot about proper welding skills and surface prep after the welding is done in order to prevent the new welds from rusting out. It seems that the heat caused by welding actually weakens the metal and can cause cracking adjacent to the welds if not done carefully. Good luck to you on this ambitious project, Don.
Yes Coronet66JJ, please give us a link to this build.
mopar4don
Well-Known Member
Looks like some nice neat work you did getting that off! Some por-15 maybe! I seen you want to buy stock in the Blair spot weld cutters, they do work good! I see they changed them since i last bout some, my last ones had like a nail in the middle to hold them in place and the new ones i just got have a drill bit deal, hopefully better! Great work your doing bud!!
What a ridiculous amount of spot welds that had to of been, are you putting them back on or leaving it shaved of the drip rails. So, how long until you start going forward instead of backwards.......you know......putting it back together?
Propwash
Well-Known Member
- Local time
- 10:35 PM
- Joined
- Oct 29, 2009
- Messages
- 9,695
- Reaction score
- 4,338
- Location
- Island of Misfit Toys
View attachment 175942
They made a Charger convertible?
Quick question fella's, seems like a good time to ask. To remove just the roof skin, would one need to remove all of that drip rail panels to do so? Never done a roof skin myself (just patches), and I will being doing one in the real soon future on a dart.
They made a Charger convertible?
Quick question fella's, seems like a good time to ask. To remove just the roof skin, would one need to remove all of that drip rail panels to do so? Never done a roof skin myself (just patches), and I will being doing one in the real soon future on a dart.
mopar4don
Well-Known Member
Roof SURPRISE!
After I removed the roof I found something interesting.
I actually noticed it while taking this picture!
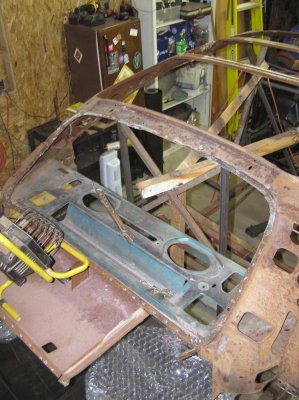
Do you see it?
It's laying in the upper rear roof bow.
Go ahead look again!
Ok here is a better picture


Apparently someone was fixing the car and had a little trouble.....:buffer:
and decided to leave some tools of the trade.
- - - Updated - - -
Here is the replacement roof and a-pillars I picked up last summer.
Not sure yet if I am going to de-skin it or try to morph it in.
Right now I am leaning on de-skining it.
Any thoughts?


After I removed the roof I found something interesting.
I actually noticed it while taking this picture!

Do you see it?
It's laying in the upper rear roof bow.
Go ahead look again!
Ok here is a better picture


Apparently someone was fixing the car and had a little trouble.....:buffer:
and decided to leave some tools of the trade.
- - - Updated - - -
Here is the replacement roof and a-pillars I picked up last summer.
Not sure yet if I am going to de-skin it or try to morph it in.
Right now I am leaning on de-skining it.
Any thoughts?


CharGer
Well-Known Member
Not knowing how solid it is, de-skinning it would ensure that all surfaces can be cleaned up and primered before putting on a new roof skin. It has to be the better way to go compared to what you have, just sayin. I say go for it.
mopar4don
Well-Known Member
Patching the Roof Support on the passenger side
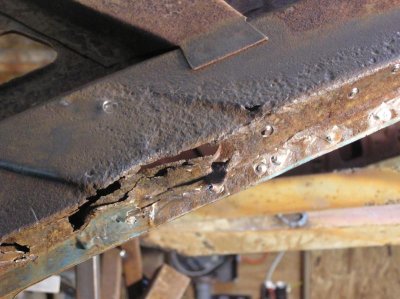
I took some reference pictures of the rust damage on the passenger side roof support.
This would be in the back sde rear window corner.
Roof 2 quarter panel bracket
The quarter panel gets welded to this.

Had 2 remove it to fix the nasty metal under it!
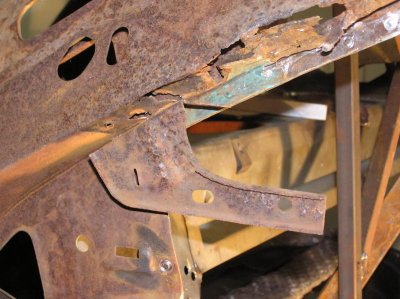

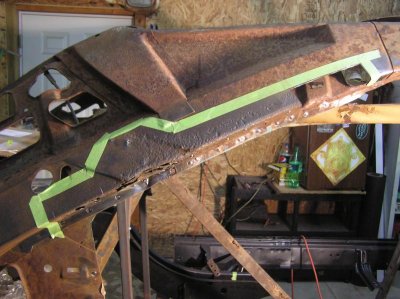
Then I used tape to layed out where I wanted to remove the heavily pitted and rotten metal
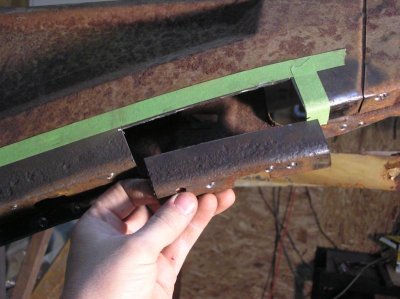
And cut out my 1st patch for this area
Took the patch and flattened it out, then transfered it to some new metal.
I went back and forth cutting and fitting the patch to the opening I had cut out.
Actually the new metal for all of the patches came from the roof I cut off. It is the same thickness.
I checked it with a micrometer.
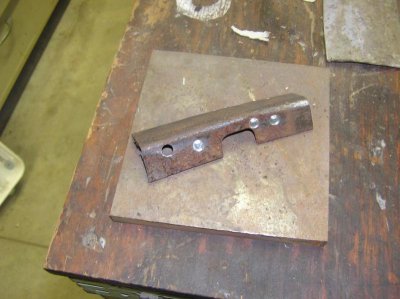

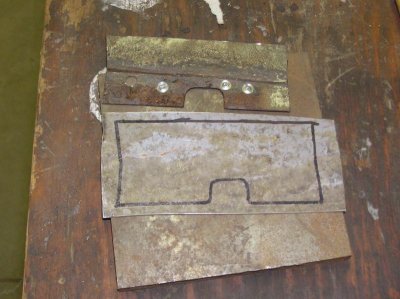
Notice the line representing were the bend needs to be
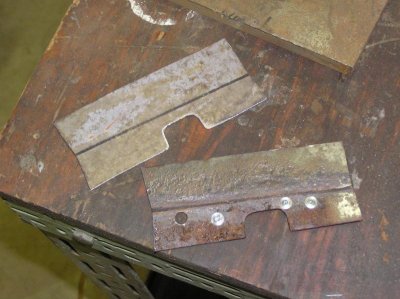
I put it in my vise aligning the marked line to the vise jaws.
I then hammered it over to create the 90 degree bend. (sorry no pictures)
Finally got it to were it looked pretty good!

Then welded it in!
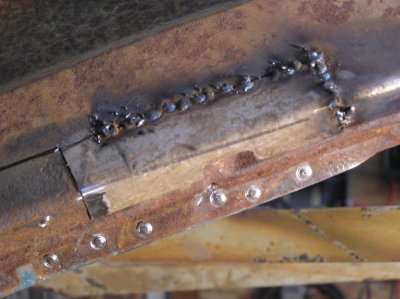
Don't turn that dial!
Tune in again on this same BAT channel for more sheetmetal surgery!
View attachment 179473


I took some reference pictures of the rust damage on the passenger side roof support.
This would be in the back sde rear window corner.
Roof 2 quarter panel bracket
The quarter panel gets welded to this.

Had 2 remove it to fix the nasty metal under it!


Then I used tape to layed out where I wanted to remove the heavily pitted and rotten metal

And cut out my 1st patch for this area

Took the patch and flattened it out, then transfered it to some new metal.
I went back and forth cutting and fitting the patch to the opening I had cut out.
Actually the new metal for all of the patches came from the roof I cut off. It is the same thickness.
I checked it with a micrometer.


Notice the line representing were the bend needs to be

I put it in my vise aligning the marked line to the vise jaws.
I then hammered it over to create the 90 degree bend. (sorry no pictures)
Finally got it to were it looked pretty good!

Then welded it in!

Don't turn that dial!
Tune in again on this same BAT channel for more sheetmetal surgery!
View attachment 179473


- Local time
- 10:35 PM
- Joined
- Feb 20, 2012
- Messages
- 75,264
- Reaction score
- 290,035
- Location
- New Hampster
Ok maybe I didn't, here's a pic of the roof surgery on mine. I don't even think this pic is on my thread but the vinyl top rotted out the front and rear window openings. Replacing it all was probably allot easier than just the skin.View attachment 173529
http://www.youtube.com/watch?v=YGxCZ8dsr3M
Similar threads
- Replies
- 2
- Views
- 216
- Replies
- 5
- Views
- 527
- Replies
- 5
- Views
- 356
- Replies
- 18
- Views
- 510

