You are using an out of date browser. It may not display this or other websites correctly.
You should upgrade or use an alternative browser.
You should upgrade or use an alternative browser.
Family Tradition
- Thread starter Propwash
- Start date
satman72
Well-Known Member
- Local time
- 1:17 AM
- Joined
- Oct 14, 2012
- Messages
- 2,499
- Reaction score
- 1,447
- Location
- Stoney Creek, Ontario
I'm gona guess 547 hp, 598 torques.
Propwash
Well-Known Member
- Local time
- 12:17 AM
- Joined
- Oct 29, 2009
- Messages
- 9,710
- Reaction score
- 4,327
- Location
- Island of Misfit Toys
will; help me here would ya. lol save me going back a 100 pages to look, do you have a pic of the headers before they coated them. it looks like a first class job and reasonable price for never having to do them again. win-win. actually its not that you are going to drive it hard and heat them way up. lol
- - - Updated - - -
we should start a pool going on the h-p number from the dyno. a sub-pool for the torque. thought! the wager would be a c-d of each others favorite shop music.
just thinking out loud.
That's a great idea shag! Here's some music for you while you make your guess...One dollar Bob, 1 Dollar.
[video=youtube;13tnjh3dZw4]http://www.youtube.com/watch?v=13tnjh3dZw4[/video]
Only good pic of the headers beforehand would be just a couple pages back..A guy spends that much on a set of headers, shouldn't have to worry about them a couple years down the road, that's why I didn't wan't to mess around and just got it done. Plus cooler under the hood temps and around the starter as well as horsepower gains due to better exhaust flow and scavenging.
Last edited:
wannadrag
Well-Known Member
Thanks guys. Lil' fink will be looking out the rear window Tallhair. Cost was $250 total for the Ceramic. Jay, B & B Racing will be doing the Dyno.
Will,if you ever have another one to dyno my buddy in Waupaca has a engine dyno.Has a small shop near Fleet Farm does a crap load of work there.Its older but works well,came from Nickerson&Volden Racing out of Milwaukee when they upgraded
Propwash
Well-Known Member
- Local time
- 12:17 AM
- Joined
- Oct 29, 2009
- Messages
- 9,710
- Reaction score
- 4,327
- Location
- Island of Misfit Toys
Will,if you ever have another one to dyno my buddy in Waupaca has a engine dyno.Has a small shop near Fleet Farm does a crap load of work there.Its older but works well,came from Nickerson&Volden Racing out of Milwaukee when they upgraded
I think I know the guy you're talking about....On that service road that runs from the backside of Fleet Farm over to Churchill Street? I heard he has a 5 Gas Diagnostic...Pretty sure I seen a '70 Roadrunner in primer on a rotisserie in front of the place last summer for sale, if that's the place you're talking about.
roadrunnerman
Well-Known Member
I'll say 550 hp and 620 ft-lbs
Finallygotmine
Well-Known Member
- Local time
- 1:17 AM
- Joined
- Mar 9, 2011
- Messages
- 597
- Reaction score
- 225
- Location
- Venice Fla./Eagle River Wi.
I'm going with 578HP and 605 TQ.
Ron 73
Deceased, But not forgotton
Propwash
Well-Known Member
- Local time
- 12:17 AM
- Joined
- Oct 29, 2009
- Messages
- 9,710
- Reaction score
- 4,327
- Location
- Island of Misfit Toys
Thanks for the guesses guys......Keep'em coming! Not too long and we'll see. I'll Mail you over a pic Ron. I plan on leaving plenty of autographs on the local city streets..lol Good to see you Daryn!
So been crackin at the bird pretty hard..real hard. Dropped the tank and welded in a -6AN bunn for my return line. Changed out a leaky rear wheel cylinder (brand new) and re-bleed the brakes, routed and wired some plumbing for the amp/stereo, other odds and ends and the real meat and potato's...........
You guys like Apples?? How about these apples....................!!!
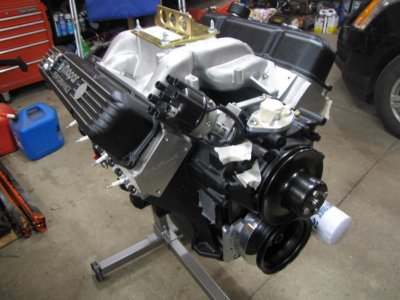
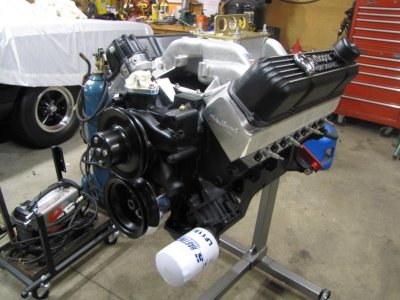
The eagle has landed.....Picked up the 512 shortblock from the machine shop Saturday afternoon. Worked on assembling the top end and the rest of the engine, on top of all the other stuff Saturday night, Sunday and part of tonight. Everything went together real smooth, better than expected. Only thing that slowed me up was setting the valves off the roller rockers (what can I say, I'm not a chevy guy!), and the sticker shock of fel-pro 1009 headgaskets. Just about there for staging for Dyno...real close!!! Going down to the speed shop to set up an appointment with the owner tomorrow. Stoked!
Another present showed up Saturday......The custom Billet Aluminum 512 emblems. They turned out absolutely fantastic IMO. Very high level of quality. I would recommend the folks that did these to anyone. Working Joe's like you and me, doing this as a side thing. Thanks again for all your input on these. The folks here on this thread all put in their 2 cents and we changed this and that to come up with an awesome emblem. Thanks Guys!!!! I just set them on the side of the air grabbers for the pic. I won't mount them until the hood is re-installed after the engine is in.


A little tech write up on installing the -AN fitting install. Nothing major, but havn't done one in a while. A couple jokers at another site said MIG welding a bunn into a regular fuel tank wasn't possible, I would just burn through like butter. Well......that made me want to weld one in even more!
So, I'm running a Bypass fuel regulator for a few reasons. 1) Cooler fuel. 2) Quicker response to changing conditions 3) choke out vapor lock issues 4) In general, a better regulated/stabile fuel system. The little 1/4" return port on the sending unit wasn't going to cut it. Most recommend the same size return line, if not larger. Being i'm running Stainless braided line and AN fittings all the way to the front and back, I went with a -6AN Bunn fitting for the return.
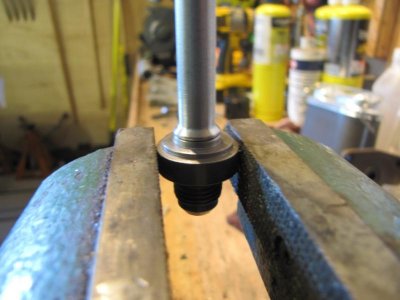
I bought a 18" chunk of 3/8" pre-flared line, cut to 9" and welded to the backside of the fitting. I used the flared side because it cups over the the inside of the AN fitting. Using the cut side I would loose some inner diameter, especially if the weld penetrated too far into the inside of the tube.
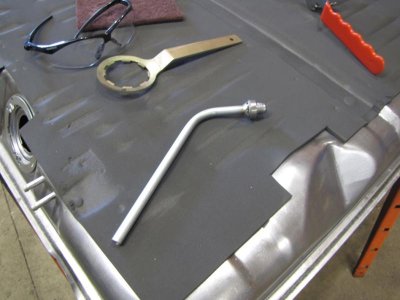
Next I bent the line. I did not want the fuel shooting straight back and turning the fuel tank into a Jacuzzi. I also didn't want it shooting straight down and boiling the fuel up like a cauldron....Hence the bend.
Drilled the hole and marked the straight up and down 12 o'clock position on the bunn. When going to weld it on I wanted the fuel to come out not only a 45* to the bottom of the tank, but also about a 45* to the side of the tank. Just to keep the agitation down. Those marks let me dial in the correct angle.
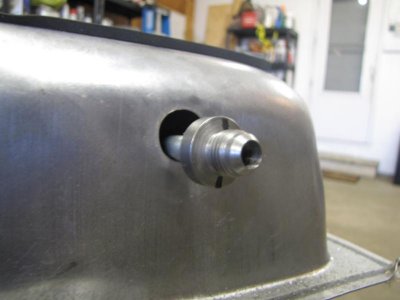
So.....can't be MIG welded eh? Hope one of the guys that was preaching that likes the picture below..I do! It was done with a Millermatic MIG welder and .030 wire!

Being this fitting is obviously subject to leaking fuel, I wanted to make real sure it doesn't leak. One way to do that is backgrind the weld. Pretty common practice out there in the real world when it comes to any kind of Code welding for pressure vessels, critical systems or something holding nasty/explosive liquids. Backgrinding into the weld will open up any kind of porosity (gas holes), undercut, fusion issues or other issues not seen by the naked eye. Kind of an insurance policy. So, wrapped the threads (wouldn't want to turn a fairly easy job into a real PIA job with a slip of a die grinder) and ground the cap back down.
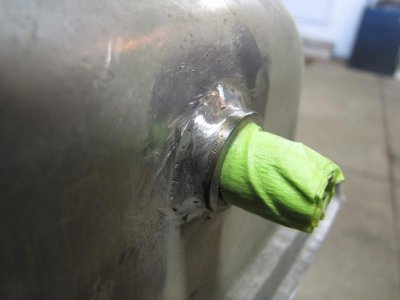
Everything looked pretty good so I welded up another pass, background/cleaned up the weld a bit and coated with some Zinc based weld thru primer (being I removeD the galvanized coating in the area for better arc). Coated with rust bullet after that.

All said and done, I hooked up my 6HP Shop-Vac and sucked anything I could out of the inside of the tank. Worked pretty well because the tank popped in about 25% (had to reverse it to pop it back out..lol). I also dumped in about a half a gallon of mineral spirits, sloshed it around and dumped. Tank is nice and clean inside, better than when I got it.
Kind of a pretty small task, but wanted to show it can be done, and easily for that matter. The benefits of running a return line are non arguable. It's simply a good system to run. So..Hope it helps someone out someday.
So been crackin at the bird pretty hard..real hard. Dropped the tank and welded in a -6AN bunn for my return line. Changed out a leaky rear wheel cylinder (brand new) and re-bleed the brakes, routed and wired some plumbing for the amp/stereo, other odds and ends and the real meat and potato's...........
You guys like Apples?? How about these apples....................!!!


The eagle has landed.....Picked up the 512 shortblock from the machine shop Saturday afternoon. Worked on assembling the top end and the rest of the engine, on top of all the other stuff Saturday night, Sunday and part of tonight. Everything went together real smooth, better than expected. Only thing that slowed me up was setting the valves off the roller rockers (what can I say, I'm not a chevy guy!), and the sticker shock of fel-pro 1009 headgaskets. Just about there for staging for Dyno...real close!!! Going down to the speed shop to set up an appointment with the owner tomorrow. Stoked!
Another present showed up Saturday......The custom Billet Aluminum 512 emblems. They turned out absolutely fantastic IMO. Very high level of quality. I would recommend the folks that did these to anyone. Working Joe's like you and me, doing this as a side thing. Thanks again for all your input on these. The folks here on this thread all put in their 2 cents and we changed this and that to come up with an awesome emblem. Thanks Guys!!!! I just set them on the side of the air grabbers for the pic. I won't mount them until the hood is re-installed after the engine is in.


A little tech write up on installing the -AN fitting install. Nothing major, but havn't done one in a while. A couple jokers at another site said MIG welding a bunn into a regular fuel tank wasn't possible, I would just burn through like butter. Well......that made me want to weld one in even more!
So, I'm running a Bypass fuel regulator for a few reasons. 1) Cooler fuel. 2) Quicker response to changing conditions 3) choke out vapor lock issues 4) In general, a better regulated/stabile fuel system. The little 1/4" return port on the sending unit wasn't going to cut it. Most recommend the same size return line, if not larger. Being i'm running Stainless braided line and AN fittings all the way to the front and back, I went with a -6AN Bunn fitting for the return.
I bought a 18" chunk of 3/8" pre-flared line, cut to 9" and welded to the backside of the fitting. I used the flared side because it cups over the the inside of the AN fitting. Using the cut side I would loose some inner diameter, especially if the weld penetrated too far into the inside of the tube.

Next I bent the line. I did not want the fuel shooting straight back and turning the fuel tank into a Jacuzzi. I also didn't want it shooting straight down and boiling the fuel up like a cauldron....Hence the bend.

Drilled the hole and marked the straight up and down 12 o'clock position on the bunn. When going to weld it on I wanted the fuel to come out not only a 45* to the bottom of the tank, but also about a 45* to the side of the tank. Just to keep the agitation down. Those marks let me dial in the correct angle.

So.....can't be MIG welded eh? Hope one of the guys that was preaching that likes the picture below..I do! It was done with a Millermatic MIG welder and .030 wire!

Being this fitting is obviously subject to leaking fuel, I wanted to make real sure it doesn't leak. One way to do that is backgrind the weld. Pretty common practice out there in the real world when it comes to any kind of Code welding for pressure vessels, critical systems or something holding nasty/explosive liquids. Backgrinding into the weld will open up any kind of porosity (gas holes), undercut, fusion issues or other issues not seen by the naked eye. Kind of an insurance policy. So, wrapped the threads (wouldn't want to turn a fairly easy job into a real PIA job with a slip of a die grinder) and ground the cap back down.

Everything looked pretty good so I welded up another pass, background/cleaned up the weld a bit and coated with some Zinc based weld thru primer (being I removeD the galvanized coating in the area for better arc). Coated with rust bullet after that.

All said and done, I hooked up my 6HP Shop-Vac and sucked anything I could out of the inside of the tank. Worked pretty well because the tank popped in about 25% (had to reverse it to pop it back out..lol). I also dumped in about a half a gallon of mineral spirits, sloshed it around and dumped. Tank is nice and clean inside, better than when I got it.
Kind of a pretty small task, but wanted to show it can be done, and easily for that matter. The benefits of running a return line are non arguable. It's simply a good system to run. So..Hope it helps someone out someday.
Last edited:
Finallygotmine
Well-Known Member
- Local time
- 1:17 AM
- Joined
- Mar 9, 2011
- Messages
- 597
- Reaction score
- 225
- Location
- Venice Fla./Eagle River Wi.
Man, those emblems turned out great. As always your knowledge and workmanship is top notch. Looks fantastic Will!!
satman72
Well-Known Member
- Local time
- 1:17 AM
- Joined
- Oct 14, 2012
- Messages
- 2,499
- Reaction score
- 1,447
- Location
- Stoney Creek, Ontario
Hey Will; 
Seriously... That's some great work. I hope some day that I get to see Skeletor in person.
Seriously... That's some great work. I hope some day that I get to see Skeletor in person.
- Local time
- 12:17 AM
- Joined
- Jan 1, 2013
- Messages
- 8,050
- Reaction score
- 3,466
- Location
- Mascoutah, Illinois
WOW! Wil. That's a whole lot of awesomeness packed into one post. It all looks top notch and of course the 512 emblems rock. Thanks.
northerndave
Well-Known Member
Doooooood, Everything looks awesome!
Your tires, it's so sad, the poor back tires.. they just don't know what they are getting themselves into.
:blob1:
Your tires, it's so sad, the poor back tires.. they just don't know what they are getting themselves into.
:blob1:
sublimegtx
Well-Known Member
The engine looks fantastic black, and the 512's came outgreat also. You can tell it says 512 easily. of course you're gonna be moving so fast that no one's gonna be able to read them. 
Propwash
Well-Known Member
- Local time
- 12:17 AM
- Joined
- Oct 29, 2009
- Messages
- 9,710
- Reaction score
- 4,327
- Location
- Island of Misfit Toys
Thanks Guys!! Glad you like it. Daryn, you'll have to update me on your bird. Hopefully she's rolling along good. Sick of sanding yet Joel?..lol
Thanks man.......Thought about tossing in some 3.23's and running coast to coast down, maybe next year. Might have to cross a border to the north and hang out with you crazy cats up there.
Thanks Dave.........The tires, what can I say. Gonna look like black shredded kitty litter all over the pavement.
Thanks Sublime....You know, there's a couple brothers rolling around town here harassing literally everyone with their cute matching pair of hugger orange camaro's. I really hope they get a good look at the 512 on the hood, because after that all they're going to see is their ego's deflating while watching the birds tail lights disappear. Hehehehehe.
Hey Will;
Seriously... That's some great work. I hope some day that I get to see Skeletor in person.
Thanks man.......Thought about tossing in some 3.23's and running coast to coast down, maybe next year. Might have to cross a border to the north and hang out with you crazy cats up there.
Doooooood, Everything looks awesome!
Your tires, it's so sad, the poor back tires.. they just don't know what they are getting themselves into.
:blob1:
Thanks Dave.........The tires, what can I say. Gonna look like black shredded kitty litter all over the pavement.
The engine looks fantastic black, and the 512's came outgreat also. You can tell it says 512 easily. of course you're gonna be moving so fast that no one's gonna be able to read them.
Thanks Sublime....You know, there's a couple brothers rolling around town here harassing literally everyone with their cute matching pair of hugger orange camaro's. I really hope they get a good look at the 512 on the hood, because after that all they're going to see is their ego's deflating while watching the birds tail lights disappear. Hehehehehe.
satman72
Well-Known Member
- Local time
- 1:17 AM
- Joined
- Oct 14, 2012
- Messages
- 2,499
- Reaction score
- 1,447
- Location
- Stoney Creek, Ontario
northerndave
Well-Known Member
Firestone cheater slicks with the pie crust edge and a wide, wide, wide white wall!!! Yeeeeaaaahhhh!!!
Wait.... No that's for my 51 ford 2 dr shoebox with a thunderbird FE and toploader 4 speed.... Never mind, I get confused so easily in my current mental state.
:toothy6:
LMAO!
Wait.... No that's for my 51 ford 2 dr shoebox with a thunderbird FE and toploader 4 speed.... Never mind, I get confused so easily in my current mental state.
:toothy6:
LMAO!
Gpuller
Well-Known Member
Firestone cheater slicks with the pie crust edge and a wide, wide, wide white wall!!! Yeeeeaaaahhhh!!!
Wait.... No that's for my 51 ford 2 dr shoebox with a thunderbird FE and toploader 4 speed.... Never mind, I get confused so easily in my current mental state.
:toothy6:
LMAO!
What is this "Ford" stuff you speak of? Time to crack the shop door!
Similar threads
- Replies
- 9
- Views
- 663
- Replies
- 107
- Views
- 7K
- Replies
- 43
- Views
- 3K


