Nice! 
You are using an out of date browser. It may not display this or other websites correctly.
You should upgrade or use an alternative browser.
You should upgrade or use an alternative browser.
Hawk-Rod: The Restoration
- Thread starter HawkRod
- Start date
Thanks for posting the pics, I've never seen them mounted there but I really like that. That routing would never work for mine though because my alternator (100 amp) already slips the belt if it's not kept really tight. I might have to look into something like that if I can figure out how to make it work without the belts slipping.
Thanks for posting the pics, I've never seen them mounted there but I really like that. That routing would never work for mine though because my alternator (100 amp) already slips the belt if it's not kept really tight. I might have to look into something like that if I can figure out how to make it work without the belts slipping.
Interesting. I put a 60 amp unit on my car, so we will have to see if I have problems with slippage; obviously, I won't know until I run it. Of course, this whole setup looks ripe for a serpentine belt upgrade - I honestly don't like having three separate belts to monitor, and the alternator belt is really short too.
Assuming it works, the layout is awesome because it does a great job of hiding the compressor and doesn't detract from my air grabber setup...
Hawk
Edit: So in thinking about this - if I have problems with slippage, then it might be appropriate to go to a Mopar two belt drive pulley, and see if I can drive both the AC compressor and a dual belt alternator. Of course that will be a project for another day...
I'm guessing your alternator won't be as bad being a 60 amp but your right I like the hidden look apposed to being on top much better. I did get the 2 groove alternator but because of my pulleys I can't put 2 belts on it (didn't want to spend the money on pulleys until the A/C went on if you know what I mean). Definitely going to try to make it work cause I like it!
bobtile
Well-Known Member
Great job on all the smaller stuff you're working on Hawk. The car is really coming together. It's going to be beautiful when it's done. Tell Mark I said hello and his repair on my car is working great. Even though I keep on stressing it more and more every week. Keep up the great work and informative posts.
Great job on all the smaller stuff you're working on Hawk. The car is really coming together. It's going to be beautiful when it's done. Tell Mark I said hello and his repair on my car is working great. Even though I keep on stressing it more and more every week. Keep up the great work and informative posts.
Thanks Bob. I am really looking forward to my trip next year, and this car is my dream car to use on the trip. No, it won't be perfect, but it will be a driver that hopefully is nice and handles well. Apex is doing great job on my car so far, and I am happy to have them be partners in helping me achieve my dream.
The great thing about this hobby is all the great people you meet along the way. Hopefully I'll have a few more people I can call friends when this is all done, and Mark and Tom are two of them!
Glad you are enjoying the posts - I have a lot of work ahead of me, but I am excited about the potential finished product. Let's hope it is decent!
Hawk
- Local time
- 5:21 PM
- Joined
- Jul 17, 2008
- Messages
- 26,641
- Reaction score
- 83,383
- Location
- South Jersey USA
sorry guys..... been a while........ lots going on
today was a pretty big day....... been nibblin around the edges and in the trunk and under hood for a few weeks, doing all the little stuff that goes unnoticed..... unless of course, it gets skipped over.... then everyone sees it.
today we buried a few hundred hours of painful labor under a nice layer of epoxy primer........ spending so much time before this step is really gonna payoff as it wont need a whole lot to be paint ready....... hope to paint the trunk area and under hood very soon...... the other panels have been this far for a few months....... yes Hawk, there really is a light at the end of the tunnel!
Absolutely, friggin' AWESOME!!!!
Soon: :3gears:
- Local time
- 5:21 PM
- Joined
- Jul 17, 2008
- Messages
- 26,641
- Reaction score
- 83,383
- Location
- South Jersey USA
you like these little surprises, dont you  ccasion16:
I worked on the dash this weekend, getting the now re-keyed glove box painted and put back together, as well as assembling most of the dash.
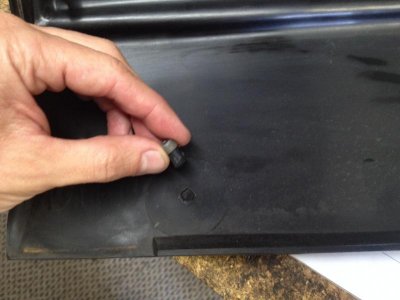
Cleaning the back of the glove box door and the one stud broke off. I swear I barely touched it!!! So I had to glue that back on - extra time :angryfire:
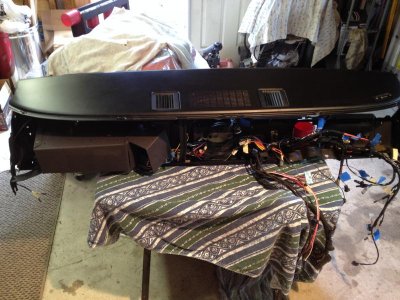
It may just look like a mess here, but I spent a lot of time getting all the wiring and components back into the dash where they belonged. I also installed the speaker for the eventual radio, although the radio won't be ready for a few months. The dash will have to be installed without it.
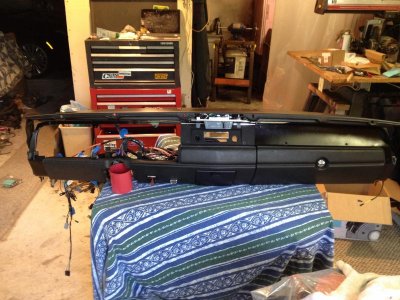
Here is the front of the dash. I haven't received my instrument cluster back, and I need to restore or replace my bezels. Finally, I need to replace my dash pad. I bought a restoration dash pad and it is terrible. I plan to return it and order another one. Besides that stuff, the dash is ready...
Cleaning the back of the glove box door and the one stud broke off. I swear I barely touched it!!! So I had to glue that back on - extra time :angryfire:

It may just look like a mess here, but I spent a lot of time getting all the wiring and components back into the dash where they belonged. I also installed the speaker for the eventual radio, although the radio won't be ready for a few months. The dash will have to be installed without it.

Here is the front of the dash. I haven't received my instrument cluster back, and I need to restore or replace my bezels. Finally, I need to replace my dash pad. I bought a restoration dash pad and it is terrible. I plan to return it and order another one. Besides that stuff, the dash is ready...

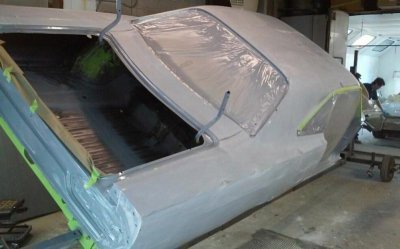
More Body Progress
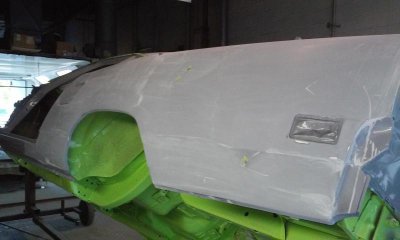
Mark sent me a couple of pictures - he is sanding his a$$ off and probably has worn his fingers to nubs... :notworthy:
The body project is entering the final phase of sanding before she gets her final coat of bright green FJ5 paint, just like she originally wore!
It is getting exciting! Can this crazy idea of having it ready for the trip by March next year actually happen??? Just maybe! Soon it will be on my unprofessional shoulders to get all the pieces put together. :surprised-005:


Redhorse719
Well-Known Member
It won't be long!
69RRGTX
Well-Known Member
She is looking great Hawk!!! Looks like she will be heading home soon.
-Mark
-Mark
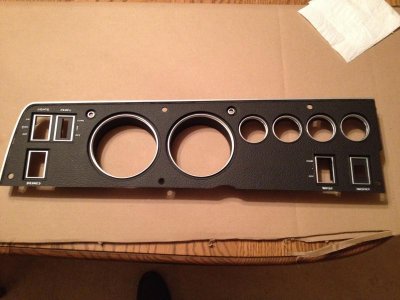
I worked this weekend on my instrument and dash bezels. They were in pretty rough shape, but reproductions are $500 - not in my budget.
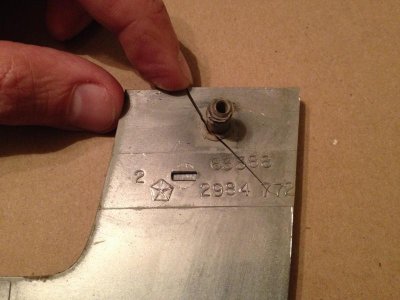
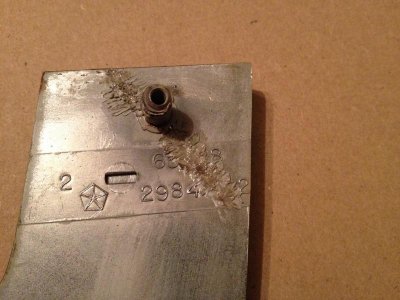
First I had to fix a crack. This was my first try at plastic welding. I cheated a bit and first glued the seam, and then I melted and (hopefully) bonded the back. You can't see the crack anymore in the finished product, so I guess it came out OK.
My instrument bezel was OK from the standpoint of breaks, but definitely needed fresh paint.
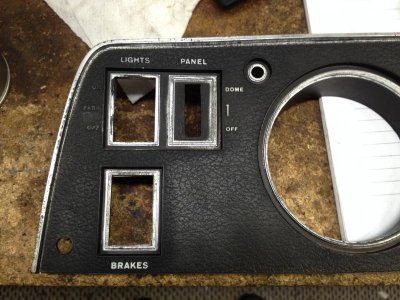
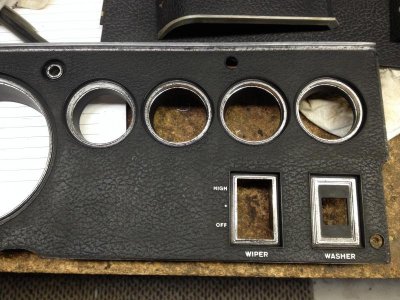
First, I painted my bezels flat black. After that paint dried, I then worked on painting the 'chrome'. What worked OK was a Testor's brand silver paint pen - kind of like a big Sharpie but with silver paint. It's not chrome, but the best I could think of to do. With all the intricate areas that need (or don't) need silver, I think this would be very hard to mask off and spray paint. I did it all free hand with the silver 'pen'. Finally, I used a fine, #0 paint brush and painted white Testor's paint on the lettering. This was tough as heck, as it is nearly impossible to get the fine detail to get it perfect. My results are passable.
Some things I learned: (1) Do not try to save ANY of the original silvering unless you are trying to save it all. Repainting the silver is easier if you have sanded and painted the area first. (2) The 'pen' works much better than a brush, and gave me good control. I recommend it over a paintbrush. (3) This is &^%#@ hard!!!
First I had to fix a crack. This was my first try at plastic welding. I cheated a bit and first glued the seam, and then I melted and (hopefully) bonded the back. You can't see the crack anymore in the finished product, so I guess it came out OK.


My instrument bezel was OK from the standpoint of breaks, but definitely needed fresh paint.


First, I painted my bezels flat black. After that paint dried, I then worked on painting the 'chrome'. What worked OK was a Testor's brand silver paint pen - kind of like a big Sharpie but with silver paint. It's not chrome, but the best I could think of to do. With all the intricate areas that need (or don't) need silver, I think this would be very hard to mask off and spray paint. I did it all free hand with the silver 'pen'. Finally, I used a fine, #0 paint brush and painted white Testor's paint on the lettering. This was tough as heck, as it is nearly impossible to get the fine detail to get it perfect. My results are passable.
Some things I learned: (1) Do not try to save ANY of the original silvering unless you are trying to save it all. Repainting the silver is easier if you have sanded and painted the area first. (2) The 'pen' works much better than a brush, and gave me good control. I recommend it over a paintbrush. (3) This is &^%#@ hard!!!

Redhorse719
Well-Known Member
Hawk, what did you do to prep the panel for painting? Nice job by the way.
Hawk, what did you do to prep the panel for painting? Nice job by the way.
I lightly sanded the chromed edges so they would take paint. Then I washed them carefully with soap and water, using a toothbrush to clean all the small crevices in the instrument bezel. Finally, I wiped them down with lacquer thinner.
My mother-in-law used to make greeting cards and she used stamps to put down ink images. I almost wonder if a flat stamp with white paint would do a better job of getting the words painted white. That was a PITA and almost impossible to get it looking really good with a brush.
Hawk
maxwedge1962
Member
Hey Hawk,
Things look like they are progressing quite well and taking shape on the bird. Won't bee long and she will be back home.
I know this doesn't help you now, but I have found in the past when trying to put paint on small detail items like the letters, that round toothpicks work quite well in applying the paint. Just food for thought if you need to try something different next time you ever need to do something like this.
Just dip the tip of the toothpick in the paint, make sure it is just a small amount, not a glob, then just touch it to the letter and slowly move it along and let the paint run off onto the letter. It takes a few times for each letter, but the results are worth it as they turn out pretty sharp with no bad edges.
Keep up the good work and I enjoy keeping track of where you are at with the project.
- - - Updated - - -
Hey Hawk,
Things look like they are progressing quite well and taking shape on the bird. Won't be long and she will be back home.
I know this doesn't help you now, but I have found in the past when trying to put paint on small detail items like the letters, that round toothpicks work quite well in applying the paint. Just food for thought if you need to try something different next time you ever need to do something like this.
Just dip the tip of the toothpick in the paint, make sure it is just a small amount, not a glob, then just touch it to the letter and slowly move it along and let the paint run off onto the letter. It takes a few times for each letter, but the results are worth it as they turn out pretty sharp with no bad edges.
Keep up the good work and I enjoy keeping track of where you are at with the project.
Bruce
MoparMitch
Well-Known Member
- Local time
- 5:21 PM
- Joined
- Apr 12, 2011
- Messages
- 3,810
- Reaction score
- 2,838
- Location
- Friendship, Maryland
Hey Hawk. That dash bezel looks great. I remember doing the 68 RR. Had no silver to deal with, but I also hand painted the raised white letters. It was a b!tch.
Hey Hawk,
Things look like they are progressing quite well and taking shape on the bird. Won't be long and she will be back home.
I know this doesn't help you now, but I have found in the past when trying to put paint on small detail items like the letters, that round toothpicks work quite well in applying the paint. Just food for thought if you need to try something different next time you ever need to do something like this.
Just dip the tip of the toothpick in the paint, make sure it is just a small amount, not a glob, then just touch it to the letter and slowly move it along and let the paint run off onto the letter. It takes a few times for each letter, but the results are worth it as they turn out pretty sharp with no bad edges.
Keep up the good work and I enjoy keeping track of where you are at with the project.
Bruce
Thanks for the tip Bruce. Yeah, I think I outsmarted myself. I have used toothpicks before, but I figured I would one-up that and I went to an art supply store a bought a #0 brush, which is tiny and pointed. I figured that would improve my ability to paint the letters. I think it actually hindered my ability to do a good job, since the brush holds more paint than the toothpick would. The key is to use very limited quantities of paint, and I actually think a good old fashioned toothpick is best! Go figure...
So while I will give myself an 'A' for effort, the results are a 'B'. :hmh:
- - - Updated - - -
Hey Hawk. That dash bezel looks great. I remember doing the 68 RR. Had no silver to deal with, but I also hand painted the raised white letters. It was a b!tch.
I'm STILL trying to uncross my eyes!!!
Similar threads
- Replies
- 41
- Views
- 5K
- Replies
- 100
- Views
- 3K
- Replies
- 29
- Views
- 943
- Replies
- 5
- Views
- 356


