• When you click on links to various merchants on this site and make a purchase, this can result in this site earning a commission. Affiliate programs and affiliations include, but are not limited to, the eBay Partner Network.

Hawk-Rod: The Restoration

Man - This is exactly where my Bee stands. The dash, steering, wiring, clutch linkage and front brake plumbing. Looks awesome.
 
your Gaining!
a saying at the body and upholstery shop next door...
Yesterday I didn't know how to spell upolsterr'er and today I are one :)
I'm sure you gave your job more TLC than having anyone else doing it.
I was doing the same last week replacing the burlap and doing some repair on my 4 door.
the blister I got from the hog ring pliers is just about healed up.
I cheated when I put the new burlap down on the springs.
first the new burlap then laid the old burlap with the wire on top of the new and hog ringed both to the springs.
I've been using an old Kenmore sewing machine I bought from Good Will for a few dollars, for most of the sewing has been working fine.
 
All looks awesome Hawk. If I bring my GTS seat stuff to Carlisle, will you do mine ?? JK

LOL. Bring that 440 single 4 barrel air grabber base plate and we'll talk!!! (smile)

Seriously, if I can help, let me know. This is now my third set of upholstered seats in my life, so I am F A R from being any kind of expert - but I muddle along. I will likely have a fair amount of spare cotton padding, so if you need it let me know - it might save a couple of dollars...

- - - Updated - - -

Man - This is exactly where my Bee stands. The dash, steering, wiring, clutch linkage and front brake plumbing. Looks awesome.

Cool. Perhaps we can both bring our cars to Carlisle this year? That is my goal and should be part of my car's "shakedown" test. I'll drool over yours and you can drool over mine!

- - - Updated - - -

your Gaining!
a saying at the body and upholstery shop next door...
Yesterday I didn't know how to spell upolsterr'er and today I are one :)
I'm sure you gave your job more TLC than having anyone else doing it.
I was doing the same last week replacing the burlap and doing some repair on my 4 door.
the blister I got from the hog ring pliers is just about healed up.
I cheated when I put the new burlap down on the springs.
first the new burlap then laid the old burlap with the wire on top of the new and hog ringed both to the springs.
I've been using an old Kenmore sewing machine I bought from Good Will for a few dollars, for most of the sewing has been working fine.

Yes, I am a gainin'!!! I have been able to have some significant bolt on assemblies that have allowed some great visual additions. Now I need to go back to some detail items like finishing up under dash and under hood wiring, Dynamat and other stuff like that. It won't be exciting from a pictorial perspective, but it needs to get done.

By the way, if you check out all the videos that Legendary has made, they NEVER replace those wires in the burlap. They just attach the burlap and call it a day. My feeling is that Chrysler put it there for good reason, so as much of a pain in the a$$ it is to replace, I figured I would do it.
 
She's looking great Hsormen! Great job on the seat, looks great and the car is coming right along.
 
One final update before the Superbowl starts.
First, I always push safety stuff, because things can go wrong in a hurry. Do I listen to myself? NO :iamwithstupid:
I was using steel wool on my headlight bezels when I realized that they were stainless. Why not polish them? Of course, I started without my gloves on and the bezel got caught and whipped around on to my hand. OUCH! Nothing really serious, but it hurts.

Folks, wear your protective gear- it only takes a second to get hurt...
View attachment 236699

OK, here are the results of the bezels - My car now has eyes!
View attachment 236700
Once the grill is sitting in its proper place, you'll need a chair for the night to sit and dream of the spring thats coming! I am now except ive plowed so much snow im running out of room and im WONDERING if spring will get here!!! lol, Great work Hawk!!!
 
Wow Hawk! I take my eye off your thread for a week and you've assembled half a car! Amazing work, I'll be referencing this when I finally feel like tearing mine down to the body and building it back up right... nice work.
 
Great job on the seats and bumper alignment Hawk and thanks for all the eye candy again this weekend ;)
 
Thanks for the kind words, guys. I'm trying to do the best job I can, although I am constantly learning, making mistakes, spending money, spending money, spending money... LOL, this damn thing is expensive! Spring is coming quickly (although it doesn't feel like it), so I need to keep pushing to get it done.

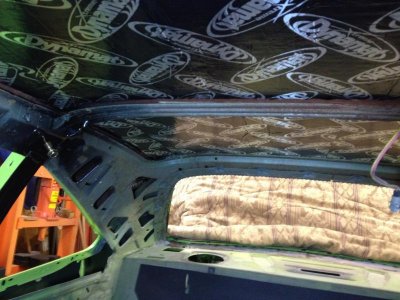
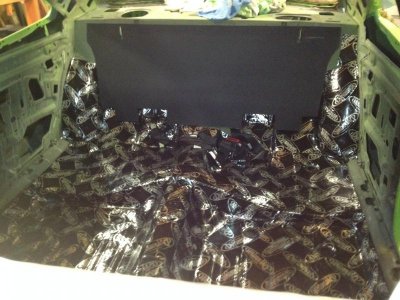
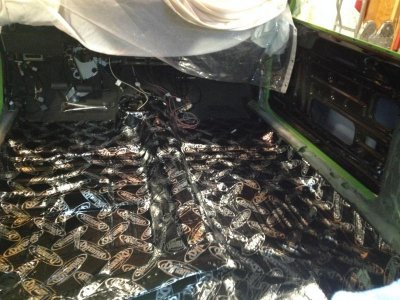
I spent the last couple of days working on the interior. I put Dynamat on the ceiling and floors. Although not hard, it is a time consuming pain in the arse. You try to stick a flat sheet of extremely sticky material on a floor that has lots of bumps, grooves, and shapes. It is not always easy to get it stuck solidly to the floor like it is supposed to.

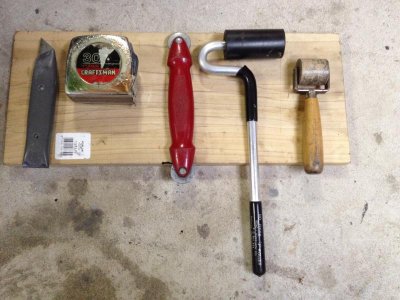
Anyway, here are some of the tools I used. The roller on the right was super useful. Not only did I use the roller part, but I also used the rounded handle to push down the Dynamat into the beads in the floor. I used this tool almost exclusively, although the larger roller was handy in some cases. The red tool with two wheels is like a blunt pizza cutter. It was handy both to mark the Dynamat, but also to get into the really tight spots and push the Dynamat down.
IMG_4151.jpg

Of course, the ceiling had to be scraped clean, and wiped with lacquer thinner (floors too). This is a shot after I had the Dynamat up.
IMG_4126.jpg

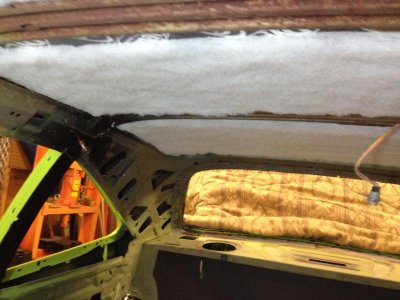
Here is after I glued the insulation on top. This is not factory correct stuff, but an aftermarket product. It worked fine, and fit OK, although it was cut just a little bit narrow. I also need to paint some rust converter on the cross member, as it has some surface rust...
IMG_4131.jpg

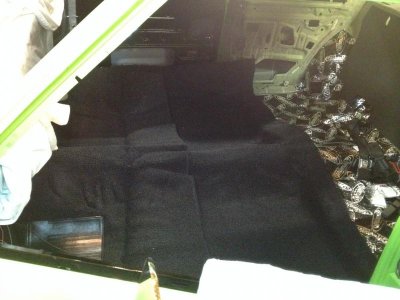
Then I finished the floor. In the first shot you can see some seat belts installed. I haven't finished these yet, so these will be the subject of another post - these are rear seat shoulder belts, and I am still working on the final design for the retractor...
IMG_4144.jpgIMG_4145.jpg

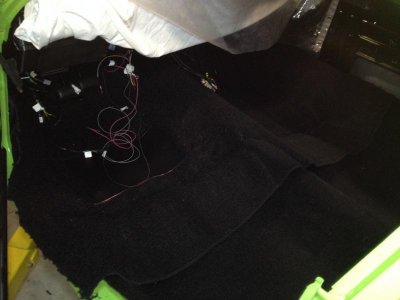
Finally, I tossed the carpet into the car to let it "rest" and begin to take the proper shape. The back carpet should be pretty easy to install - the front looks like a pain, especially with the 4 speed hump...
IMG_4154.jpgIMG_4155.jpg
 
Looking good Hawk. I know what you mean about time consuming on the dynamat install, and I agree about the little roller, it's magic. Wish I had one of the those "pizza cutters" when I did mine, that would have been handy.
 
Nice work on the Dynamat. Interesting what you said about wiping lacquer thinner on the roof. I sanded down the ceiling 'cause it was all surface rust and then covered with POR-15. I plan on installing the Dynamat too so I'll have to check on the surface prep before the install.
 
Nice work on the Dynamat. Interesting what you said about wiping lacquer thinner on the roof. I sanded down the ceiling 'cause it was all surface rust and then covered with POR-15. I plan on installing the Dynamat too so I'll have to check on the surface prep before the install.

If I would have done this car perfectly, I would have painted the roof with POR-15 or similar. The roof of my car (or the ceiling, I guess) was not in bad shape. It maybe had a couple of spots of very light surface rust, so light you can almost wipe it away. So this was an area where I took a "shortcut" to save some time. I merely scraped away the old glue (which also protected the surface) and then followed that up with a good wipe down with lacquer thinner. Especially on the roof, you want stuff to stick to it so it does not come unglued later on! You might not need the wipe down, since your roof will have fresh, clean painted surface...

Hawk
 
At this rate you should have a lot of miles under your and the birds belts before you head west on Route 66 !

As always thanks for the show and tell
 
If I would have done this car perfectly...
Hawk
I think it's safe to say that your car is about as close to perfect as one can get... I'm have to admit that after reading your posts I say to myself " I want to do that!"
 
Nice work! You're going to notice and really enjoy how much drivetrain & road noise that mat will eliminate. A real good addition. Install looks great!
 
I think it's safe to say that your car is about as close to perfect as one can get... I'm have to admit that after reading your posts I say to myself " I want to do that!"

LOL. It is certainly not perfect, although I must say overall I am pretty happy with the direction it is going! This car has always been slated to be a driver. Maybe a careful driver, but still a driver! Heck, later this year I plan to drive it on my cross country trip, so it will see its fair share of rain and wear & tear!

...Plus, I don't show you the pictures of stuff I screw up... :tongue:

Seriously though, thanks for the kind words. If folks get ideas for their cars from my thread - that's awesome. I've gotten so much help from the forum so I am happy if, in some small way, I can help pay it back!

Hawk

- - - Updated - - -

Nice work! You're going to notice and really enjoy how much drivetrain & road noise that mat will eliminate. A real good addition. Install looks great!

Thanks Prop!

So I am trying to remember if you did this for your car - I will need to go back to your thread to check, but from your reply it sounds like you did. I need more Dynamat, as I still need to do the inside of the doors and quarter panels (beside rear seat). I was not planning to Dynamat the trunk area, but just hope the dividing panel and rear seat would absorb the noise. I was thinking maybe to add some more noise reducing material to the panel or seat back if needed.

Any disagreements with this plan?

Thanks,

Hawk
 
I was not planning to Dynamat the trunk area, but just hope the dividing panel and rear seat would absorb the noise. I was thinking maybe to add some more noise reducing material to the panel or seat back if needed.

Any disagreements with this plan?

Thanks,

Hawk

I thought the same thing Hawk. I started to continue with the sound deadener into the trunk area, behind the rear seat brace, but then stopped and took it off again. I ended up putting the felt underlay onto the back of the divider board. Keeps the trunk area looking better too I think.
 

The red tool in the picture is a tool that you can pick up at the local home improvement store, it's a tool for installing the spline into the groove that holds the screening in place for your screens in your house.

Just go to the screen repair area and you should be able to easily find it. Looks like a great tool to have on hand for dynamat installation ! !
 
I thought the same thing Hawk. I started to continue with the sound deadener into the trunk area, behind the rear seat brace, but then stopped and took it off again. I ended up putting the felt underlay onto the back of the divider board. Keeps the trunk area looking better too I think.

Great. I like the idea of keeping the trunk clean and stock looking, so I will follow your lead here. Thanks

- - - Updated - - -

The red tool in the picture is a tool that you can pick up at the local home improvement store, it's a tool for installing the spline into the groove that holds the screening in place for your screens in your house.

Just go to the screen repair area and you should be able to easily find it. Looks like a great tool to have on hand for dynamat installation ! !

I had actually forgotten what the tool is, but you post reminded me, and you are absolutely right!

I used it to tuck in a few flaps and areas where I had limited space, but it was most useful to mark the Dynamat where I wanted to cut it. So for example, If I was measuring a new piece to go down next to a piece I had already installed, I laid the new piece overlapping the installed piece (with the backing still on the new piece). You can feel the ridge where the installed piece sits, so I used the tool to mark the line along that ridge. This made it easy to cut the new piece so it fit nicely. I am sure there are other ways, but this worked in a few key areas for me...
 
Auto Transport Service
Back
Top