You are using an out of date browser. It may not display this or other websites correctly.
You should upgrade or use an alternative browser.
You should upgrade or use an alternative browser.
Hawk-Rod: The Restoration
- Thread starter HawkRod
- Start date
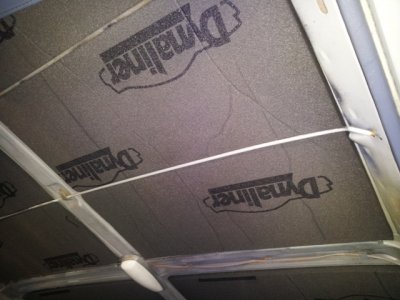
I appreciate the thoughts on the Dynamat/Dynaliner. I put the Dynaliner in my firewall area to help keep out engine bay heat, and I half considered to add it to the roof. However, I already had the "regular" insulation, although I am less than impressed with it. I do think that the Dynaliner would do a much better job with the heat if I installed that over the Dynamat. As I am way over budget, I was going to leave well enough alone, although your experience is making me rethink that plan.
As far as Dynamat inside the doors: I think I will have a little extra, so I will add some to the inside as well if it helps. Thanks for the ideas!!![/QUOTE]
I love this site and I love this thread! Hawk, between your posts and other member's ideas I'm getting an encyclopedia of information to use on my build. I had always thought that when the time came to add the Dynamat that it would be installed inside the door against the exterior panel. Then I saw the picture of the stuff glued to the inside door panel and I had a DOH! moment. But as you and Conv67bdere state, do both. I'm adding add'l insulation to the budget.
- Local time
- 9:44 PM
- Joined
- Jul 17, 2008
- Messages
- 24,343
- Reaction score
- 72,973
- Location
- South Jersey USA
X2 on the dynomat on the back side of the door skins....... many doors and skins on late model cars come with some form of a sound deadener ........ doors will sound hollow without it....... even a 6 inch strip in the middle makes a huge difference
lookin good, Hawk :headbang:
lookin good, Hawk :headbang:
I love this site and I love this thread! Hawk, between your posts and other member's ideas I'm getting an encyclopedia of information to use on my build. I had always thought that when the time came to add the Dynamat that it would be installed inside the door against the exterior panel. Then I saw the picture of the stuff glued to the inside door panel and I had a DOH! moment. But as you and Conv67bdere state, do both. I'm adding add'l insulation to the budget.
LOL. Sorry if I am blowing your budget, but then again, all you fine folks here on FBBO have done that with mine!
Truly, FBBO is great to get ideas from other members. Sometimes it is stuff you really like, occasionally it confirms what you don't like. In the end, it is all good because it helps us to build our cars the way we want.
I am now hoping to get to my rear seatbelt project. I think I have it mostly worked out but need to get out to the garage to finish it. Of course, the weather does not look like it will cooperate. Looks like record cold on Thursday. Crap! :angryfire:
LOL. Sorry if I am blowing your budget, but then again, all you fine folks here on FBBO have done that with mine!
Budget . . . uh, what's a BUDGET ? ? ( sigh ) . . . think I'll not even bother to add up the receipts . . . what's the sense ? ? ?
It's all for a great cause !
Malicious
Well-Known Member
Just a quickly on sound deadening, Dynamat is a resonance dampener, meaning it will stop noise generated from the material it's stuck to. SO door skin when it shuts, floor pan vibrating while driving down the road etc. You only need about a 50% coverage to get the benefits from it, that 50% has to be 50% of the total area. So 50% can look a little more then you would expect 50% to look. But it does mean you don't have to line the whole car, inside and out plus the dog for it to work! So that saves good money when dynamat cost as much as it does.
Now if you want to stop noise from the outside coming in, like other cars, sound of the tyres, engine and exhaust noise to name a few, you need a sound barrier. The best material available is Mass Loaded Vinyl (MLV), thats the material name, not a brand name. You can buy it in rolls to line your house car etc. or you can get it in some premium foam underlays. Its black, usually with a fiber through it and HEAVY. You can tell if your underlay has it easily, just look at the edge, if it has a black rubber like strip in the centre, it likely has MLV in it.
I used a combo of premo underlay with MLV and standard rolls of MLV. The standard I stuck to the inside doors, quarters, boot devider etc, the underlay went on the floor. Actually I also used some truck heat shield underlay. Thicker then the premo underlay, and had a reflective layer on it as well to reflect the heat from the engine and headers. That went on the firewall and front seat foot wells.
Hope that helps!
- - - Updated - - -
I should say I 50% dynamatted the roof and used the MLV underlay on the roof instead of the factory stuff. I've got the car together except for the engine/trans so the noise can still come in through the trans whole, but its like a cocoon in there. can hardly hear the radio thats cranked when I shut the door! lol
Malicios - thanks for the details on sound deadening - very helpful. I hope the inside of my car is as quiet! I need it to be something that I'm comfortable to spend hours in driving. In September, when I drive across country, I will spend many hours, day after day, in the car. It needs to be comfortable!
Conv67bdere: thanks for the picture. Yes, this is the same stuff I used on my firewall (LOL, I guess I installed it upside down - will it then conduct heat instead?!?!):
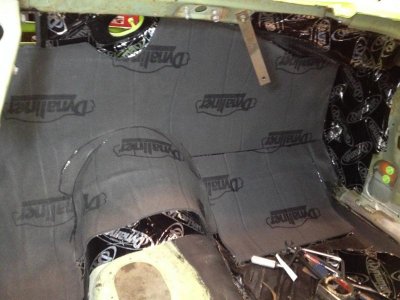
I think at this point I will leave the white mat insulation on the roof. It probably will not do near the job that Dynaliner would have, but (a) I don't want to take the time to unglue that from the roof and (b) money is really becoming an issue to finish this thing. Hopefully the combo of the Dynaliner and white mat will do a good enough job. As the car is a bright green, it hopefully will reflect a lot of heat. Plus, hopefully the A/C takes care of any heat it doesn't reflect!!!
Conv67bdere: thanks for the picture. Yes, this is the same stuff I used on my firewall (LOL, I guess I installed it upside down - will it then conduct heat instead?!?!):

I think at this point I will leave the white mat insulation on the roof. It probably will not do near the job that Dynaliner would have, but (a) I don't want to take the time to unglue that from the roof and (b) money is really becoming an issue to finish this thing. Hopefully the combo of the Dynaliner and white mat will do a good enough job. As the car is a bright green, it hopefully will reflect a lot of heat. Plus, hopefully the A/C takes care of any heat it doesn't reflect!!!
Rear Seat Belts
OK, froze my butt off today, but I did make some progress.
So I want three point belts for both the from AND rear seats. I got the rear seat belts mounted today, and I am happy with the way they turned out...
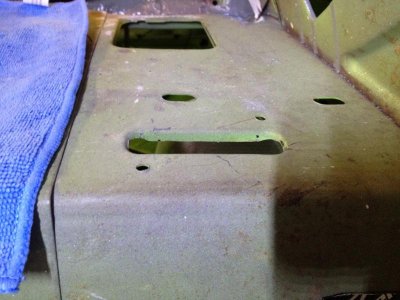
First, my package tray has these holes cut out at the perfect location. I am convinced that they were put in there to plan for the potential of a shoulder belt (that never happened). Whether they were or not, they are in the perfect position. Not only that, they have the metal folded down to make a smooth surface for the belt too. Here are a couple of shots of this area. First, looking from the rear window:
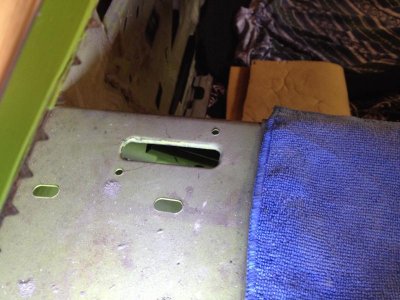
Here is a shot from inside the car:
Also, there is a hole in the "V" cross brace - could this have been planned to attach a belt? Who knows? The hole didn't line up well for me, but I did drill through the brace. The lower right hole is my new hole I drilled.

Here is a picture of the area from inside the car so you can get a better feel for the location...

Here is the belt once it was mounted. Sorry about the rotation - it was right before I uploaded it angryfire
 . I used the stock lower mounting bolts. The belt will come through the package tray, and you can see the guide plate that will sit on top of the package tray to provide a finished look. Obviously, I can't mount this until the package tray is fully installed.
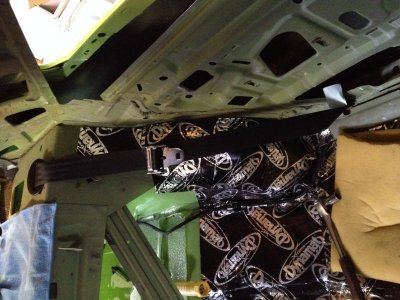
Here is a shot of the retractor from inside the trunk. The belt pulls smoothly and I think this will work well. Of course, if you do this to your car, your hardware needs to be at least Grade 5 strength. I used Grade 8 with big Grade 8 washers...


OK, froze my butt off today, but I did make some progress.
So I want three point belts for both the from AND rear seats. I got the rear seat belts mounted today, and I am happy with the way they turned out...
First, my package tray has these holes cut out at the perfect location. I am convinced that they were put in there to plan for the potential of a shoulder belt (that never happened). Whether they were or not, they are in the perfect position. Not only that, they have the metal folded down to make a smooth surface for the belt too. Here are a couple of shots of this area. First, looking from the rear window:

Here is a shot from inside the car:

Also, there is a hole in the "V" cross brace - could this have been planned to attach a belt? Who knows? The hole didn't line up well for me, but I did drill through the brace. The lower right hole is my new hole I drilled.

Here is a picture of the area from inside the car so you can get a better feel for the location...

Here is the belt once it was mounted. Sorry about the rotation - it was right before I uploaded it

Here is a shot of the retractor from inside the trunk. The belt pulls smoothly and I think this will work well. Of course, if you do this to your car, your hardware needs to be at least Grade 5 strength. I used Grade 8 with big Grade 8 washers...


NZ 70 RR
Well-Known Member
Great work Hawk, looks very professional . Always wondered about those holes in the parcel tray.
Dynamat looking sharp also.
Dynamat looking sharp also.
440+6
Well-Known Member
The code for rear shoulder belts is: C14 69-71 Rear Shoulder Belts
Not sure what cars you could get them in but all the package trays that I have seen have the provisions for them, this would be a cool option.
Good work Hawk
Not sure what cars you could get them in but all the package trays that I have seen have the provisions for them, this would be a cool option.
Good work Hawk
showard
Well-Known Member
Impressive! I just spent some time going through your build. You are doing a great job. I wrote down some notes and will use your examples when I get to those areas on my build. You have made good notes for me to learn from. Thank you.
The code for rear shoulder belts is: C14 69-71 Rear Shoulder Belts
Not sure what cars you could get them in but all the package trays that I have seen have the provisions for them, this would be a cool option.
Good work Hawk
Very cool! Thanks for sharing. This confirms my belief that the cutouts are for shoulder belts, and makes me even more comfortable in using them.
- - - Updated - - -
Impressive! I just spent some time going through your build. You are doing a great job. I wrote down some notes and will use your examples when I get to those areas on my build. You have made good notes for me to learn from. Thank you.
You are welcome. I have learned so much from this forum and from folks at FBBO, so I am happy if I can give back in some small way!
Hawk
Do you know which way those belts were originally mounted? Most are sensitive to mounting angles and mounting it other than intended will cause the lock to not work properly. I used 2013 Dodge Dart belts in my rear seats and mounted them just the way they were which was with the bolt hole parallel with the package tray, my fronts were from Summit and were very specific on mounting them very level up and down. Good luck
Do you know which way those belts were originally mounted? Most are sensitive to mounting angles and mounting it other than intended will cause the lock to not work properly. I used 2013 Dodge Dart belts in my rear seats and mounted them just the way they were which was with the bolt hole parallel with the package tray, my fronts were from Summit and were very specific on mounting them very level up and down. Good luck
I do not know how the belts were originally mounted. I would suspect that any shoulder belt would have been fixed at the back and manually adjusted to length, just like the fronts were.
I did spend a lot of time playing with the mounting to be sure they worked nicely. The retractor is actually mounted slightly outboard of the center of the hole due to the fact that the belt is pulled out and towards the center when it is put on. I also used 4 grade 8 washers to align the retractor front to back and give the belt a straight shot out of the hole. In my extensive consumer testing (smile), they seemed to work OK. Of course, that was without the final package tray and bezel that the seat belt will travel through, so I will keep my fingers crossed...
Fuel Injection and Front Fittings
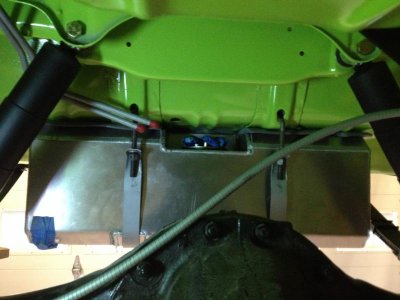
So let's start with good progress. I still had to finish the connections with the fuel lines to my fuel injection tank. As stated in earlier posts, I used two stock 3/8" fuel lines and mounted them in the car. This picture shows how I started the day - the lines were just hanging there and not connected to the tank. Of course, I had marked the supply and return lines since I had hooked them up in the engine compartment.
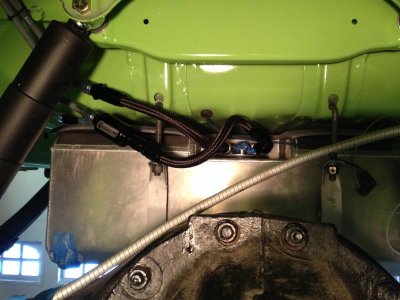
Here is a picture after completion. To do this, I terminated each end of the steel 3/8" lines with AN6 female fittings. On the supply line I hooked in the Russel fuel filter. On the return line, I just hooked the line directly up to the tank. I hooked the fuel filter up, then custom cut and made the return line, and then finished up with the supply line. As each line was made, I connected the hard line to the body. You can see I still have a zip tie on the lines in this picture. Everything seems to fit well, and I don't believe there will be any rubbing or rattling problems. The tank has to drop one more time to hook up a vent line, the sender and fuel pump power. But good progress here!
(SIGH) So then let's move to the front suspension.
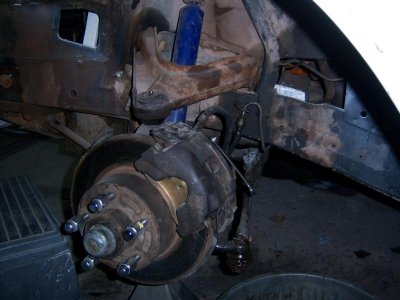
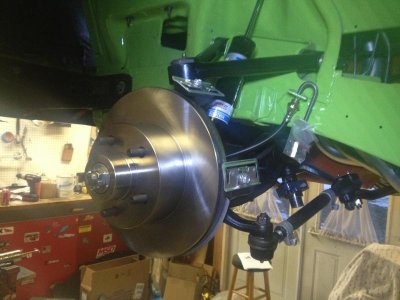
I received my replacement spindles from Right Stuff Detailing. I painted them up and set to work installing them. They have Left and Right markings on them, and the calipers mount on the rear on the 73 Road Runner. All the pictures show this too, but then again, I really didn't read the instructions because I know what I am doing, right? :iamwithstupid:
Well, I mounted them all up, including connecting the upper ball joint and torqueing them to 100 LB FT. Then I couldn't hook up the brake line, so I then went back to the instructions. Oh, if the line doesn't fit, you have to reverse the assemblies and switch them side to side. This will mount the calipers on the front of the wheel.
CRAP. I now don't know if I can now get these apart without damaging the upper ball joint or at least the rubber boot. Beating on a pickle fork is sure to cause some sort of problems.
I guess I will first try to get some other brake lines and see if I can make them fit well. Grrrrr
So let's start with good progress. I still had to finish the connections with the fuel lines to my fuel injection tank. As stated in earlier posts, I used two stock 3/8" fuel lines and mounted them in the car. This picture shows how I started the day - the lines were just hanging there and not connected to the tank. Of course, I had marked the supply and return lines since I had hooked them up in the engine compartment.

Here is a picture after completion. To do this, I terminated each end of the steel 3/8" lines with AN6 female fittings. On the supply line I hooked in the Russel fuel filter. On the return line, I just hooked the line directly up to the tank. I hooked the fuel filter up, then custom cut and made the return line, and then finished up with the supply line. As each line was made, I connected the hard line to the body. You can see I still have a zip tie on the lines in this picture. Everything seems to fit well, and I don't believe there will be any rubbing or rattling problems. The tank has to drop one more time to hook up a vent line, the sender and fuel pump power. But good progress here!

(SIGH) So then let's move to the front suspension.
I received my replacement spindles from Right Stuff Detailing. I painted them up and set to work installing them. They have Left and Right markings on them, and the calipers mount on the rear on the 73 Road Runner. All the pictures show this too, but then again, I really didn't read the instructions because I know what I am doing, right? :iamwithstupid:
Well, I mounted them all up, including connecting the upper ball joint and torqueing them to 100 LB FT. Then I couldn't hook up the brake line, so I then went back to the instructions. Oh, if the line doesn't fit, you have to reverse the assemblies and switch them side to side. This will mount the calipers on the front of the wheel.
CRAP. I now don't know if I can now get these apart without damaging the upper ball joint or at least the rubber boot. Beating on a pickle fork is sure to cause some sort of problems.
I guess I will first try to get some other brake lines and see if I can make them fit well. Grrrrr

- Local time
- 8:44 PM
- Joined
- Jan 1, 2013
- Messages
- 8,050
- Reaction score
- 3,467
- Location
- Mascoutah, Illinois
Hawk I haven't installed my brake stuff on the 68 R/T yet but plan to mount calipers to the rear so I can keep the stock front 68 sway bar (not an issue on 70's).
Maybe you can just leave them as is and do some work on the brake lines instead of risking damaging the Ball joints. Perhaps use some of the 73 lines
Maybe you can just leave them as is and do some work on the brake lines instead of risking damaging the Ball joints. Perhaps use some of the 73 lines
Rodney
Well-Known Member
Disc brake line
I 2nd keeping the calipers to the rear. without seeing the other end of the brake like difficult to tell why they don't fit?
This is the lines I used on my last disc brake conversion using the same caliper as you and the same brake line location routing under the frame rail. FYI the last set of "New" calipers I bought I had to have them trued up on a brake lathe, they were out of specs big time. The car stopped horribly and pulsated. After I had them turned it was fixed. More quality import parts.. Not.
Carquest SP 5563
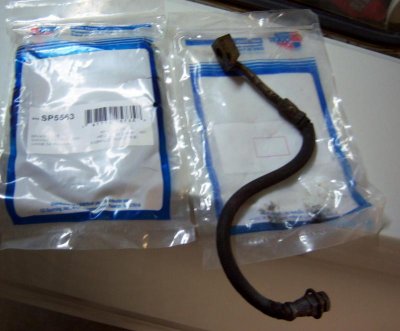

I 2nd keeping the calipers to the rear. without seeing the other end of the brake like difficult to tell why they don't fit?
This is the lines I used on my last disc brake conversion using the same caliper as you and the same brake line location routing under the frame rail. FYI the last set of "New" calipers I bought I had to have them trued up on a brake lathe, they were out of specs big time. The car stopped horribly and pulsated. After I had them turned it was fixed. More quality import parts.. Not.
Thank you for the picture and the response. The line you have in your picture is exactly the line that I have in my kit. With the long metal line on the one end and the connection that connects the line pointing downward, it seemed like it would really kink and be problematic.
So a dumb question, if I may: So the end with the hard line that connects to the caliper. Did you mount that facing rearward or forward? It seems it has to face rearward...
So maybe I need to go mount this up and take a picture and show the issue better? If it worked for you, then am I doing something wrong? Let me go out and check...
Rodney
Well-Known Member
Similar threads
- Replies
- 68
- Views
- 4K
- Replies
- 107
- Views
- 7K
- Replies
- 187
- Views
- 16K

